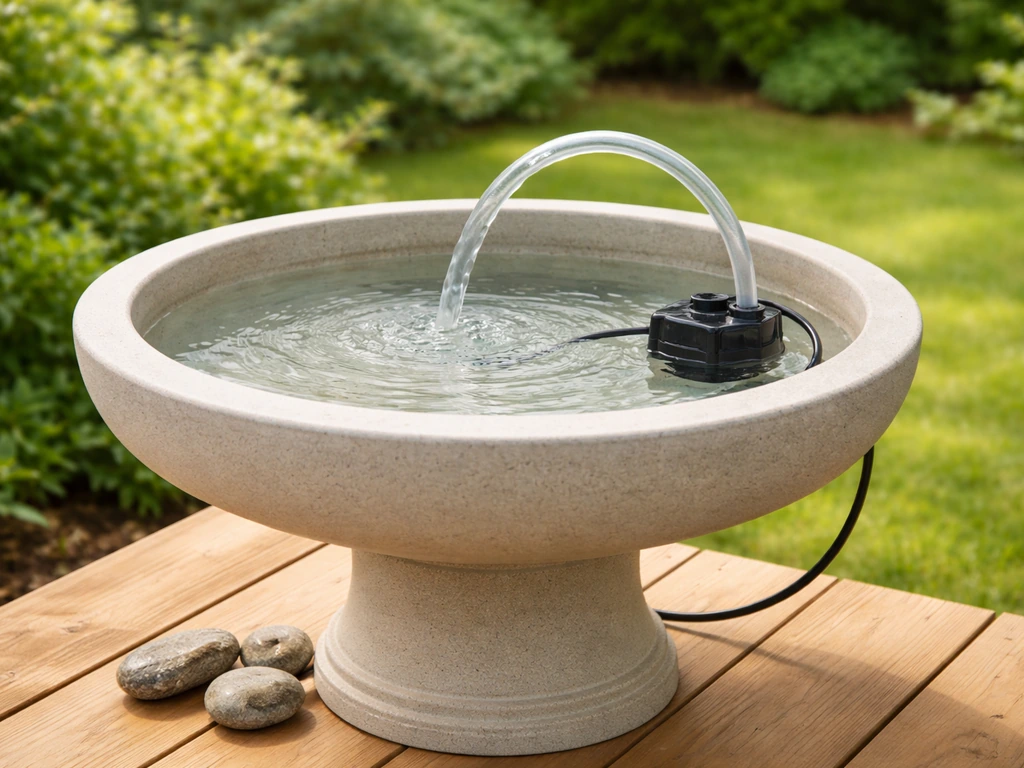
A recirculating bird bath uses a small submersible pump to continuously pull water from the basin, push it up through tubing, and release it back in as a gentle stream, drip, or bubbling flow. That constant movement does three things at once: it attracts birds with sight and sound, it keeps water fresh by discouraging stagnant conditions, and it dramatically reduces the chance of mosquitoes breeding. You can build one from scratch for around $30 to $60 in parts, or convert an existing concrete, ceramic, or metal bath with a pump kit in under an hour. If you want to turn a bird bath into a fountain, focus on achieving a gentle recirculating trickle or bubble and then tune the pump so it does not splash out of the basin.
How to Make a Recirculating Bird Bath: DIY Guide

Marcus Henley
1 Jul 2026
What makes a bird bath 'recirculating' and why birds prefer it
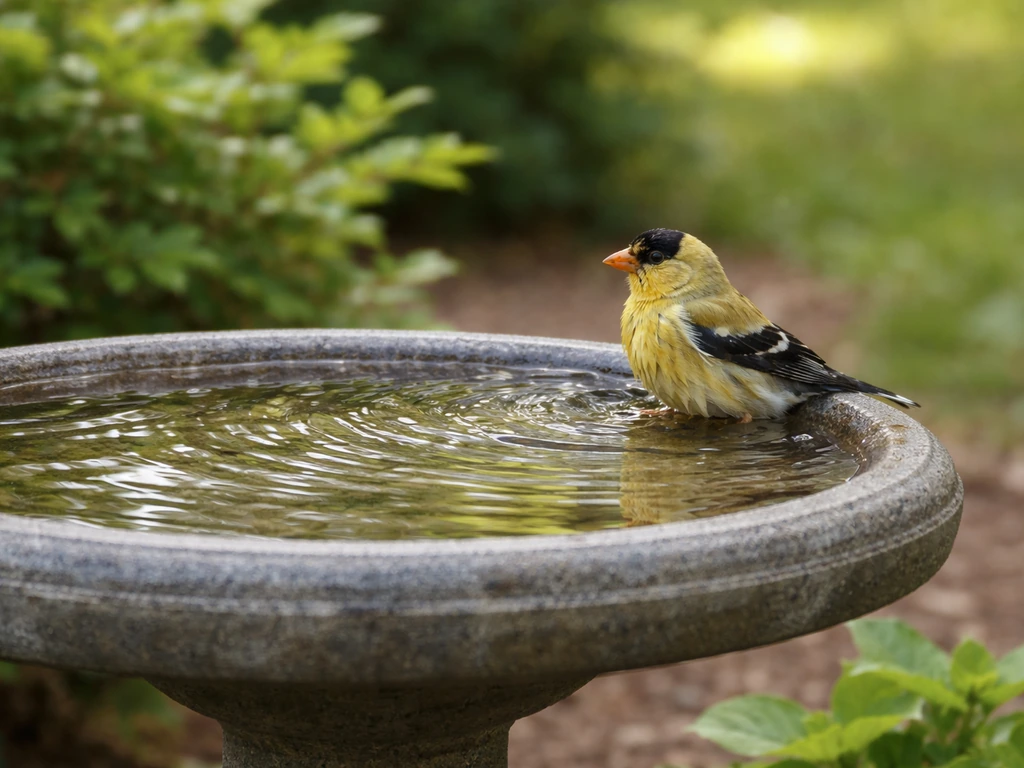
A standard static bird bath just holds water. A recirculating one cycles the same water continuously through a pump and back into the basin, creating constant movement. That distinction matters more than it might seem. Birds detect water primarily by sound and glint of light reflecting off a moving surface. A gentle trickle or bubble reaches birds at a distance that a still pan of water simply cannot. Research from ornithology programs consistently shows that aerators and slow drips increase visitation and attract a wider variety of species, including warblers and vireos that rarely stop at still baths.
The functional benefits go beyond attraction. Moving water resists algae colonization better than standing water, stays oxygenated, and discourages mosquitoes from laying eggs. Mosquitoes need calm surface water to breed, and even a modest trickle interrupts their life cycle. That said, recirculation is not a complete substitute for regular cleaning. Think of it as a head start, not a hands-free solution.
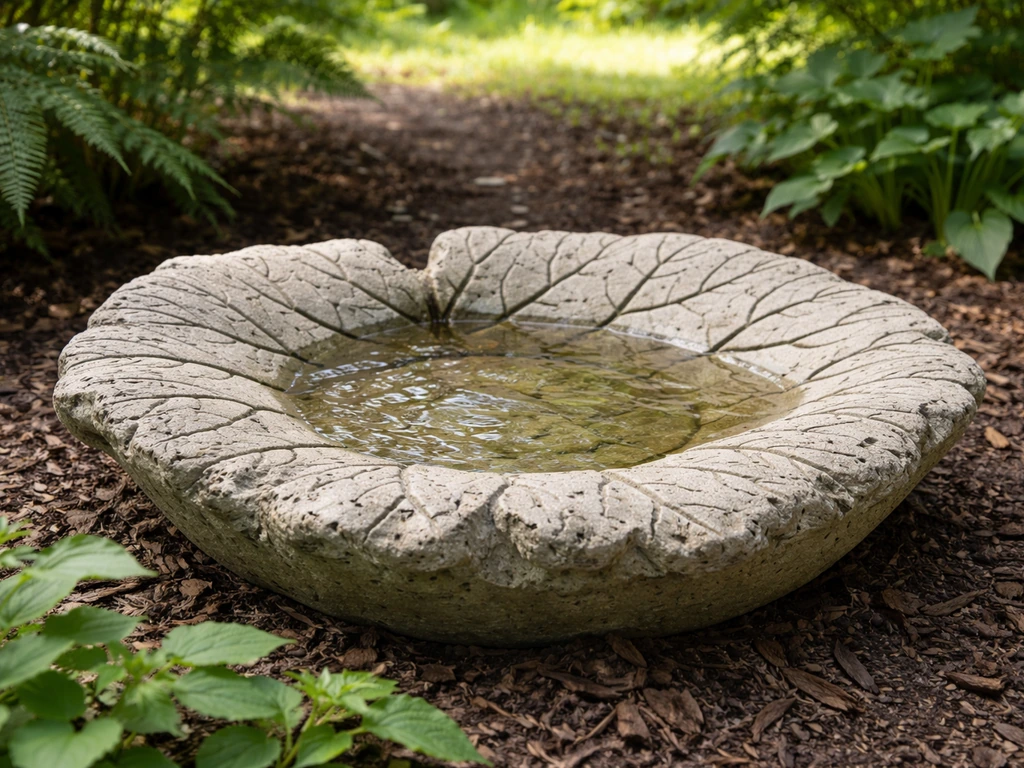
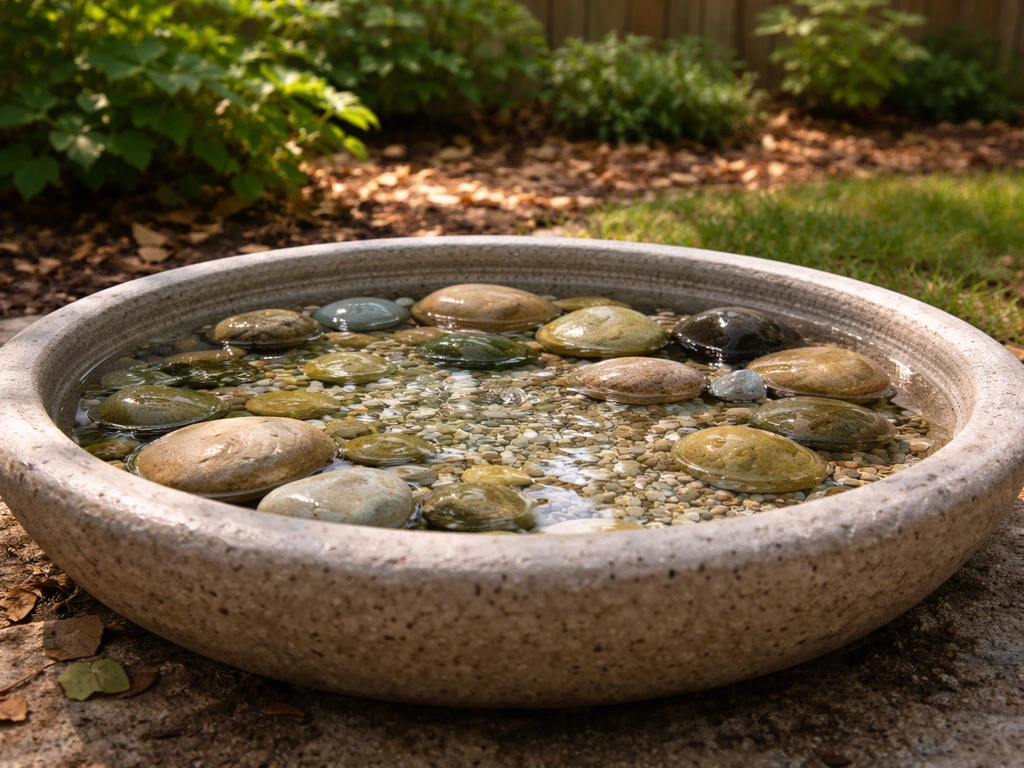
For the bath itself to be truly bird-friendly, depth matters as much as movement. The ideal basin is 1 to 2 inches deep at the center, with gently sloping sides so birds can wade in gradually. The Birds in View (BIV) Water Sources Brochure (2015) likewise recommends a blank" rel="noopener noreferrer">bath depth of about 1.5 to 2 inches at the center for typical bird bath use. A bath that is too deep will be ignored by smaller songbirds even if the water is moving beautifully. If your basin runs 3 to 4 inches deep, add a flat stone or two to create a shallow shelf.
Choosing the right pump, filter, and basin
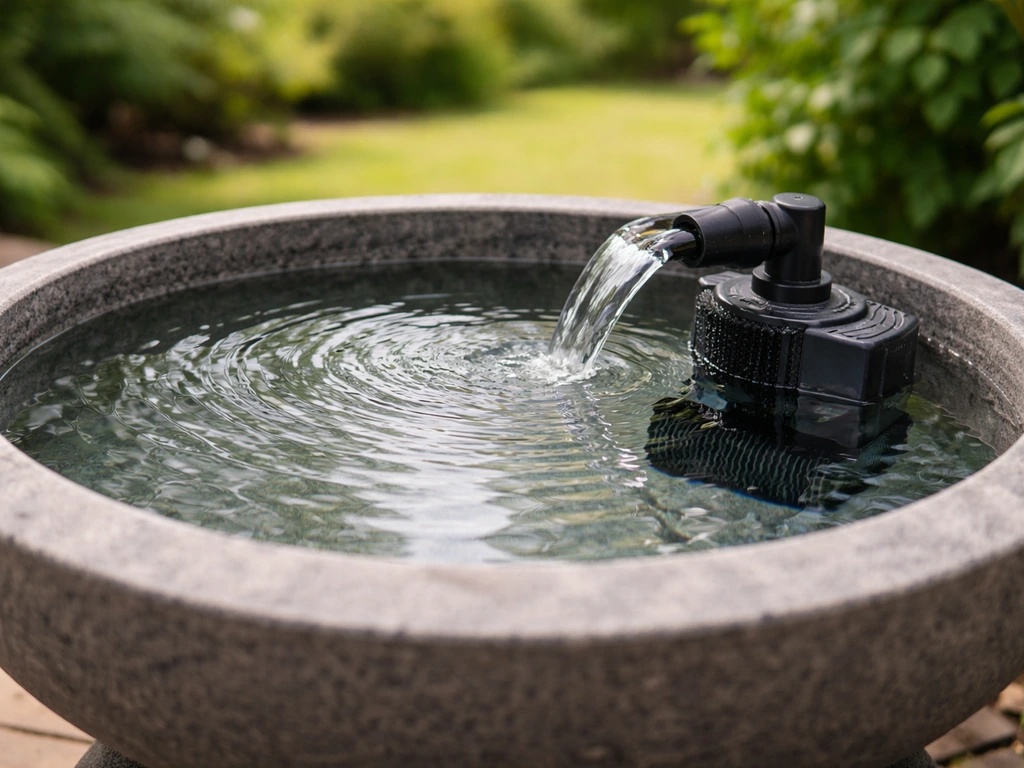
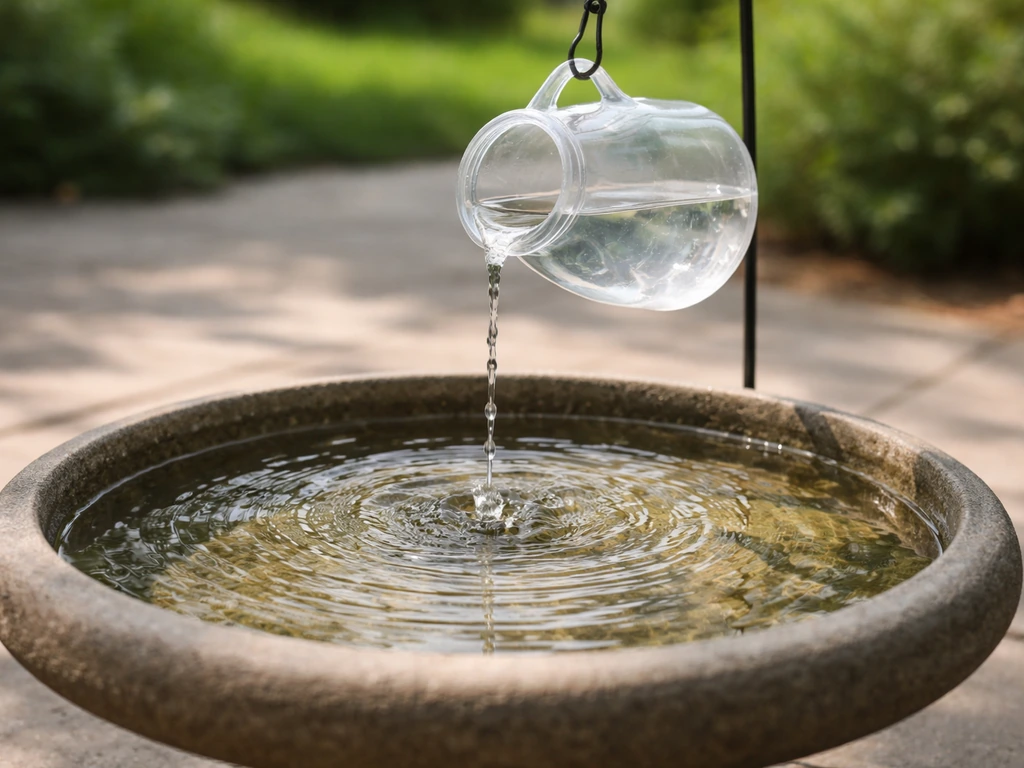
The pump is the heart of the system, and oversizing or undersizing it causes most of the problems people run into. For a standard bird bath basin in the 12 to 18 inch diameter range, a small submersible fountain pump rated at 40 to 80 gallons per hour (GPH) is all you need. Anything more powerful creates a forceful jet that splashes water out of the basin and startles birds. Look for pumps with an adjustable flow dial, which lets you tune the output down to a gentle trickle after installation. To get bubbling, aim for a gentle fountain-style flow and confirm your pump is sized so the trickle creates movement without blasting water out of the basin bubbling bird bath.
Submersible pumps sit directly in the water and are the best choice for bird baths. They run quieter than external pumps, require no priming, and are simpler to wire safely outdoors. External (inline) pumps work fine for larger pond-style setups but add plumbing complexity and more potential leak points for a basic bird bath. Stick with a quality submersible unless you have a specific reason not to.
On filtration: most small bird bath pumps include a foam pre-filter around the intake that catches debris and protects the impeller. That foam insert is your primary filter and the thing you will clean most often. For a bird bath specifically, a simple mechanical foam filter is usually all you need. Chemical or UV filters add cost and bulk that are not warranted at this scale. If you are converting a large basin (24 inches or more), consider a small pond pump with a slightly higher GPH rating and a slightly larger foam filter basket.
| Basin Size | Recommended Pump GPH | Tubing Diameter | Filter Type |
|---|---|---|---|
| Under 14 inches | 40–60 GPH | 1/2 inch | Foam pre-filter (included) |
| 14–18 inches | 60–80 GPH | 1/2 inch | Foam pre-filter (included) |
| 18–24 inches | 80–120 GPH | 1/2 to 3/4 inch | Foam pre-filter or small pond filter |
| Over 24 inches | 120–200 GPH | 3/4 inch | Small pond filter basket |
For the basin itself, concrete and glazed ceramic hold up best outdoors and are easy to drill if you need to run tubing through the bottom or side. Metal basins work too, but check for rust-prone materials if you plan to leave them out year-round. If you are starting fresh rather than converting an existing bath, a pre-drilled concrete or resin basin marketed as a fountain base is the easiest starting point.
DIY build vs. buying a recirculating kit
You have two real paths here, and both work. The DIY route gives you more control over depth, flow, and aesthetics. The kit route gets you running in 30 minutes with fewer decisions. Here is how each one plays out in practice. If you want a more unusual DIY option, you can even repurpose rhubarb leaves to create a decorative bird-bath base.
Option 1: DIY from components
This approach suits anyone who already has a basin they love or wants a custom look. Total parts cost is typically $25 to $55 depending on pump quality.
- Gather your parts: a 40–80 GPH submersible pump with adjustable flow, 3 to 4 feet of 1/2-inch flexible vinyl tubing, a small flat stone or pump riser (to elevate the pump off the basin floor slightly), waterproof silicone sealant rated for outdoor/aquatic use, and a drill with a carbide or diamond bit if you need to run the cord through a basin hole.
- Position the pump on the riser stone at the deepest part of the basin. The pump must stay fully submerged at all times while running. Running it dry even briefly can damage the impeller.
- Run the tubing from the pump's outlet up to the lip of the basin or through a small decorative rock or spitter ornament. The outlet should release water a few inches above the surface to create a pleasant trickle sound without excessive splash.
- Route the power cord over the basin edge (never under it, where it can pinch and crack insulation) and down the pedestal or support structure. Keep the cord clear of standing water wherever possible outside the basin.
- Fill the basin with water before plugging in. Check that the pump is fully submerged and turn it on. Adjust the flow dial until you get a gentle stream or bubble rather than a forceful jet.
- Seal any cord exit points or tubing pass-throughs with aquatic silicone. Let it cure for at least 24 hours before leaving the setup unattended.
Option 2: Buying a recirculating kit or pre-built unit
Ready-to-run recirculating kits typically include a basin (often resin or lightweight concrete), a matched submersible pump, and all tubing pre-cut to length. If you want an easier path, focus on choosing a ready-to-run recirculating kit that matches your bird bath size, so you can build a working bird bath dripper with less trial and error recirculating kits. Prices range from $45 to $150 depending on size and material. Setup is mostly fill-and-plug. The trade-off is that kit pumps are often the cheapest the manufacturer could source, and they may need replacing within a year or two of regular use. When a kit pump dies, it is almost always worth swapping in a quality replacement pump rather than buying a whole new kit. This option overlaps closely with ready-made fountain-style bird baths, which is a natural direction to explore if you want a finished look right away.
Quick comparison
| Factor | DIY Build | Recirculating Kit |
|---|---|---|
| Upfront cost | $25–$55 | $45–$150 |
| Setup time | 1–2 hours | 20–45 minutes |
| Customization | High (any basin, any flow style) | Low to moderate |
| Pump quality | Your choice | Variable (often entry-level) |
| Best for | Existing basins, specific aesthetics | Fast start, no existing basin |
Placement, height, and flow settings that actually attract birds
Even a perfectly built recirculating bath will go unused if it is in the wrong spot. Placement is where a lot of people lose birds without realizing why. Here is what works consistently.
- Height: most songbirds prefer a bath at 18 to 36 inches off the ground. Ground-level baths work for robins and doves but increase predator risk. Pedestal height of about 24 to 30 inches is a reliable default.
- Distance from cover: place the bath within 10 to 15 feet of shrubs or trees so birds have a quick escape route, but not directly under a branch where predators can perch overhead. Three to five feet of clear space around the bath lets birds spot approaching cats.
- Sun and shade balance: some morning sun helps keep water from getting too cold in spring and fall, but afternoon shade in summer prevents rapid evaporation and keeps the water cooler and more inviting. A spot with filtered dappled shade is ideal.
- Proximity to feeders: within 10 to 20 feet of your feeding station works well. Birds already visiting feeders will naturally notice the sound of moving water nearby.
- Visibility of the water movement: orient the tubing outlet or spitter so the moving water catches light from the primary direction birds approach. The visual glint of moving water is a major draw.
- Flow rate setting: start with the gentlest trickle your pump allows. A flow that barely dimples the surface is more attractive to small birds than a vigorous splash. You can experiment upward from there, but err quiet and slow first.
If you are also interested in attracting hummingbirds specifically, they respond especially well to a fine mist or very gentle drip rather than a bubbling stream. A dedicated setup for hummingbirds involves its own design considerations worth exploring separately.
Plumbing, electrical safety, and water management
Outdoor electrical work for a bird bath is straightforward, but it has to be done right every time. Water and electricity in the same setup deserve real respect.
Electrical basics
Every outdoor outlet you plug a bird bath pump into must be GFCI (Ground Fault Circuit Interrupter) protected. This is a code requirement for outdoor dwelling-unit receptacles under NEC 2023, and more importantly, it is the one device that can prevent electrocution if a cord develops a fault near water. If your outdoor outlets are not already GFCI protected, install a GFCI outlet or use a portable GFCI adapter. Do not skip this step.
Use only pumps and extension cords rated for outdoor use. Look for a UL listing and a weatherproof designation on the cord. Avoid running cords across high-traffic areas or where they can be pinched under furniture legs. Where a cord exits the basin or runs along a hard surface, use a strain relief fitting or cable clip to prevent the cord from being tugged or bent sharply at connection points. OSHA identifies cord strain points as a leading cause of electrical hazard in equipment used near water.
Keep the power connection point (the plug itself and any junction) as far from the water as practical. A covered outdoor outlet box or a weatherproof outlet cover adds meaningful protection. If you are running a longer cord to reach the outlet, bury it in conduit rather than leaving it on the surface.
Plumbing and leak prevention
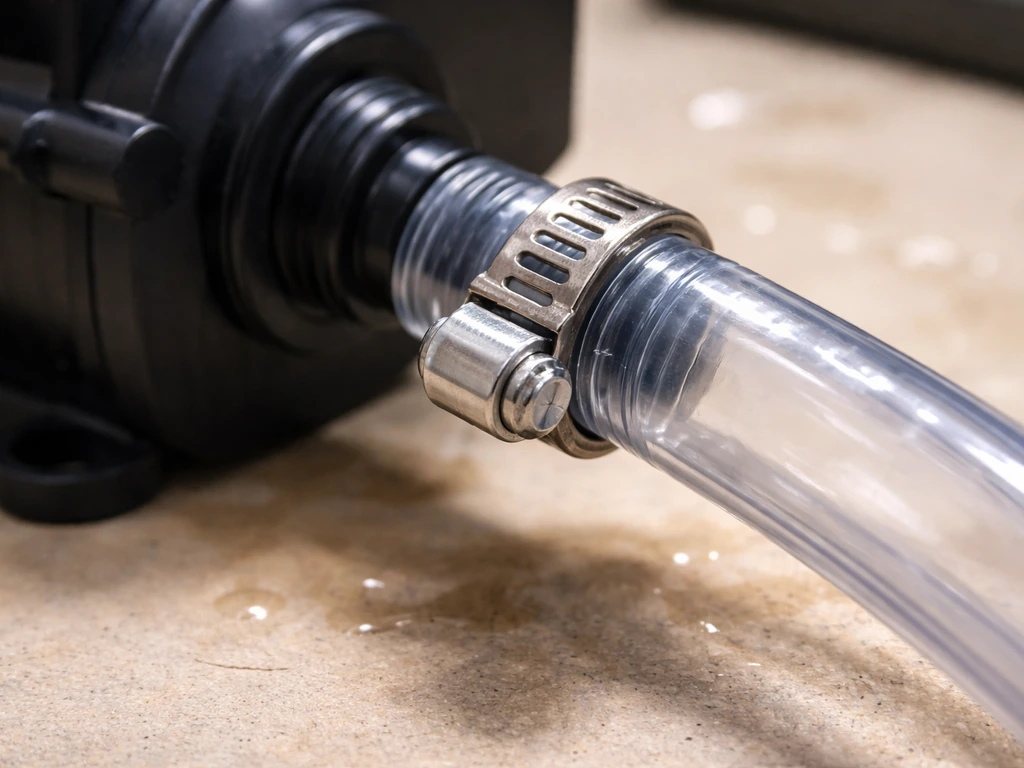
Vinyl tubing connections for small pumps rely on snug friction fits or barbed fittings. Push tubing firmly onto the pump outlet barb until it seats fully. For any permanent connections you want to lock in place, a small hose clamp tightened over the barb adds security without requiring solvent cement. If your project involves PVC pipe fittings (more common on larger setups), use primer followed by solvent cement as the manufacturer specifies. Dry-fit every joint before gluing, and never rush the cure time. A joint that looks set after five minutes can still pull apart under pressure for an hour.
For submersible pump systems, a check valve installed on the outlet line is worth adding if your tubing run is longer than 18 inches or runs vertically. The check valve prevents water from siphoning back through the pump when power cuts out, which reduces wear and prevents the impeller cavity from running dry on restart.
Water level management
Recirculating systems lose water to evaporation and splashing, sometimes surprisingly fast in hot weather. Check the water level every one to two days in summer. A pump running with the water level below the pump intake will burn out quickly. Some people add a float valve from a pond supply store to maintain a consistent level automatically, which is a nice upgrade for a permanent installation.
Cleaning schedule, filter maintenance, and stopping algae before it starts
Moving water slows algae growth but does not eliminate it. You still need a real cleaning routine. Here is the schedule that works in practice.
Water changes
Change the water completely every two to three days minimum, and every day in hot weather above 85°F. Even with recirculation, organic matter like bird droppings, feathers, and pollen accumulates. The pump recirculates that material along with the water. Frequent changes keep bacterial levels low and the water genuinely safe for birds to drink.
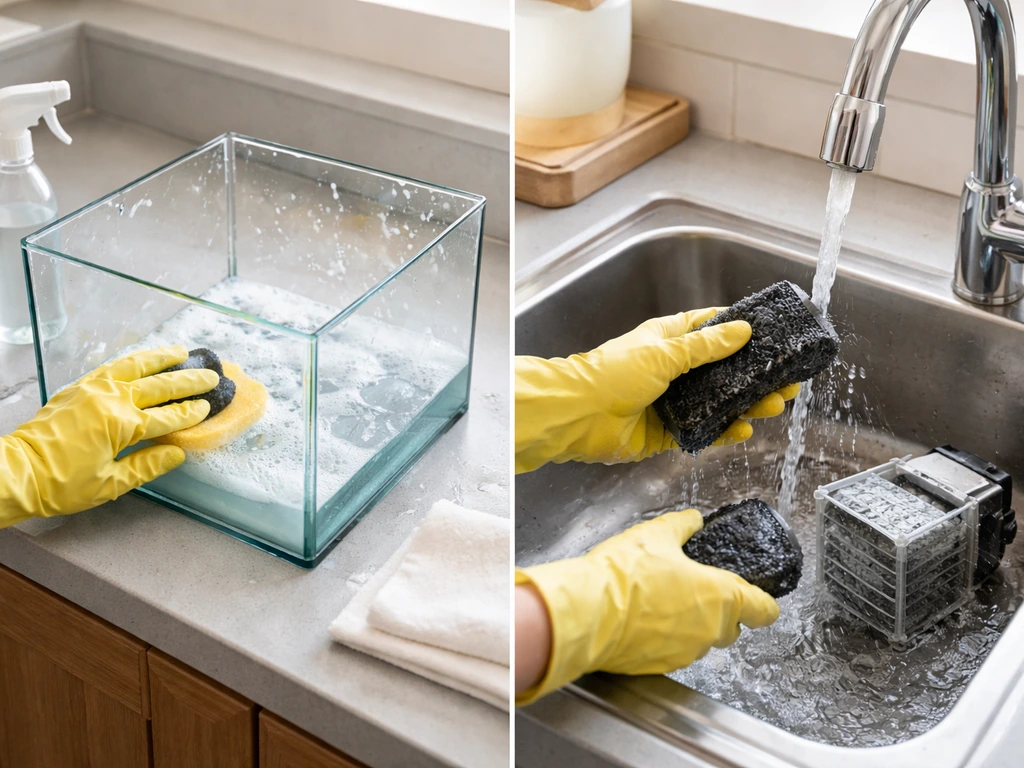
Basin scrubbing
Once a week, empty the basin fully and scrub it with a 9:1 water-to-white-vinegar solution using a stiff brush. Vinegar breaks down mineral deposits and mild algae without introducing chemicals that could harm birds. Rinse thoroughly before refilling. Avoid soap or bleach in the basin itself, as residue can be harmful. For stubborn algae buildup, a dilute hydrogen peroxide rinse (one part 3% peroxide to nine parts water) works well and breaks down safely.
Pump and filter maintenance
Rinse the foam pre-filter under running water every week, or more often if the bath is in a high-debris area under trees. Squeeze it gently to dislodge trapped material. Do not use soap on the foam. Every two to four weeks, disassemble the pump head according to the manufacturer's instructions and check the impeller chamber for debris. A toothbrush works well for clearing the impeller and the intake screen. A partially clogged impeller is the most common reason for sudden low flow, and cleaning it takes about five minutes.
Winterizing and keeping mosquitoes out while staying safe
Winter operation
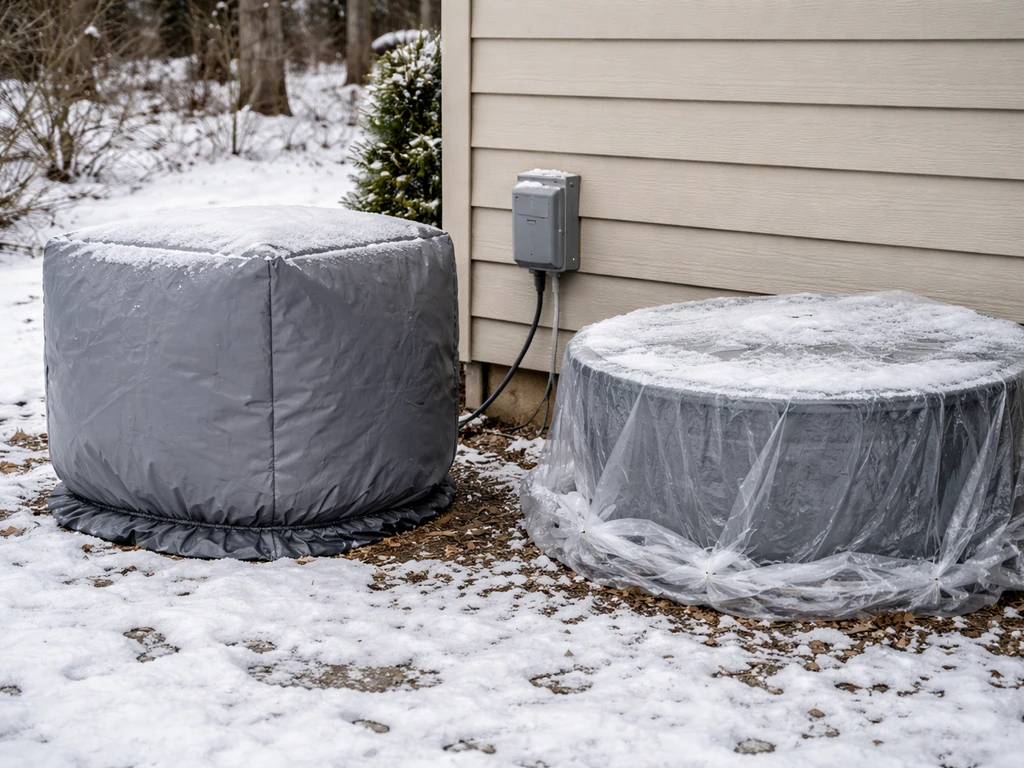
Whether you run a recirculating bath through winter depends on your climate. In zones where temperatures regularly drop below 25°F, the practical answer is to either shut down and store the pump or pair it with a thermostatically controlled birdbath heater. A heater keeps the water from freezing so birds can still access it for drinking (birds need liquid water in winter as much as in summer), while the pump keeps it from becoming stagnant. The combination works well but requires a second power draw, so make sure your outdoor outlet circuit can handle both.
If you choose to run the pump in cold weather, never let ice form while the pump is running. Ice can trap and stress the pump cord and crack the basin. In a freeze event, unplug the pump before water freezes solid. You can maintain access manually by pouring warm water over ice to melt a hole, as Audubon recommends, or switch to a heater-only setup during the deepest cold snaps. When you store the pump for winter, drain it fully and keep it in a dry location above freezing. Water left inside the pump housing can expand and crack it.
For the basin itself, concrete is vulnerable to freeze-thaw cracking if water is left sitting in it through hard freezes. Drain and invert the basin or bring it indoors if temps will stay below freezing for extended periods. Resin and fiberglass basins are more freeze-tolerant.
Mosquito prevention
A properly recirculating bird bath is already a poor habitat for mosquito larvae because moving water disrupts the surface film they need. But if your pump flow slows or stops (power outage, clog) and water sits still for more than 48 to 72 hours in warm weather, mosquitoes can begin laying eggs. The best backup is Bti (Bacillus thuringiensis israelensis), a naturally occurring bacterium sold as 'mosquito dunks' or granules. Bti kills mosquito larvae before they develop and is safe for birds, other wildlife, and humans when used as directed by the CDC. Drop a small piece of a dunk in the basin during any period when the pump is off. Regular water changes (every two to three days) are your first line of defense. Bti is your backup.
Troubleshooting the problems you'll actually run into
Low flow or weak trickle
Unplug the pump before touching it. Check the foam pre-filter first. A clogged foam sleeve is behind 80% of low-flow complaints. Rinse it, reinstall, and test. If flow is still weak, remove the pump head and inspect the impeller for debris, hair, or algae buildup. A toothbrush or thin wire clears most impeller blockages. If the impeller spins freely but flow is still low, the pump may be at end of life, especially if it is more than two to three years old.
Noisy or vibrating pump
A humming or rattling pump is usually sitting directly on a hard basin surface and transmitting vibration. Place a small rubber mat or folded silicone pad under the pump. A rattle that persists after that typically points to debris in the impeller or a worn bearing. Clean the impeller first. If the noise continues, the pump needs replacement.
Leaks at fittings or tubing joints
Friction-fit tubing leaks almost always come from an under-seated barb connection. Unplug, push the tubing firmly onto the barb (you should feel resistance), and add a hose clamp. For drilled pass-throughs in a basin, let the aquatic silicone cure a full 24 hours before refilling. Solvent-welded PVC joints that leak were either not primed, not given enough cement, or pulled before the joint cured. Cut out the bad joint and redo it properly.
Birds avoiding the bath
Give a new bath a full week before worrying. Birds are cautious about new features. If avoidance persists, check these in order: Is the flow too forceful? Dial it back to the gentlest setting. Is the water too deep at the center? Add a flat stone to create a shallow shelf of 1 to 1.5 inches. Is the bath exposed with no nearby cover? Add a shrub or move it closer to existing vegetation. Is the pump making an unusual vibration noise that carries through the basin? Add a rubber isolating pad. Is the water discolored or smelling? Do a full clean and water change.
Rapid evaporation or water loss
Some splash loss from the trickle is normal. If you are losing more than half an inch of water per day in mild weather, the flow rate is likely too high or the outlet is directed at an angle that throws water out of the basin. Reduce the flow and redirect the tubing outlet toward the center of the basin. A pump running low on water makes a gurgling sound before the intake goes dry. That sound is your warning to top up.
Your next steps and a quick reference checklist
If you are starting today, the fastest path to a working recirculating bird bath is: buy a 40 to 80 GPH adjustable submersible pump, connect it to your existing basin or a new one, set flow to its lowest setting, plug into a GFCI outlet, and fill to about 1.5 inches deep. That setup will outperform any static bath from day one. From there, dial in placement, refine the flow, and build your maintenance rhythm. The birds will tell you quickly whether they approve.
- Pump submerged and fully covered with water before powering on
- Flow set to a gentle trickle, not a forceful jet
- Basin depth 1 to 2 inches at center, with a shallow wading shelf if needed
- Power cord routed to a GFCI-protected outdoor outlet
- Cord secured with strain relief or cable clips at bend points
- Water topped up every one to two days in warm weather
- Full water change every two to three days (daily in heat above 85°F)
- Foam pre-filter rinsed weekly
- Basin scrubbed with 9: 1 water-vinegar solution weekly
- Impeller cleaned every two to four weeks
- Bti dunk on hand for any period when pump is offline in summer
- Pump drained and stored indoors before hard freeze season
FAQ
How do I choose the right pump height and tubing length for a recirculating bird bath?
Match the pump’s rated GPH to your basin size, then keep tubing runs as short as practical. If the discharge must rise vertically more than about 18 inches, expect lower flow than the box rating, so you will usually need either a slightly higher-rated pump or a gentler design (lower lift height, shorter tubing, and a properly placed outlet).
Can I use a recirculating bird bath near my garden so birds do not track debris into the water?
Yes. Place the bath so prevailing wind and nearby ground vegetation do not continuously drop leaf litter into it. Also consider adding a small overhanging plant or shade element to reduce pollen fall, and clean the foam pre-filter more frequently in areas under trees.
What should I do if birds keep splashing so hard that the water level drops quickly?
Start by dialing the flow down to the lowest setting that still creates visible movement at the center. Then redirect the outlet so the stream falls into the water gently rather than hitting the basin wall. If you still lose water rapidly in heat, add a float valve so the level stays consistent.
Is it safe to run the pump continuously, or should I schedule it for certain hours?
Continuous recirculation is generally fine, but if you want lower maintenance, you can run it on a timer set to longer daytime intervals (when birds drink) and off overnight, as long as you prevent stagnant water buildup. If the pump is off, keep an eye on warm weather, because mosquitoes can start after roughly 48 to 72 hours of still water.
Why does my recirculating bird bath suddenly stop flowing well after working for a while?
The most common cause is debris loading the foam pre-filter or trapping at the impeller intake. Turn the pump off, unplug it, rinse the foam insert, then inspect and clear the impeller chamber with a toothbrush. If the impeller spins freely and flow is still weak, the pump may be near end of life.
Can I make a recirculating bird bath with PVC plumbing instead of vinyl tubing?
You can, but only for layouts that tolerate rigid plumbing and allow for dry-fitting and proper solvent-cement curing. For bird-bath scale, vinyl tubing is often easier to service, and you can lock connections with hose clamps. If you use PVC, never put pressure on joints before the cure time, and plan clean-out access if algae clogs the line.
What flow pattern is best for small songbirds, not just big birds?
Aim for a shallow center (about 1 to 2 inches) plus a gentle trickle or small bubble that agitates the surface without blasting. Small birds avoid deep centers even when water is moving, so if your basin is naturally deeper, build a shallow shelf using flat stones placed securely so they cannot shift.
Should I add a heater in winter if I already have recirculation?
In areas where temperatures regularly fall below about 25°F, recirculation alone will not reliably keep water from freezing. Use a thermostatically controlled birdbath heater if you want birds to drink during cold snaps, and ensure your circuit can handle heater plus pump power draw.
How do I prevent ice damage if I keep the pump running during freezing weather?
Do not let ice form while the pump is running. Unplug before water freezes solid, and if you need to create a drinking hole quickly, pour warm water to melt an opening rather than repeatedly chipping ice. For longer freezes, switch to a heater-only approach instead of relying on the pump.
What is the best way to deal with algae even though the water is moving?
Treat algae like a schedule issue, not a “set it and forget it” problem. Keep your cleaning rhythm (regular water changes plus weekly vinegar scrubbing), and rinse the foam filter frequently so reduced flow does not allow surface film to build. If algae persists, add a targeted rinse with diluted 3% hydrogen peroxide as a follow-up before refilling.
Can I add chemicals, clarifiers, or UV to keep the water clear?
It is usually not necessary at bird-bath scale and can complicate maintenance. Stick to mechanical filtration (the foam pre-filter) and frequent water changes. If you add any treatment, use only bird-safe options and avoid residues like soap or bleach in the basin.
Do I need a check valve for every recirculating setup?
A check valve is most valuable when you have longer tubing runs or any vertical lift, because it prevents back-siphoning after power loss. If your line is very short and runs essentially downhill, you may be able to skip it, but adding one is still a low-effort way to reduce restart wear.
How long should I wait before judging whether my new recirculating bird bath is working?
Give it about a week before concluding birds will not use it. Birds often avoid new setups temporarily, and small adjustments, like lowering flow intensity, improving shelter near the bath, or fixing center depth with a stone shelf, are usually what convert a “test” bath into a reliable spot.
Next Articles
How to Make a Bird Bath From Rhubarb Leaves
Step-by-step DIY rhubarb leaf bird bath, with materials, safety tips for birds, placement, and maintenance to prevent al
How to Make a Bird Bath Dripper Step-by-Step DIY
Step-by-step DIY guide to make a bird bath dripper, with flow setup, placement, maintenance, and fixes for clogs and lea
How to Make a Hummingbird Bird Bath Step by Step
Step-by-step DIY guide to build a hummingbird bird bath: size, placement, safe water depth, cleaning, and troubleshootin