If your bird bath top is cracked, chipped, leaking, or just missing, you can absolutely replace it without buying a whole new bird bath. The right replacement top depends on three things: what type of bird bath you have, what size fits your base or pedestal, and what material makes sense for your climate and budget. Get those three right and the whole swap takes under an hour.
Replacement Top for Bird Bath: Measure and Install Guide

Marcus Henley
13 Apr 2026

Figure out what kind of bird bath top you actually have
"Bird bath top" can mean a few different things depending on your setup. On most traditional pedestal bird baths, the top is the bowl or basin that sits on top of a column or post. On some designs it's a shallow dish or insert that drops into a frame. On heated or solar bird baths, the "top" may be a basin with built-in hardware. Before you buy anything, figure out which of these you're dealing with.
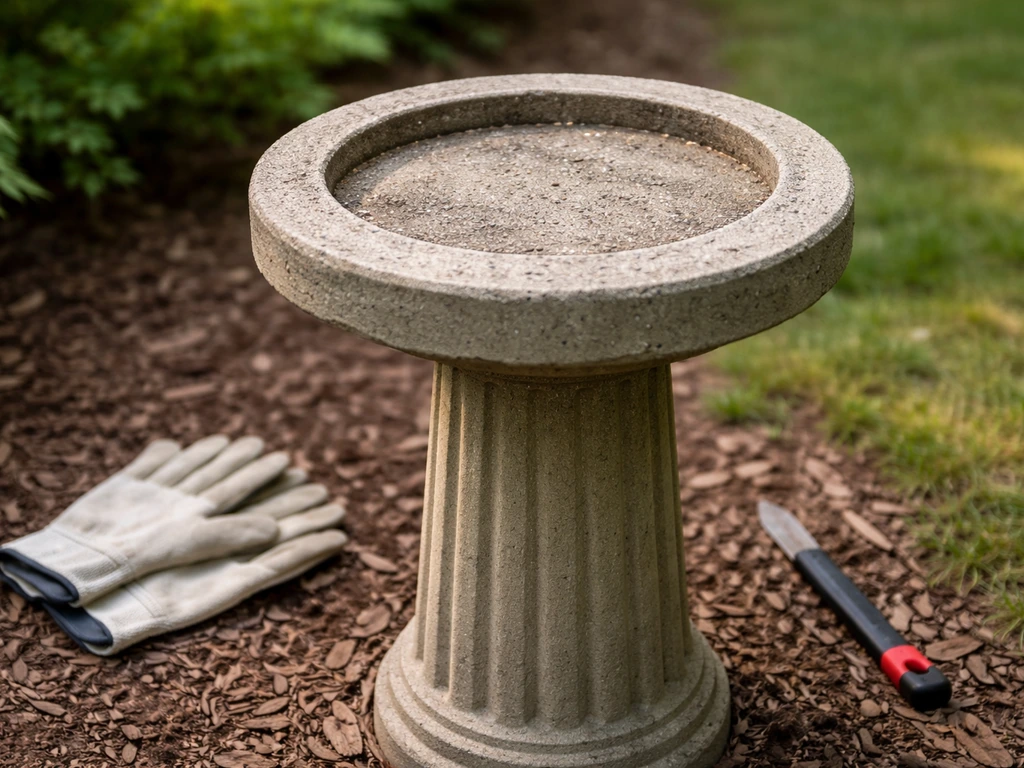
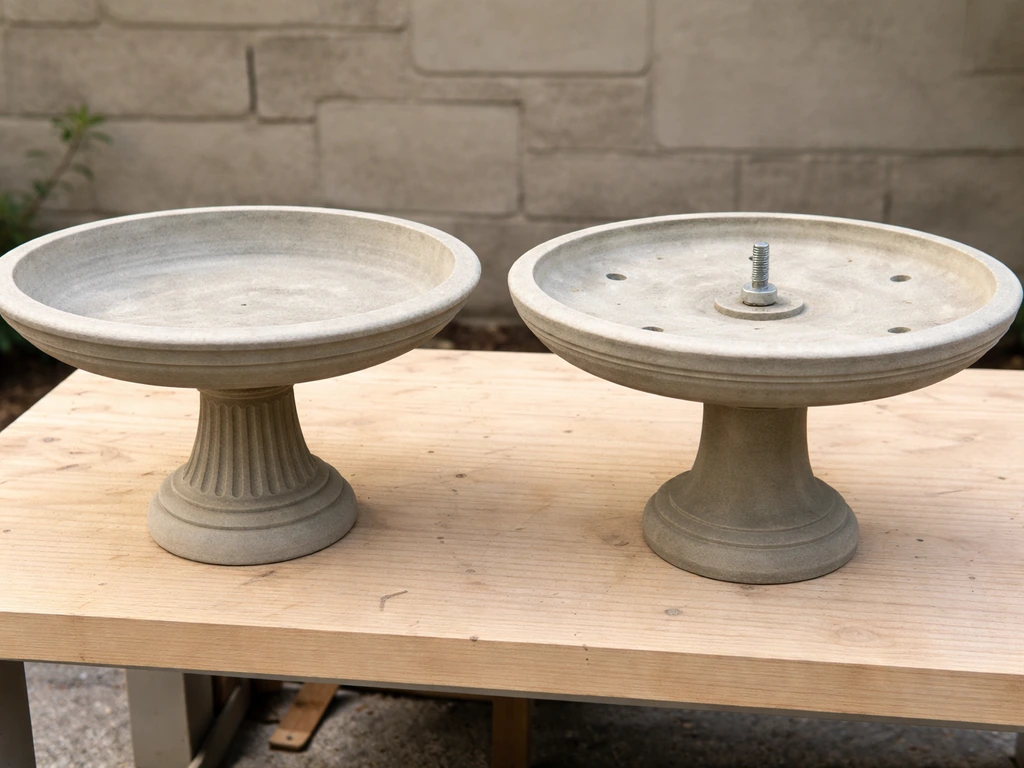
- Set-on bowl: the basin just rests on top of the pedestal under its own weight, with no hardware. This is the most common style and the easiest to replace.
- Bolted or studded mount: the bowl is fastened to the pedestal using studs, bolts, washers, and nuts (often M6 or M8 hardware). You'll see this on many cast-metal and resin bird baths.
- Fitted insert or liner: a removable inner basin drops into an outer shell or frame. Common on decorative or mosaic designs.
- Integrated heated or solar basin: the bowl contains wiring or a solar panel element. Replacing these requires matching not just size but the electrical or panel specs.
While you're inspecting the old top, figure out what's actually failing. A hairline crack that's leaking? That might be repairable with silicone sealant rather than a full replacement. A clean break, deep chip at the rim, or a crack that freezing has opened up wide? That needs a new top. Also check whether the pedestal or base is still solid, because a cracked base will cause the same problems all over again no matter how nice the new basin is.
Measure everything before you order
Measuring correctly is the step most people skip, and it's why they end up returning tops that don't fit. Here's exactly what to measure.
- Outer diameter: measure across the widest point of the bowl rim in inches. Most residential bird bath tops range from 14 to 24 inches. As a reference point, Burley Pottery's universal ceramic top comes in at 16.5 inches outer diameter, which fits a wide range of standard pedestals.
- Inner basin diameter and depth: this affects how much water the bath holds and how accessible it is to birds. Shallow basins (1 to 2 inches deep) work well for small songbirds; 2 to 3 inches is the practical maximum for most backyard species.
- Rim profile: is the rim flat, slightly angled inward, or angled outward? This matters for stability on a set-on pedestal and for how water drains after rain.
- Pedestal top diameter or mounting plate: if it's a set-on style, measure the top of your pedestal column so you know how much of the basin will be supported. If it's bolted, measure the bolt hole spacing precisely.
- Thickness and weight: heavier tops (like a concrete top over 20 lbs) need a solid, stable base. A top that's too light for a windy spot will blow off.
- Height and drain hole position: some tops have a weep hole or drain at the lowest point of the basin. Check whether yours does and whether any replacement will need one in the same location to drain properly.
Write all those numbers down before you start shopping. A top that's even an inch off in diameter can sit off-center or rock on the pedestal, which causes both a drainage problem and a tipping hazard for birds.
Choose the right replacement by bird bath type and material
Once you know your measurements, material choice is the next big decision. Here's a direct comparison of the main options:
| Material | Weight | Freeze Resistance | Durability | Best For |
|---|---|---|---|---|
| Concrete | Heavy (15–30+ lbs) | Moderate (can crack if water sits in it) | Very high if sealed | Traditional pedestal baths, permanent setups |
| Ceramic/Glazed | Medium (10–15 lbs) | Low (glaze and body can crack) | Good if not frozen | Decorative baths, mild climates or indoor winter storage |
| Cast resin/polymer | Light (3–8 lbs) | Good | Moderate (can fade/crack with UV) | Budget replacements, windy areas |
| Cast metal (aluminum, iron) | Heavy | Good (metal won't crack) | Very high | Formal gardens, durable setups |
| Glass mosaic | Medium | Very low (highly susceptible) | Fragile | Decorative only, warm climates or seasonal use |
If you have a traditional concrete pedestal bird bath, a concrete bird bath top is usually the best match because the weight, texture, and drainage behavior are already calibrated for that kind of base. For a decorative pedestal with a glaze finish, a ceramic bird bath top replacement preserves the original look and tends to be a drop-in fit if you match the diameter.
If you're replacing the top on a large, freestanding pedestal bath and want something that accommodates more birds at once, a large bird bath top only in the 20 to 24-inch range gives you the basin area without paying for a new pedestal. And if you want something a bit more distinctive and your climate is mild year-round, a glass top bird bath can be a beautiful option, just know going in that glass and mosaic tops are among the most vulnerable to freeze-thaw damage.
For heated bird baths or solar setups, don't just grab any replacement basin. The wiring harness, sensor, or solar panel needs to be compatible with the replacement top's mounting holes and basin shape. In most cases, you'll need to contact the original manufacturer for a matching replacement part rather than buying a universal top.
Tools and supplies you'll need
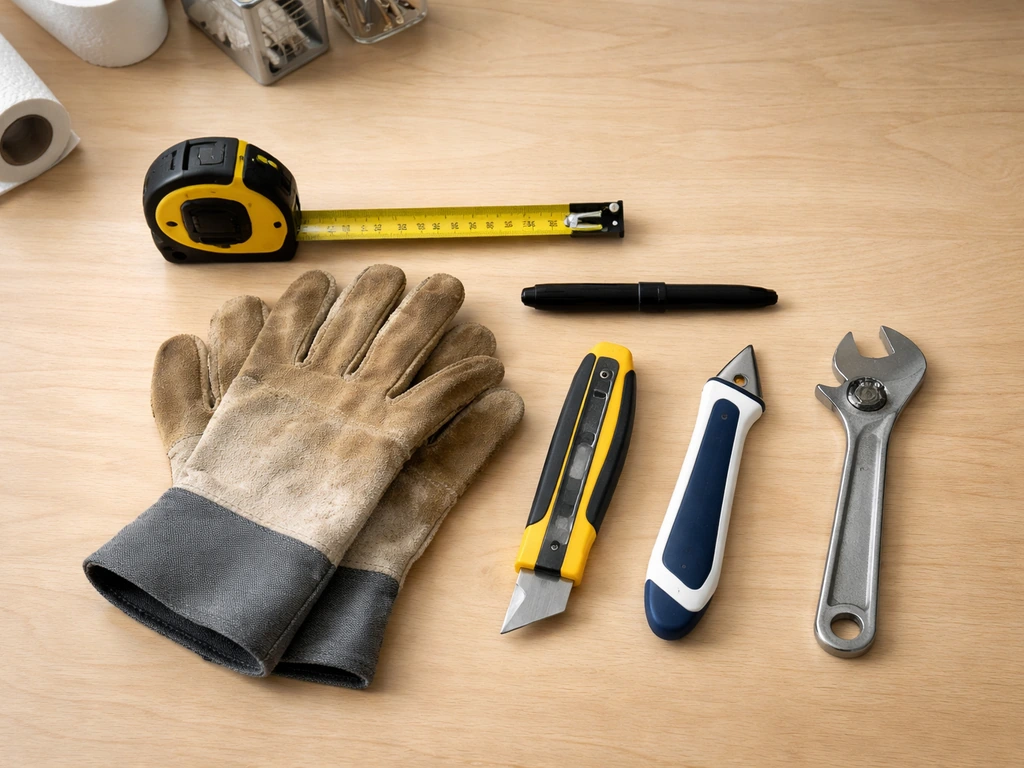
For a basic set-on replacement, you don't need much. For a bolted mount or one with old sealant to remove, have these on hand before you start:
- Measuring tape and a marker
- Work gloves (broken ceramic and concrete edges are sharp)
- Utility knife or caulk remover tool (for cutting out old sealant)
- Dry paper towels and a clean rag
- Level (a small torpedo level works fine)
- Silicone sealant rated for outdoor/water use: a 100% RTV silicone product like EasyPro black silicone is a solid choice for watertight seals on concrete or stone interfaces
- Bird bath adhesive putty strip (optional but useful for ceramic tops on concrete pedestals: it holds the top in place while still allowing removal for cleaning or winter storage)
- Wrench or socket set (for bolted mounts using M6 or M8 hardware)
- Replacement bolts, flat washers, and nuts if the originals are rusted
How to remove the old top and install the new one
Removing the old top
Start by emptying any standing water from the basin. If the top is a simple set-on style, lift it straight up. Ceramic and concrete tops can be heavier than they look, so use both hands and have a clear spot to set it down. If there's an adhesive putty or sealant bead around the rim where it meets the pedestal, run a utility knife around the joint to cut through it before lifting. Don't pry or lever from one side, that can chip the pedestal rim or crack a fragile bowl.
For a bolted mount, use a wrench to back off the nuts while holding the stud steady. Work opposite corners alternately rather than fully removing one bolt before touching the others, this keeps the load even and prevents cracking. Once the hardware is off, lift the bowl clear. If any old silicone or sealant is left on the pedestal top, remove it now: cut it away with a utility knife and wipe the surface clean with a dry paper towel. You need a clean, dry surface for the new sealant to bond properly.
Installing the new top
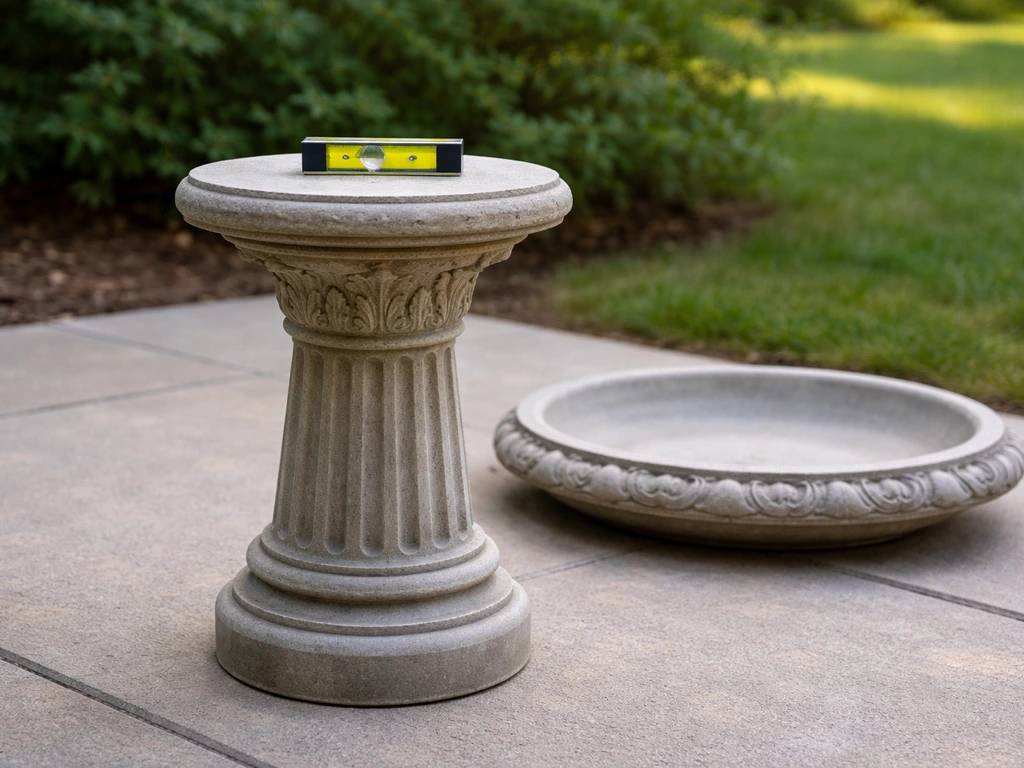
- Set the pedestal or base on a smooth, level surface before placing the new top. Check it with a level. This is not optional: even a small tilt means water pools to one side and drains or evaporates unevenly.
- If you're using sealant or adhesive putty, apply it to the top of the pedestal rim now, not to the basin itself. A continuous bead around the contact point works better than blobs.
- Lower the new basin carefully onto the pedestal, centering it visually and confirming it's centered by measuring the overhang on opposite sides.
- For a bolted mount, hand-thread the hardware before tightening anything with a wrench. Work in a cross pattern (like tightening lug nuts) and stop when snug. Do not overtighten: the goal is firm contact, not cracking the basin material.
- Place your level across the basin in two directions (front-to-back and side-to-side). If it's not level, shim the pedestal base using flat stones or patio shims until the basin reads flat.
- If you used sealant or adhesive, allow 24 hours to cure before filling with water. Once cured, it's safe for birds.
- Fill the basin with fresh water and watch it for 10 minutes. Check for any slight rocking, tilting, or seeping at the pedestal joint.
One thing worth checking before birds start using it: run your fingers around the entire rim and bowl surface of the new top. Any sharp edge from manufacturing, a chip during shipping, or a rough seam from casting can injure birds' feet. If you find one, smooth it down with 220-grit wet/dry sandpaper.
Keeping the new top in good shape after installation
Cleaning and algae
A freshly installed top won't stay clean on its own. Plan to scrub the basin with a stiff brush and rinse it every two to three days during warm weather. The basin shape you chose matters here: a gently sloped bowl drains and rinses more completely than a flat-bottomed one, which tends to leave a film of sediment that feeds algae. Adding water movement, even a simple dripper or wiggler, helps slow algae growth and makes the bath more attractive to birds at the same time. Some people drop a clean copper coin into the basin as a mild algae deterrent after refilling, though that's a supplement to regular cleaning, not a substitute for it.
Mosquito prevention
Standing water that sits for more than 4 to 5 days is all mosquitoes need to lay eggs. The simplest fix is to change the water every two days. If that's not realistic for your schedule, a small solar-powered agitator keeps the surface moving enough to discourage egg-laying. Don't let leaf litter pile up in the basin either: debris creates still pockets even in an otherwise active bath.
Winter and freezing
This is where most replacement tops fail prematurely, so take it seriously. Concrete, ceramic, glass, mosaic, and stone tops are all vulnerable to freeze-thaw cracking because water expands when it freezes and that expansion happens inside any crack or pore in the material. The standard advice from multiple manufacturers is the same: either flip the basin upside down so water can't collect in it, or bring it indoors when freezing temperatures arrive.
If you don't want to deal with that, install a low-wattage bird bath heater in the basin instead. North Carolina State University Cooperative Extension recommends using a bird bath heater and other strategies to prevent ice formation so birds keep having access to water during freezing weather [install a low-wattage bird bath heater in the basin instead. ](https://www. ces.
ncsu. edu/wp-content/uploads/2021/12/Quick-TIP-JKing. pdf? fwd=no).
A heater doesn't make the water warm, it just keeps a small area from freezing solid, which protects both the birds and the basin. Also don't let your pedestal freeze to the ground or sit in a pool of ice, that's a common cause of base cracking that then destabilizes the whole setup.
Sealing and curing considerations by material
Unglazed concrete tops are porous and will absorb water, which speeds up freeze-thaw damage and makes them harder to clean. If your new concrete top hasn't been sealed at the factory, apply a bird-safe concrete sealer before use and reapply every season. Glazed ceramic tops don't need sealing, but check the glaze for hairline cracks after the first winter: even small crazing in the glaze lets water into the ceramic body. Resin and polymer tops don't need sealing but do benefit from a UV-protective rinse product if they're in direct sun for most of the day, which extends the life of the color and prevents the material from becoming brittle.
FAQ
How do I know whether to measure the basin outer diameter or the pedestal opening for a replacement top for bird bath?
Use the outer diameter of the basin at the widest point (including any rim lip), not the pedestal column size. If the top is a drop-in insert, also measure the inner diameter of the opening on the frame and the depth of the insert area, so the replacement sits at the same height for proper drainage.
Can I repair my bird bath top with sealant instead of replacing it?
Yes, but only for hairline leaks, not for structural cracks. If you see a crack that is actively weeping or you can feel water escaping under a gentle hose, sealant often won’t last through freeze-thaw. A practical test is to dry the area thoroughly, run a small trickle, and watch where moisture reappears after 10 to 15 minutes.
What should I check if the pedestal or base is level but the new top still rocks?
If the pedestal wobbles with no load, replace or stabilize the base first. A new top will hide the problem but not fix it, and an off-level basin increases tipping risk and can cause poor runoff. Quick check, place a level across the pedestal and confirm the highest side is within about 1/8 inch across the support area.
I have a heated or solar bird bath, how do I make sure a replacement top will work with the wiring and sensor?
For heated or solar tops, compatibility is usually about matching the mounting hole pattern, sensor location, and connector type, not just the basin diameter. If the manufacturer is no longer selling that exact model, bring the old wiring harness and the underside mounting area to a store or request a measurement-based match, otherwise you may end up with misalignment that prevents proper water level sensing.
Will a universal replacement top for a heated bird bath work, even if the diameter matches?
Avoid universal tops if your original had a specific insert depth, because the heater or solar components may require a precise basin shape for airflow and water coverage. Universal basins can fit by diameter but still leave gaps around the mounting points, which can trap water and accelerate cracking around the hardware.
How can I confirm my replacement top has the right drainage so it does not collect water or sediment?
After installation, check drainage by running a full watering-can pour and looking for whether water pools at one side. A good sign is an even, continuous pour-off pattern with no standing water ring around the drain area for more than a minute or two.
What’s the best way to reseal a set-on replacement top where it meets the pedestal?
If you have a set-on style, don’t assume caulk-only is enough. Many leaks happen because the old rim surface is uneven or has residue. Use the utility knife to remove old sealant, dry the surface completely, then apply a fresh, exterior-grade silicone intended for wet outdoor use.
Do I need to seal a concrete or ceramic replacement top before use, and how often should I reapply it?
It depends on the material and whether your top is already sealed. For unglazed concrete, seal before first winter, then reapply each season in freeze-prone areas. For glazed ceramic, focus on checking for glaze crazing after the first winter rather than applying a new sealer that could change drainage or bonding.
Is it safe to use chemicals or coins to prevent mosquitoes, algae, and debris in a replacement bird bath top?
No, not if the top has any chance of freeze exposure. Metal pieces can also stain or create hotspots around seams. The safer mosquito control approach is changing water on a schedule, using a low-power agitator if needed, and removing leaf debris that creates still pockets.
What’s the best way to handle shipping chips or rough seams on a new replacement bird bath top?
If you notice sharp edges, sand them immediately, even if it seems minor. Also inspect around any drilled or cast seams because birds’ feet can catch there. After sanding, rinse and brush the basin to remove dust, then let it dry briefly before refilling to avoid residue causing a film.
Can I cover my bird bath top instead of removing it during freezes?
If you plan to store the bath, do it with the same freeze strategy you would use outdoors. Either fully drain and store indoors, or flip the basin upside down to prevent water from collecting in pores and cracks. Do not just cover it outdoors, trapped moisture and condensation can still freeze and damage the top.
When is a bird bath heater actually worth it, and how do I choose the right kind for my basin?
If you can feel cold transfer at the basin edges during early freezing nights, a heater is more likely to help than waiting for major ice formation. Choose a low-wattage heater sized for your basin’s footprint, and confirm it sits low enough to protect the water from freezing solid rather than only warming the sensor area.
Next Article
Concrete Bird Bath Top Replacement Guide: Size, Fit, Steps
Replace a concrete bird bath top with the right size, secure fitting steps, and maintenance for lasting outdoor use.