If you need a large bird bath top only, here's the direct answer: measure your existing pedestal's top diameter, confirm it falls within the range your replacement top is designed for (many 'universal' tops need a pedestal top between roughly 7.25" and 8.25" in diameter), then choose a basin that's at least 24 inches wide and 3 to 4 inches deep, secure it with birdbath adhesive, and let it cure for 24 hours before filling. Let the silicone sealant cure before water contact, since many aquarium silicone guides recommend a 24, 48 hour cure window 24–48 hour cure window. That's the whole process. Everything below helps you get each step right.
Large Bird Bath Top Only Guide: Measure, Fit, Install

Marcus Henley
24 Apr 2026
What 'large' and 'top only' actually mean here

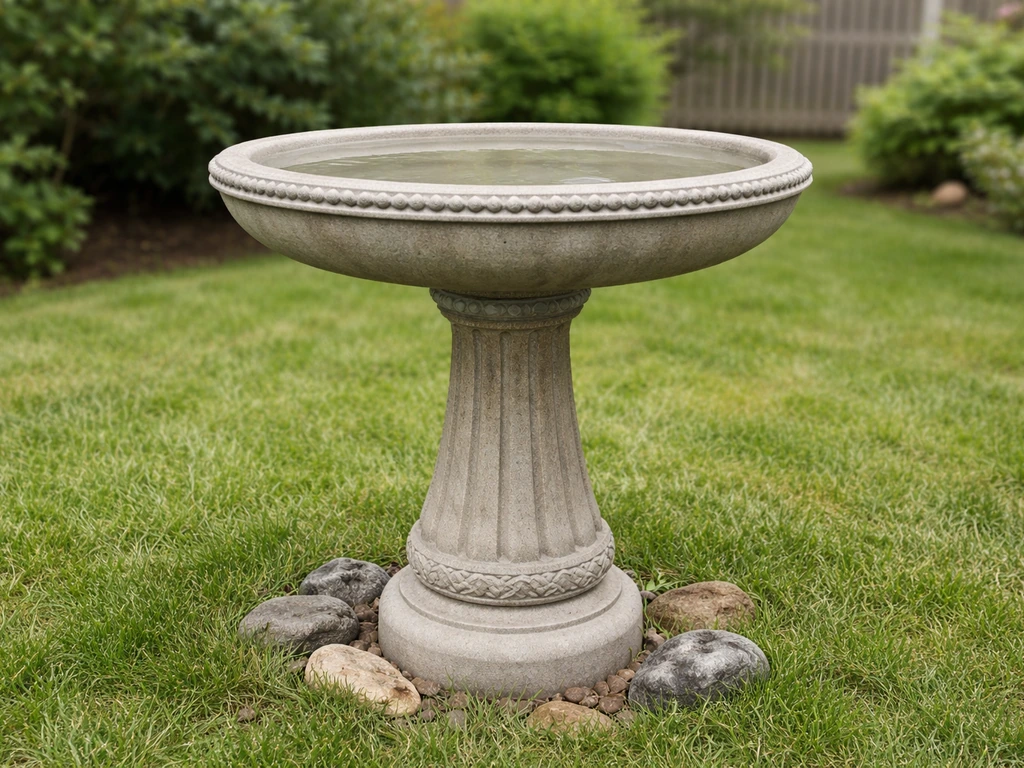
When people search for a large bird bath top only, they usually mean one of two things: they have an existing pedestal or stand and the basin cracked, chipped, or just wore out, and they want to replace the bowl without buying the whole unit again. The 'large' part matters because standard replacement tops run around 17 inches in diameter, which works fine for smaller songbirds but limits larger visitors like robins, jays, crows, and doves. For those birds, you want a basin that's at least 24 inches across and deep enough to let them actually soak, not just sip from the edge.
The 'top only' framing tells you the basin is sold separately from the base or pedestal. That's actually a smart way to shop because pedestals tend to outlast the basin by years, and replacing just the top saves money and lets you upgrade the material or size. The catch is that 'top only' doesn't automatically mean it fits your specific base, which is where most people run into trouble.
Universal vs. model-specific tops: will it actually fit?
The word 'universal' on a bird bath top does a lot of work that it can't always back up. A truly universal top has a flat bottom designed to sit on a wide range of pedestal surfaces, and the manufacturer typically recommends adhesive to secure it since there's no locking mechanism. Other tops have a recessed circle indentation molded into the bottom that physically locks into a matching protrusion on the pedestal. Those are more stable but only work with compatible pedestals from the same brand or product line.
Here's the compatibility issue that catches people off guard: if your pedestal has a protrusion or 'nub' on the top center, a flat-bottomed universal top won't sit flush, and you'll end up with a wobbly, leaking setup. Conversely, if you buy a top with a locking indentation but your pedestal is flat or has a threaded rod, it won't lock in the way it's designed to. Before you order anything, look at the top of your pedestal and figure out exactly what's there.
- Flat pedestal top with no hardware: a universal flat-bottomed top plus birdbath adhesive works well
- Pedestal with a center nub or protrusion: you need a top with a matching recessed indentation, or the nub has to be removed
- Pedestal with a threaded rod: look for tops with a center hole and use a rubber washer plus nut to secure
- Pedestal from a specific brand: check whether the manufacturer sells a branded replacement top before going universal
Also consider that some 'universal' tops include a locking lid knob underneath, which requires the pedestal top to have an open clearance hole. If your pedestal is solid, that knob has nowhere to go and the top won't sit level. Read the product specs carefully for this detail before buying.
How to measure for a replacement bird bath top
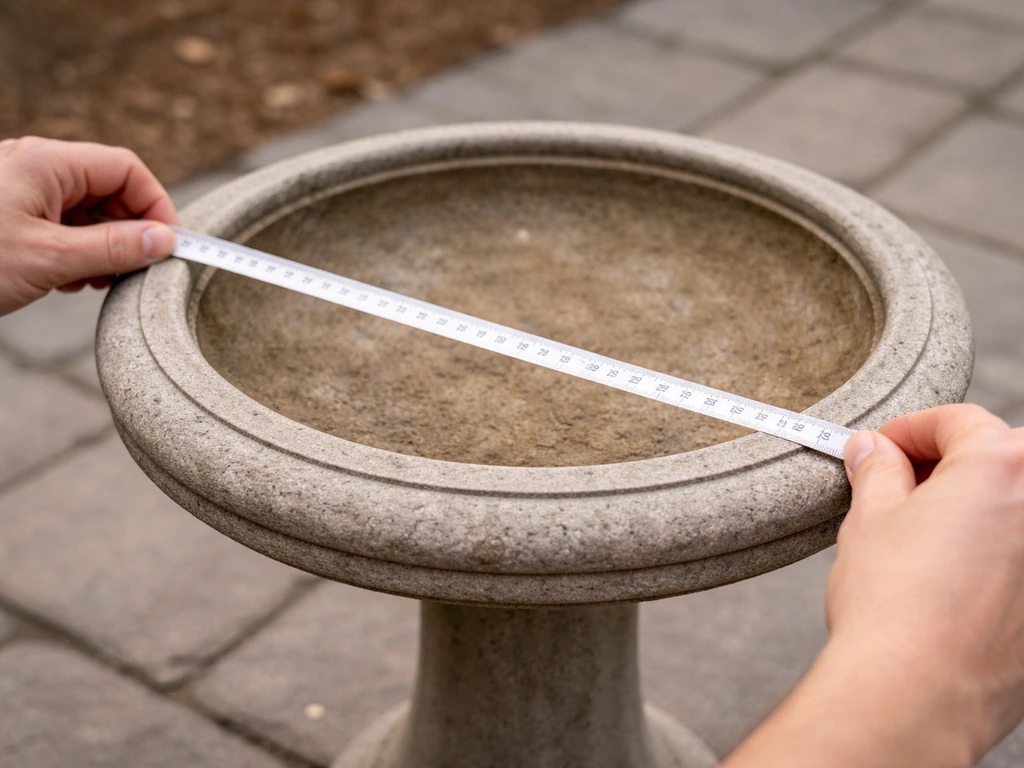
Get a tape measure and spend five minutes on this before you do anything else. It will save you a return shipment and a lot of frustration.
- Measure the outer diameter of your pedestal's top surface. Most compatible universal tops are designed for pedestals with a top diameter between about 7.25" and 8.25". Write this number down.
- Check for any protrusion, nub, hole, or threaded rod at the center of the pedestal top. Note its diameter and height if present.
- Measure the basin diameter you want. For large birds, aim for at least 24 inches (2 feet) across. A 75 cm (roughly 30-inch) basin gives birds a full perimeter of over 92 inches to land and move around.
- Measure the rim style of your old top if you still have it. Some pedestals have a recessed shelf or lip that the basin sits into; others are just flat. If your pedestal has a shelf, the basin's outer lip needs to match or overhang it cleanly.
- Note the height. Replacement tops add height to the overall bath. A top that's 3.75" tall on a standard 30" pedestal puts the water surface at about 34", which is in the comfortable range for most birds and for easy cleaning access.
Once you have those numbers, compare them against the product specs of any replacement top you're considering. Don't assume 'universal' means your measurements don't matter. They always matter.
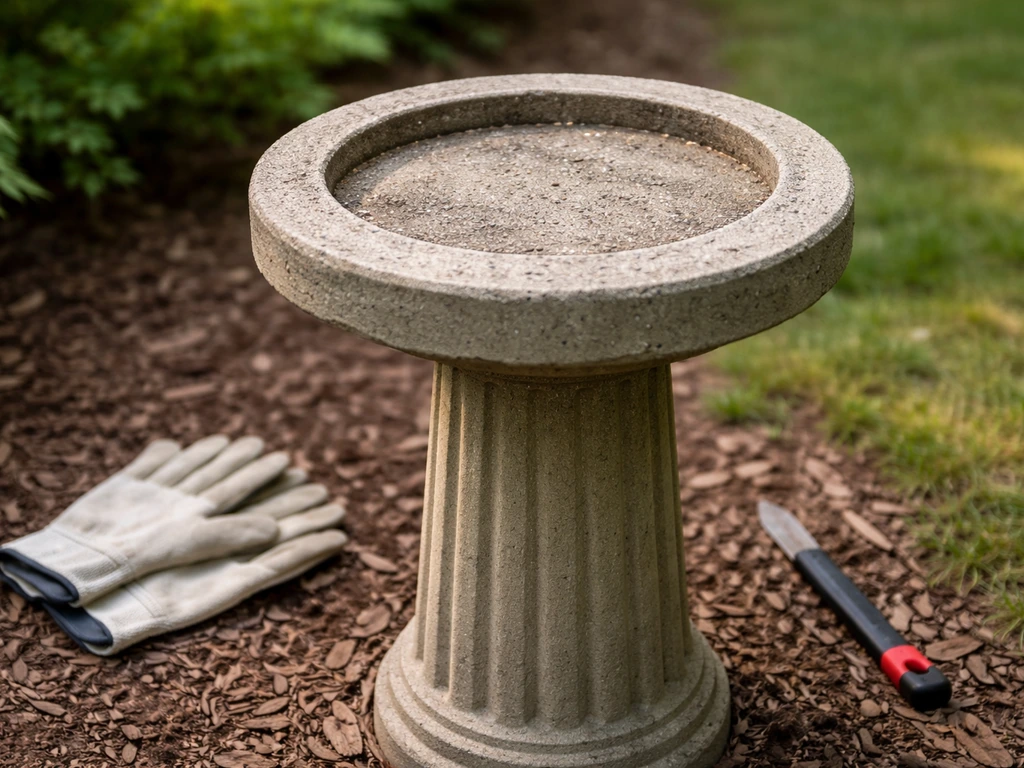
Materials and design choices for large bird bath tops
The material you choose affects weight, durability, cleaning effort, and how well it handles temperature swings. Here's a practical breakdown for large tops specifically, since size amplifies both the strengths and weaknesses of each material.
| Material | Weight | Durability | Cleaning ease | Freeze resistance | Best for |
|---|---|---|---|---|---|
| Concrete | Heavy (20–40+ lbs) | Very high if sealed | Moderate (porous without sealant) | Low (can crack) | Permanent setups, classic look |
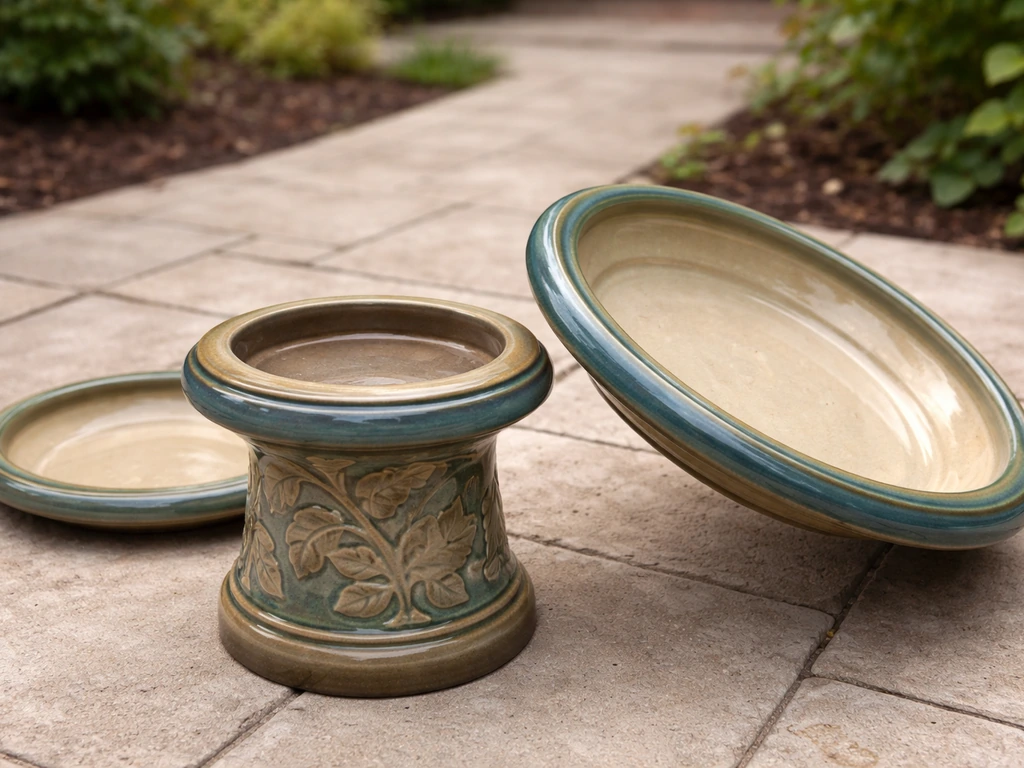
| Ceramic/Glazed | Moderate to heavy | Good if glazed | Easy (smooth surface) | Low (glazing can crack) | Aesthetics, easy upkeep |
| Resin/Plastic | Light (5–10 lbs) | Good quality varies widely | Very easy | Good (flexible) | DIY replacement, lightweight setups |
| Metal (cast iron) | Very heavy | Excellent | Moderate (can rust if unpainted) | Moderate | Heavyweight permanent installs |
| Glass | Moderate | Fragile | Easy | Low | Decorative, sheltered locations |
For a large replacement top, resin or high-quality polyresin is usually the most practical choice if you're going top-only on an existing pedestal. If you also want to choose the right material, review options for large replacement tops so the finish and weight match your setup replacement top for bird bath. It's light enough to handle alone, won't crack in a freeze, and is easy to clean. Concrete tops are beautiful and durable but heavy enough that a large one can stress an aging pedestal, especially if the original base wasn't sized for extra weight. A concrete bird bath top is especially important to match with a sturdy pedestal since it adds significant weight. If you want the concrete look, a concrete replacement top is a great option, but make sure your base can handle it. Ceramic and glazed tops clean up quickly and look sharp, though the glaze can spider-crack in hard freezes. If you’re considering a ceramic option, look for a finish that resists staining and is easy to rinse after each cleaning ceramic bird bath top replacement. Glass tops are striking but best kept in sheltered spots.
Design-wise, look for a basin with a gradual slope from the outer edge toward the center rather than a steep bowl shape. This gives birds of different sizes comfortable footing. For large birds, you want that center depth to hit around 3 to 4 inches at the deepest point, with shallower ledges around the rim where smaller birds can stand.
How to install a top-only replacement
What you'll need
- Birdbath adhesive or exterior-grade construction adhesive
- Silicone sealant (clear or color-matched)
- Caulk gun
- Rubber mallet or soft cloth and regular mallet
- Isopropyl alcohol and rags for surface prep
- Rubber gloves
- Level
- Masonry screws and rubber washers (if your top has mounting holes)
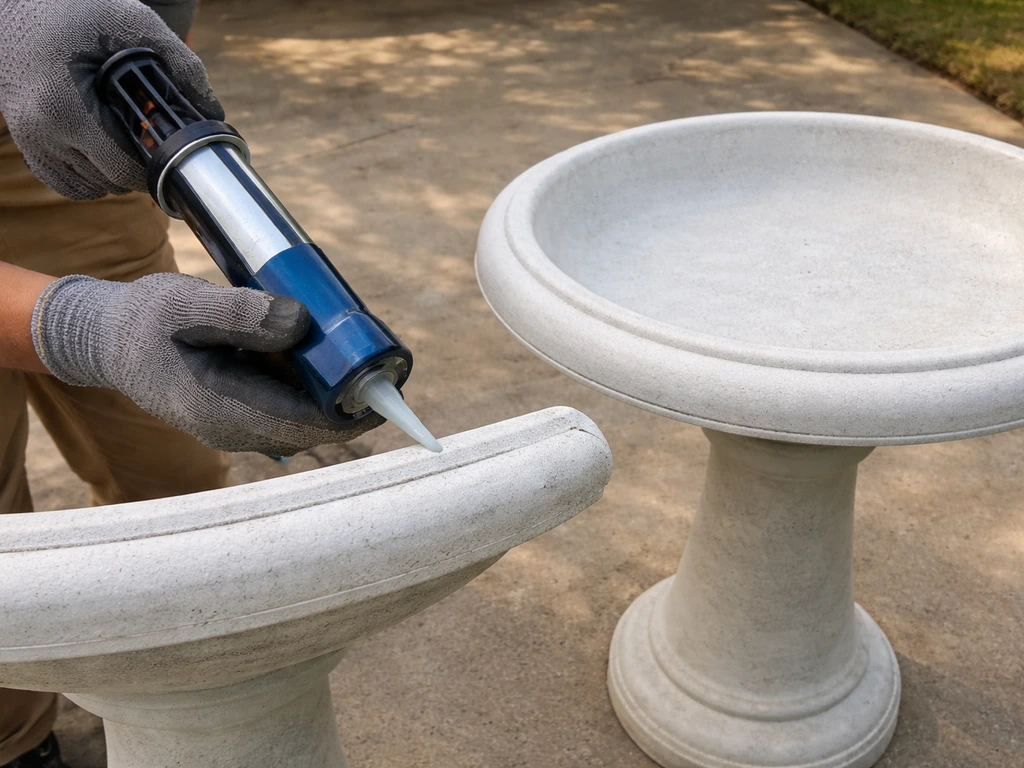
Step-by-step installation
- Clean the top surface of your pedestal thoroughly with isopropyl alcohol and let it dry completely. Any dust, algae, or old adhesive will prevent a good bond.
- Do a dry fit first. Set the new top on the pedestal without any adhesive and check that it sits level. Use a small level tool or eyeball from multiple angles. If it rocks, figure out why before adding adhesive.
- If your pedestal has a locking nub and your top has a matching indentation, press them together firmly to confirm they seat. If it locks cleanly, you may need only a light bead of adhesive around the seam for weatherproofing.
- For flat-bottom universal tops, apply a generous bead of birdbath adhesive in a ring on the pedestal top, about 1 inch in from the outer edge. Don't cover the entire surface, as you want a little airflow to help cure and to avoid air pockets.
- Lower the basin top onto the pedestal carefully. Press down firmly and wiggle slightly to spread the adhesive. Wipe away any squeeze-out with a damp rag before it sets.
- If your installation uses screws (common with cast iron or mounted tops), thread a rubber washer onto each screw before driving it. Apply a small bead of silicone sealant under the screw head to create a watertight seal at each hole.
- Run a bead of silicone sealant around the seam where the basin meets the pedestal, pressing the nozzle against the surface and dragging it along to force sealant into the joint. Smooth it with a wet finger.
- Let the adhesive cure for at least 24 hours before filling with water. Don't rush this step, even if the bond feels firm after a few hours.
If you're in a cold climate, do this installation during a warm stretch. Adhesives and silicone sealants need temperatures above about 40°F to cure properly. Installing in near-freezing conditions usually means a failed bond and a repeat job in spring.
Keeping a large bird bath top clean and healthy
A larger basin holds more water, which sounds like less maintenance, but it also means more surface area for algae to colonize and more water for mosquitoes to use as a breeding ground. The good news is that the cleaning method is simple; it just needs to happen on a regular schedule.
Weekly cleaning routine

- Dump the old water completely. Don't just top it off.
- Scrub the basin with a stiff brush and a diluted solution of one part white vinegar to nine parts water. For stubborn algae, use a 10% bleach solution but rinse extremely thoroughly afterward.
- Rinse three or four times with fresh water before refilling. Birds are sensitive to bleach and soap residue.
- Refill with fresh water and, if you're in a hard-water area, add a copper penny or a small copper mesh scrubber to the basin. Copper naturally inhibits algae without harming birds.
Preventing mineral scale buildup
If you have hard water, white crusty deposits will build up on the basin surface over time. Vinegar is your best friend here. Soak the dried basin with undiluted white vinegar for 15 to 20 minutes, then scrub and rinse. On a concrete or unglazed ceramic top, applying a concrete sealer once a year significantly reduces how much scale sticks to the surface and makes cleaning much faster.
Stopping mosquitoes
Mosquitoes need standing water that sits still for about 7 to 10 days to complete their breeding cycle. The most effective way to stop them is to change the water every 2 to 3 days, which you should be doing anyway. If you want extra insurance, add a solar-powered agitator or dripper to keep the water moving. You can also drop in a Bti (Bacillus thuringiensis israelensis) mosquito dunk, which is toxic to mosquito larvae but completely safe for birds and other wildlife. CDC states that EPA-registered larvicides can be used for mosquito control, and that Bacillus thuringiensis subspecies israelensis (Bti) is found in the soil.
Winter and freezing
Freezing water is the number one killer of bird bath tops, especially concrete and ceramic. Water expands as it freezes, and that expansion cracks even well-sealed basins from the inside out. If you're in a freeze-prone climate, you have three options: bring the top indoors for winter, add a submersible bird bath heater to keep the water just above freezing, or accept that a concrete or ceramic top may need replacing every few years and budget accordingly. Resin tops handle freezing much better since they flex slightly instead of cracking.
Placement and optimization for big-top bird baths
A large basin gives you more flexibility in placement because birds feel safer with more room to maneuver, but a few positioning rules still matter a lot.
Sun vs. shade
Full sun encourages algae and warms the water quickly, making it less appealing to birds on hot days. Full shade keeps water cool but can also make birds feel exposed to predators if there's no surrounding cover. The sweet spot is dappled shade or a spot that gets morning sun and afternoon shade, especially in warm climates. In cooler regions, a bit more sun helps keep the water from getting too cold and discouraging visits.
Distance from cover
Place the bath within 10 to 15 feet of shrubs or low trees where birds can perch, preen, and retreat if they get spooked. Closer than 3 feet becomes a problem because cats and other predators can ambush from cover. Farther than 20 feet and many birds won't bother making the open-air crossing. Get that distance right and visitation usually increases noticeably within a few days.
Water depth for different birds
The ideal depth for most birds is about 3 inches at the deepest point, but a large basin should ideally have a gradual transition from about half an inch at the rim to 3 or 4 inches at center. That serves small songbirds at the edges and larger birds like robins, jays, and mourning doves in the middle. If your large replacement top is uniformly deep, add a few flat stones or a purpose-made bath insert near the edges to create shallower perching spots.
Stability and grounding
A large top adds significant weight and wind resistance. If your pedestal is the stake-in-ground type, push it at least 12 inches into the soil and check it for wobble after the first week. If it's a freestanding pedestal, place it on a paver or flat stone to prevent it sinking into soft soil after rain. A large top that shifts even slightly in the wind will alarm birds and reduce visits.
Troubleshooting problems after installation
The top wobbles or rocks
This almost always means the pedestal top isn't flush with the basin's bottom. Check whether a nub or protrusion is preventing full contact, or whether the pedestal top is uneven. If it's uneven, build up low spots with additional adhesive or a thin shim of weather-resistant material before re-setting the top. Let it cure fully before testing.
Water leaking from the seam
If water is escaping where the basin meets the pedestal, the silicone bead wasn't fully sealed. Drain the bath, dry the seam completely, and run a fresh bead of silicone sealant along the joint. Force the sealant into the gap by pressing the nozzle against the surface as you drag it along, then smooth it with a wet fingertip. Let it cure at least 24 hours before refilling.
Cracks appearing in the basin
Hairline cracks in concrete or ceramic tops can usually be saved. Apply silicone sealant or a concrete-specific repair filler directly into the crack, forcing it in from the top. Wipe away the excess and let it cure fully. If the crack runs all the way through the bottom, water loss will be significant and the top probably needs replacing. This is exactly the situation where a concrete or ceramic replacement top makes sense.
Freezing damage
If the basin cracked over winter, the frozen water did the damage from inside. Going forward, either empty the basin before your first hard freeze, add a bird bath heater rated for your lowest expected temperature, or switch to a resin top that flexes instead of cracking. Don't pour hot water into a frozen concrete or ceramic basin to thaw it; the thermal shock will crack it faster than the freeze did.
Birds aren't using the new top
Give it a week before worrying. Birds are creatures of habit and need time to discover a new or repositioned water source. Speed things up by adding a dripper or wiggler to create movement and sound, which birds detect from a distance. Make sure the water depth is right, remove any chemical smell from new adhesive or sealant by rinsing the basin several times, and check that the bath is visible from perching spots nearby. If you've switched materials, the new basin surface may have a smell or texture birds aren't used to; a few days usually resolves that.
FAQ
My pedestal has a center nub, can I still use a “large bird bath top only” universal basin?
Only if the bottom of the replacement top is built to accommodate it. A flat-bottom universal top will often sit on the nub instead of the full pedestal, causing wobble and gaps. Look for a model that specifies a recessed/locking design compatible with your pedestal shape, or plan to use adhesive plus a shim only if the seam can stay fully sealed and level.
How do I measure for a large bird bath top only replacement if my pedestal top is not perfectly round?
Measure in two directions (north-south and east-west) and use the larger diameter when choosing the replacement range. If the pedestal is oval or warped, a “fits 7.25 to 8.25 inches” claim may still be wrong for your exact surface, leading to uneven contact and leaks.
What’s the best way to check whether the base will support a concrete or ceramic large bird bath top only?
Do a wobble test before installing. If the pedestal moves on your current setup or visibly sinks into soft soil, the extra weight of concrete or glazed ceramic can worsen instability. For stake-in-ground pedestals, push the stake deeper and retest after a week, for freestanding bases, use a paver to stop post-rain settling.
Adhesive and silicone are both mentioned, do I need both for a large bird bath top only?
Usually yes, unless your product instructions specify a single method. Adhesive helps bond and fill micro gaps, silicone sealant handles water-tight sealing at the seam. If you use only adhesive, water can still migrate through a thin joint line, especially with movement from wind or uneven contact.
Can I install a large bird bath top only in cooler weather, even if it feels “warm enough”?
Avoid installing when the surface temperature is below about 40°F, not just the air temperature. Cold surfaces slow cure and can create a weak bond that fails during the first rain or first fill cycle. If you must, move the process to a warmer stretch or allow extra cure time beyond 24 hours.
How much water should I use to avoid overflow for a large replacement top with a deeper center?
Fill so the deepest point is around 3 to 4 inches, but keep the rim ledge exposed enough for birds to land and preen. If you fill higher than the design depth, the waterline rises into the pedestal area and increases leakage risk at the seam.
What should I do if the top sits level but still leaks at the seam?
Re-seal, don’t just add more adhesive. Drain and dry completely, then apply a fresh silicone bead into the joint, pressing the nozzle into the gap and smoothing it tightly. Cure fully (at least 24 hours) before refilling, and check level again after the first full day of water exposure.
Can I repair a hairline crack in a resin large bird bath top only, or does it need replacement?
Repair is often possible for small surface cracks, but resin repairs are only reliable if the crack is not structural and the top can be fully cleaned and dried first. If the crack opens when the basin is filled, or it runs through a high-stress area like the center bottom, replacement is safer to prevent ongoing leaks.
How soon can birds use the bath after installation with new adhesive or sealant?
Give it time for both odor and cure. Even after the stated 24 hour cure, rinse the basin several times to remove residual smell, then wait a few days for birds to adapt, especially if the material or texture changed.
What’s the safest way to prevent mosquitoes in a large bird bath top only without harming birds?
Change the water every 2 to 3 days, then add a mosquito dunk if you want extra insurance. Ensure the dunk or treatment is specifically labeled for mosquito larvae control in bird-safe water, and keep water moving with a solar dripper or agitator if algae buildup is a frequent issue.
Do I need to empty a large bird bath top only before freezing nights, even if it’s resin?
It’s still a good idea to empty or partially empty before hard freezes, even for resin, because ice can stress the joint and any sealed seam. If you can’t empty it, use a bird bath heater rated for your lowest temperature, and avoid thawing with hot water to prevent crack and thermal stress.
My large bird bath top only attracts algae fast, how can I reduce it without decreasing bird visits?
Shift placement to morning sun and afternoon shade if possible, and clean on a consistent schedule. Algae thrives on warm, stagnant water, so smaller but more frequent water changes and a quick scrub will usually outperform trying to “let it sit” longer between cleanings.
What are common mistakes when ordering a large bird bath top only replacement?
Two mistakes are most common: assuming “universal” means your pedestal shape and nub geometry don’t matter, and only measuring one diameter. Also double-check compatibility details like locking knob clearance under the top, because it can prevent full seating even when the top size range matches.
Next Articles
Ceramic Bird Bath Top Replacement Guide for a Perfect Fit
Replace a ceramic bird bath top today with correct measurements, fit tips, DIY steps, sealing, and maintenance for lasti

Replacement Top for Bird Bath: Measure and Install Guide
Learn how to measure and install a compatible replacement top for your bird bath, safely and level for birds.
Concrete Bird Bath Top Replacement Guide: Size, Fit, Steps
Replace a concrete bird bath top with the right size, secure fitting steps, and maintenance for lasting outdoor use.