
Stack a few clay pots, seal the saucer basin, add water at 1 to 2 inches deep, and you have a fully functional bird bath that costs under $30 and takes an afternoon to build. The finished result is a tiered terracotta tower, usually 18 to 24 inches tall, topped with a wide unglazed saucer that songbirds, robins, sparrows, and even crows will visit within days of setup. I have built half a dozen of these in my own backyard, and they consistently outperform fancier options for sheer bird traffic.
Clay Pot Bird Bath Instructions: DIY Step-by-Step Guide

Marcus Henley
6 Aug 2026
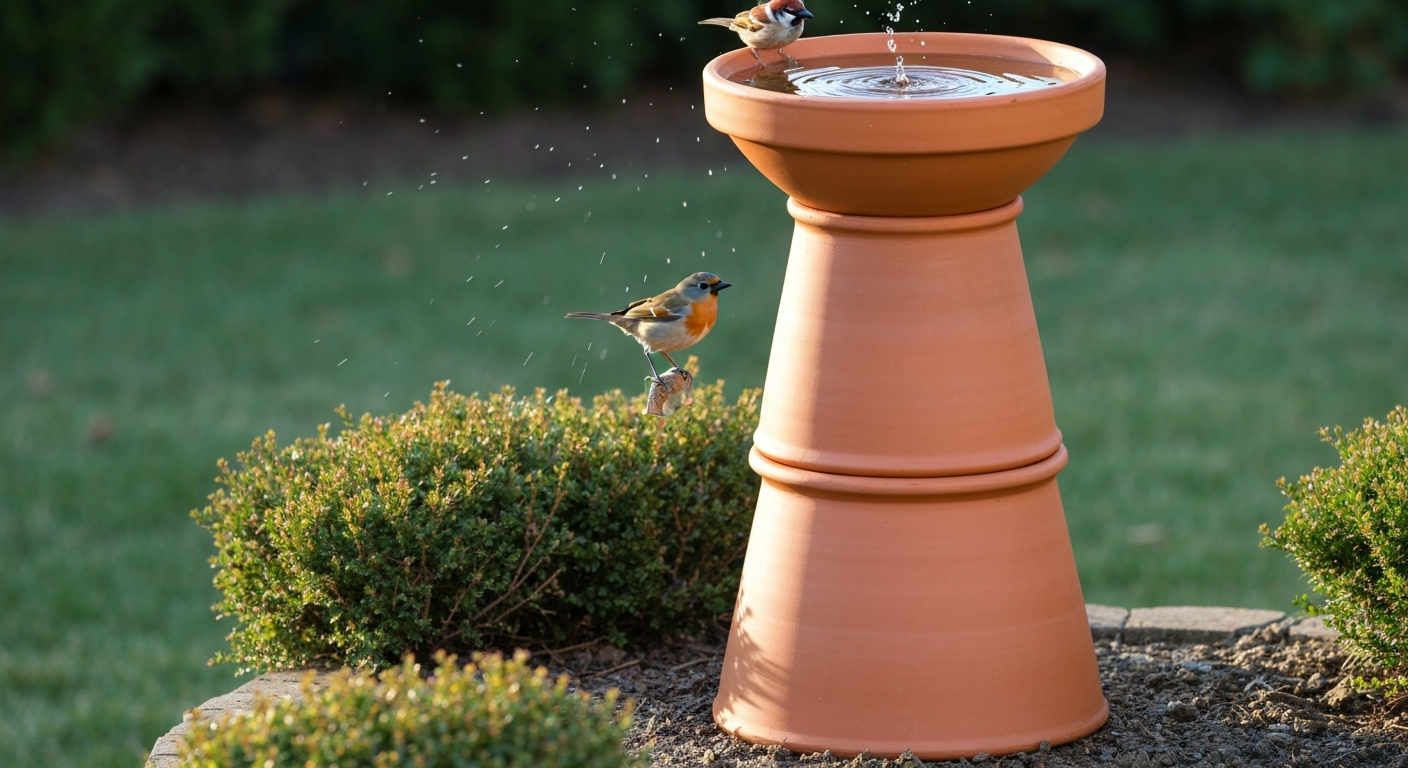
What the finished bird bath looks like (and what birds will do with it)
A typical clay pot bird bath uses two or three stacked terracotta pots as the pedestal, with a large clay saucer (12 to 16 inches in diameter) sitting on top as the basin. The look is rustic and earthy, fitting naturally into garden beds, patios, or lawn borders. You can leave it natural terracotta, paint it, add a mosaic surface, or glaze it, all of which are covered below.
Water depth matters more than aesthetics. Most small backyard songbirds prefer a gentle slope with about 1 inch of water at the edges and no more than 1 to 2 inches at the deepest point of the basin. Larger birds like crows and doves can handle up to 3 to 4 inches in the center, so if you want to attract a wider range, keep the margins shallow and let the center of a deeper saucer handle the bigger visitors. Hummingbirds are a special case: they need the water surface to be barely there, under half an inch, combined with movement from a dripper or mister. A clay saucer on its own is too deep and too still for hummingbirds unless you retrofit it.
Once the bath is out and filled, expect a few days before the first visitors arrive. Robins and house sparrows tend to find it first. Chickadees and finches follow. If you add a dripper or small fountain pump, activity picks up noticeably within the first week because birds are drawn to the sound of moving water from a surprising distance.
Time, difficulty, and what it will cost you
| Factor | Details |
|---|---|
| Total build time | 2 to 4 hours (including sealant cure time of 1 to 24 hours depending on product) |
| Difficulty | Beginner. No special skills required beyond basic drilling. |
| Cost (basic build) | $15 to $30 for pots, saucer, sealant, and adhesive |
| Cost (with mosaic finish) | $25 to $60 depending on tile quantity and grout |
| Cost (with heated add-on) | $50 to $90 adding a 50-watt birdbath deicer |
| Cost (with solar pump) | $35 to $70 adding a small solar fountain pump |
The main wait is sealant cure time. Aquarium-grade 100% silicone, which I recommend for the basin, is typically touchable after an hour but needs 24 hours of full cure before you introduce water and birds. Plan your build day around that window.
Everything you need: materials and tools checklist
Pots and saucers
- 1 large terracotta saucer, 12 to 16 inches diameter (basin)
- 1 medium terracotta pot, 8 to 10 inches (top pedestal section)
- 1 large terracotta pot, 10 to 14 inches (bottom pedestal section, used inverted)
- Optional: one extra small pot (4 to 6 inches) for a three-tier build
- Unglazed terracotta is preferred for the basin — birds grip it more easily than smooth glazed surfaces
Sealants and adhesives (bird-safe options)
- Aquarium-grade 100% silicone sealant (e.g., Aqueon Aquarium Silicone): waterproof, non-toxic once fully cured, ideal for sealing the interior of the saucer basin
- Food-safe or aquarium-safe epoxy (e.g., ArtResin, which documents compliance with FDA 21 CFR 175.300): suitable for bonding pot joints and filling cracks when fully cured
- Modified thinset mortar: for adhering mosaic tiles to the exterior — follow manufacturer cure instructions before bird contact
- Epoxy grout (e.g., SpectraLock or SikaTile-825): for grouting mosaic tiles in wet/outdoor conditions — uncured epoxy products are hazardous, so wear gloves and allow full cure per the manufacturer datasheet before the bird bath goes into service
Tools
- Electric drill with carbide- or diamond-tipped masonry bit (3/8 inch starter, step up as needed)
- Masking tape (applied over drill spot to reduce chipping)
- Spray bottle with water (for cooling the pot while drilling)
- Sandpaper or masonry file (for smoothing rough edges)
- Measuring tape
- Level
- Caulking gun (for silicone application)
- Gloves, eye protection, and a dust mask for drilling and mixing adhesives
Optional heated and solar components
- Submersible birdbath deicer or heated base (50-watt models are common; look for a thermostat that activates below 35°F)
- Solar fountain pump kit (small floating or submersible models rated 1 to 3 watts work well in a 12 to 16 inch saucer)
- GFCI outdoor extension cord if using an electric deicer near water
- Zip ties or waterproof cable clips for cord management
Safety and bird-safe product notes, read this before you build
This section is worth slowing down for. The materials you put in direct contact with standing water that birds drink from matter a great deal. Here is what I have learned the hard way and from the research I have done.
Sealants: Only use aquarium-grade or explicitly food-safe products for the interior of the water basin. Standard hardware-store silicone caulks often contain fungicides (look for the word 'mildewcide' on the label) that are toxic to wildlife. Aquarium silicone products are specifically formulated to be non-toxic when fully cured. Always follow the manufacturer's cure time, which is typically 24 hours minimum, before filling with water.
Epoxy adhesives: Uncured epoxy and epoxy grout are chemically hazardous. Wear nitrile gloves and eye protection during mixing and application, and work in a ventilated space. Once fully cured (refer to the specific product's datasheet, as some epoxy grouts need 72 hours or more), the material is stable and inert. Only then is it safe for bird contact.
Glazed pottery and lead risk: If you are sourcing pots from thrift stores, antique shops, or markets that carry imported decorative pottery, be cautious. The FDA has documented that some traditional or ornamental glazes, particularly older or imported pieces, can leach lead or cadmium into liquids. Questions and Answers on Lead-Glazed Traditional Pottery (FDA) warns that some traditional or decorative ceramic glazes, especially older, imported, or antique wares, can leach lead or cadmium into liquids. Stick to new, clearly labeled unglazed terracotta from garden centers, or use only modern non-lead glazes that have been properly fired, for any surface in direct contact with water.
Electrical safety: If you add a deicer or fountain pump, the water and electricity combination requires genuine care. Always use a GFCI-protected outdoor outlet. Keep cords managed so they cannot be tugged into the water by animals. Never use a standard indoor extension cord outdoors in wet conditions. A 50-watt deicer runs on minimal electricity, but the circuit protection is non-negotiable.
Step-by-step assembly instructions
These instructions build a two-pot pedestal with a saucer basin on top. I will note where to branch off for a three-tier build or a mold-made custom saucer. For a quick, illustrated walkthrough on how to make a bird bath out of clay pots, see this step-by-step guide.
- Gather and inspect your pots. Lay out all your terracotta pieces and check for cracks, especially around the drainage holes where stress fractures start. Small surface cracks are usually fine; hairline cracks through the saucer wall will leak even after sealing.
- Photo/diagram suggestion: overhead flat lay of all materials labeled — large pot, medium pot, saucer, silicone tube, drill, masonry bit, tape.
- Drill the bottom pot for cord routing (if adding electric components). Apply masking tape over the drainage hole or your chosen drill point. Using a carbide- or diamond-tipped masonry bit, start with a small pilot hole at low speed. Keep the bit cool by misting periodically with water. Step up bit sizes gradually to reach your target diameter (typically 3/8 to 1/2 inch for deicer cords). Drill with light, consistent pressure — do not force it.
- Sand rough edges. After drilling, use sandpaper or a masonry file to smooth any sharp edges around the hole. Sharp terracotta can wear through electrical cord insulation over time.
- Seal the interior of the saucer basin. Apply a continuous bead of aquarium-grade silicone around the interior bottom edge of the saucer and any hairline cracks. Smooth with a damp finger. Allow to cure for the full manufacturer time — at minimum 24 hours — before any water contact.
- Photo/diagram suggestion: close-up of silicone bead application inside the saucer, with arrow indicating coverage area.
- Stack the pedestal. Set the large pot upside down on your chosen flat, stable surface (a patio stone or flagstone works well as a base). Center the medium pot right-side up on top of the inverted large pot. Apply a bead of aquarium silicone or food-safe epoxy around the rim-to-rim contact point to bond them. Allow this joint to cure per the product instructions before loading it with the saucer weight.
- Photo/diagram suggestion: side-profile diagram showing large pot inverted (bottom facing up), medium pot right-side up centered on top, saucer resting on medium pot rim.
- Set and level the saucer. Place the sealed saucer on top of the medium pot rim. Use a small level to check it is not tilted — a tilted saucer spills water and concentrates depth on one side. If it rocks, use a thin bead of silicone on the rim contact point to shim and adhere it.
- Cure and check for leaks. After full cure time, fill the saucer with 1 to 2 inches of water. Check all seams after 30 minutes. If you see drips from the saucer bottom, dry it thoroughly, reapply silicone to the affected seam, and re-cure before service.
- Place and fill. Move the assembled bath to its final location before filling (it gets heavy). Fill to 1 to 1.5 inches at the center, shallower at the edges. Add a large flat stone or gravel to one side of the basin to create a shallow perch for smaller birds and a safe exit point.
- Photo/diagram suggestion: top-down view of filled saucer showing stone perch placement and gentle depth gradient.
Making and using a mold for a custom clay pot saucer
If you want a saucer with a specific diameter, custom depth profile, or a more decorative shape than what garden centers carry, making your own from a mold is a genuinely satisfying afternoon project. See a step-by-step guide on how to make a bird bath mold for measurements, materials, and troubleshooting. The principle is simple: press or pour a clay or hypertufa mixture into a form, let it set, and unmold. You can also use this technique to cast a replacement basin if an existing saucer cracks.
For a pressed-clay saucer, the easiest mold is an existing large plastic pot saucer flipped upside down and wrapped in plastic film as a release agent. Roll out a slab of air-dry or oven-dry clay to about 3/4 inch thickness, drape it over the mold form, smooth it down, and trim the edges. Allow it to dry slowly in shade for 24 to 48 hours to prevent cracking, then fire it if you have kiln access, or seal it with aquarium silicone once fully dry if you are working with an unsealed air-dry product.
For a cast hypertufa saucer, mix 1 part Portland cement, 1.5 parts peat moss, and 1.5 parts perlite with enough water to reach a thick oatmeal consistency. Press the mix into a plastic-lined mold (or over a rounded form) to about 1.5 inches thick. Cover loosely with plastic sheeting and cure for 48 hours, then unmold and continue curing in a shaded, damp spot for another two weeks before using. Hypertufa is porous, so it needs a coat of aquarium silicone on the interior basin before water contact. For step-by-step instructions on how to make a hypertufa bird bath, see the detailed guide that walks through mixing ratios, molding, curing, and sealing for bird-safe use.
The shape you choose affects bird behavior. A wide, shallow parabolic profile (wider than it is deep) gives birds more room to bathe side by side and creates that natural gentle slope that songbirds prefer. Aim for a finished interior depth of no more than 2 inches at the lowest point.
Finishing options: mosaic, glazing, sealing and how to pick one
You have three main finishing routes for a clay pot bird bath, and the right one depends on how much time you want to invest, your climate, and whether you prioritize looks or function.
Sealing only (fastest, most bird-safe)
Sealing the interior with aquarium-grade silicone is the baseline for any build and takes under an hour. For the exterior, you can apply a penetrating masonry sealer to slow weathering of the terracotta. This approach lets the natural terracotta color show, gives birds an excellent grip surface, and requires no special skills. It is also the easiest to redo when the sealant ages out, typically every two to three years.
Glazing
Applying a ceramic glaze gives a durable, water-resistant surface and opens up a huge range of colors. The critical rule is to use only modern, lead-free glazes on any surface that contacts water, and to fire them properly. If you do not have kiln access, use acrylic-based outdoor ceramic paint sealed with an exterior-grade, non-toxic topcoat on the pedestal only, and keep the basin interior unglazed or silicone-sealed. For step-by-step instructions on how to make a ceramic bird bath, see the linked guide for a full build walkthrough. A smooth glazed interior is actually harder for birds to grip than raw terracotta, so keep that in mind if you glaze the saucer.
Mosaic topping
Applying a mosaic to the top surface of the saucer or the exterior of the pedestal pots is the most decorative option. Use glass or ceramic tile pieces adhered with a modified thinset mortar rated for outdoor use. For grouting, an epoxy grout like SpectraLock is worth the extra cost in a wet outdoor application because it resists moisture intrusion and staining better than standard sanded grout. SPECTRALOCK PRO Premium Grout Product Datasheet (Laticrete) provides technical details, recommended applications, and cure-time and safety guidance for using epoxy grout in outdoor and wet installations. Be meticulous about following cure times: uncured epoxy grout is chemically hazardous, and putting a mosaic basin into bird service before the grout has fully cured is not worth the risk. Once cured, seal the grout lines with a penetrating grout sealer to slow algae and staining. The mosaic surface adds grip texture that birds actually appreciate.
| Finish Type | Best For | Skill Level | Approximate Extra Cost | Key Caution |
|---|---|---|---|---|
| Silicone seal only | Fastest, most functional build | Beginner | $0 to $8 (silicone tube) | Use aquarium-grade only; allow full cure time |
| Exterior glaze/paint | Color and weather resistance on pedestal | Beginner to intermediate | $10 to $25 | Keep lead-free glazes; do not glaze basin interior |
| Mosaic tile | Decorative, textured grip surface | Intermediate | $15 to $40 | Epoxy grout requires full cure before bird contact |
Adding heat and solar: components, installation, and winter tips
In climates where temperatures drop below freezing for extended stretches, a clay pot bird bath without a heat source will freeze solid within hours of a cold night. Frozen water is useless to birds in winter when liquid water is genuinely scarce. I add a deicer to mine every November and it is one of the most impactful things I do for winter bird welfare in my yard.
Electric birdbath deicers
A 50-watt submersible deicer is the simplest option. Most models have a built-in thermostat that only activates when air temperature approaches freezing, so they use minimal electricity the rest of the time. Drop it into the saucer, run the cord through the hole you drilled in the base pot, and plug into a GFCI outdoor outlet. Do not submerge the cord connection point. Do not use antifreeze of any kind in a bird bath: propylene glycol and ethylene glycol are both toxic to birds and other wildlife, even at low concentrations. The heated deicer is the correct safe solution.
Solar fountain pumps
A small solar pump (1 to 3 watts) placed in the saucer creates a gentle trickle or spray that does three useful things: it attracts birds through sound and movement, it slows mosquito breeding by keeping water in motion, and on borderline-frost nights, moving water resists freezing slightly longer than still water. The limitation is obvious: solar pumps stop working when it is cloudy or dark. They are best suited to the spring-through-fall season as a bird-attracting feature rather than a winter solution.
Combining heat and solar
I run a solar pump from April through October, then swap it out for an electric deicer from November through March. The two do not need to coexist. If you want moving water in winter and are comfortable with electrical wiring, a low-wattage submersible pump on a GFCI circuit will work alongside a deicer, but keep both components within a saucer that is large enough (at least 14 inches) so they are not crammed together.
Placement, depth, and attracting specific species
Where you put the bath matters as much as how you built it. Audubon recommends placing baths where birds have nearby cover at a flying height, meaning within 10 to 12 feet of a shrub or small tree that birds can retreat to quickly if a predator appears, but not so close that a cat can crouch underneath and ambush bathing birds. About 10 feet from a low shrub and in open sight lines on at least two sides is a good starting rule.
Depth configuration by target species:
| Target Species | Ideal Water Depth | Additional Tips |
|---|---|---|
| Small songbirds (sparrows, finches, chickadees) | 1 inch at edges, up to 1.5 inches center | Add a flat stone for a shallow perch at the basin edge |
| Robins, thrushes | 1.5 to 2.5 inches center | Tolerate slightly deeper water; still want a shallow entry slope |
| Crows, doves, starlings | Up to 3 to 4 inches center | Larger basin diameter (14 to 16 inches) accommodates them better |
| Hummingbirds | Under 0.5 inch surface | Requires a shallow saucer liner or mister/dripper add-on; moving water is essential |
For hummingbirds, the standard clay saucer is too deep on its own. Place a smaller, very shallow dish (1 to 2 inches diameter is fine) inside the larger saucer, or retrofit with a mister attachment that sprays a fine mist near a perching branch. Hummingbirds often fly through mist rather than bathing in standing water at all.
Shade versus sun is another practical placement question. Full sun heats the water quickly, encourages algae growth, and causes faster evaporation. Dappled shade or a spot that gets morning sun and afternoon shade is the sweet spot for water quality and bird comfort.
Cleaning, algae, and mosquito control
This is the part of bird bath ownership most people underestimate at first. A clay saucer in warm weather can develop algae and become a mosquito nursery faster than you expect. Cornell Lab's All About Birds guidance is to change the water at least every three days and to scrub when algae appears. In hot weather or direct sun, I do it more like every two days.
For routine cleaning, empty the saucer, scrub with a stiff brush and hot soapy water, rinse well, refill. For deeper sanitation, particularly after visible algae or during local disease outbreaks among wild bird populations, use a dilute bleach solution of 1 part household bleach to 9 parts water. Let it soak for 10 to 15 minutes, then rinse thoroughly multiple times and allow to air-dry before refilling. Wear gloves. This is the protocol backed by Cornell Lab, All About Birds, and multiple Cooperative Extension offices.
For mosquito control in the basin between water changes, Bacillus thuringiensis israelensis (Bti) products sold as Mosquito Dunks or Mosquito Bits are EPA-registered larvicides that target mosquito larvae specifically and are considered safe for birds, wildlife, and pets when used per label directions. Break off a small piece of a Mosquito Dunk and drop it in the saucer; it provides up to 30 days of residual activity depending on conditions. Do not use it as a substitute for regular water changes, but it is a useful backup for stretches when you know you will miss a change cycle. Never use chemical pesticides or any product not labeled for use in wildlife water features.
Troubleshooting common problems
The saucer is leaking
First, dry the saucer completely (a hair dryer on low speed helps). Identify the leak point by filling with a small amount of water and watching. Clean the area with isopropyl alcohol, allow to dry, then apply a fresh bead of aquarium silicone and allow to cure fully before testing again. If the crack runs through the full wall thickness and is longer than 2 inches, the saucer is better replaced than patched.
The pedestal is wobbly
Wobble usually comes from an uneven base surface rather than a problem with the pots themselves. Set the bottom pot on a flagstone or paving slab rather than soil, which compresses unevenly over time. If the pots are rocking against each other at their join, add a thin bead of silicone at the contact rim, press together, and let cure before loading with the saucer weight.
Stubborn staining or mineral buildup
Hard water mineral deposits (white or grey crust) on unglazed terracotta respond well to a soak in undiluted white vinegar for 30 to 60 minutes followed by scrubbing. Rinse thoroughly before returning the basin to service. Green algae staining on the exterior of the pots is normal weathering and is harmless; many gardeners actually prefer the aged look. If you want to slow it, apply a penetrating masonry sealer to the exterior annually.
No birds are using it
Give it at least a week. If nothing is visiting after 10 days, check these factors: Is it too exposed with no nearby cover? Is the water too deep (add a stone perch)? Is it near a high-traffic human area? Is the water staying clean? Adding a solar dripper to create movement and sound is the single most reliable way to draw in birds who have not yet found a new bath.
Clay pot vs. other DIY bird bath methods: a quick comparison
Clay pot builds are not the only option, and knowing where they sit relative to alternatives helps you decide if this is the right project for your situation.
| Method | Cost Range | Durability | Difficulty | Best Suited For |
|---|---|---|---|---|
| Clay pot (this guide) | $15 to $60 | Moderate (terracotta cracks in hard freezes) | Beginner | Budget builds, quick projects, renters, those wanting a natural look |
| Ceramic bird bath (from mold or wheel-thrown) | $20 to $80+ | High if properly fired | Intermediate to advanced | Those with kiln access wanting a custom, durable finish |
| Brick bird bath | $30 to $80 | Very high | Intermediate | Permanent garden installations; needs mortar work |
| Hypertufa bird bath | $15 to $40 | Good (improves with age) | Beginner to intermediate | Natural/rock-garden aesthetics; heavier and frost-resistant |
| Mosaic bird bath | $25 to $80 | High if properly grouted | Intermediate | Decorative focus; can be applied over clay pot base |
The clay pot method wins on speed, cost, and accessibility. The main trade-off is freeze-thaw durability: unglazed terracotta absorbs water and can crack in repeated hard freeze cycles. In climates with harsh winters, either bring the saucer indoors between November and March or accept that you may replace it every few years. A hypertufa or brick build lasts longer outdoors year-round with less seasonal management, but neither can be done in an afternoon at a garden center cost. If you are interested in the ceramic or mosaic routes, those are worth exploring as separate projects that can be layered on top of this basic clay pot foundation.
Keeping it going: a seasonal maintenance rhythm
Spring through summer is the high-maintenance season. Water changes every two to three days, weekly scrubbing, and monthly bleach sanitation are the baseline. Watch for algae and mosquito larvae actively. If you are running a solar pump, check that the panel is clean and getting direct sun.
Fall is prep time. Clean the saucer thoroughly in early fall before temperatures drop. Inspect all silicone seams and reapply if they are pulling away from the terracotta. Install your deicer before the first frost, not during it. If you are in a climate with sustained hard freezes and have chosen not to add a deicer, bring the saucer indoors and store it dry.
Winter with a deicer: keep the water topped up (evaporation slows but continues), and clean monthly even in cold weather. Bird disease transmission around feeders and baths does not stop in winter. Spring restart: full bleach sanitation, seam inspection, swap the deicer for the solar pump, and you are ready for the season.
FAQ
What high‑level project components must the article include to be publication‑ready?
Concise project overview and expected finished result; clear safety notes and disclaimers; full materials and tools list (with branded examples and safety data references); step‑by‑step numbered assembly with photo/diagram suggestions and required measurements; finishing options and how/when to use them; placement and species‑specific guidance (depths, perches, hummingbirds, crows); routine cleaning, algae/mosquito control and winter care (including heated/solar options); troubleshooting and maintenance; short comparisons to alternative builds (ceramic, brick, hypertufa) and decision criteria; estimated time and cost ranges; and a list of authoritative sources, product labels, SDS/PDS links and further reading.
What authoritative specifications for water depth, slope and basin size should you cite and include?
Provide RSPB/Audubon/Cornell guidance: shallow, gently sloping bath with ~1 inch (≈2.5 cm) at the edge and generally 1–2 inches (≈2.5–5 cm) across most of basin; allow up to ~4 inches (≈10 cm) only for larger species but maintain shallow margins for small songbirds. Cite RSPB, Audubon and Cornell All About Birds for these numbers and rationale (attraction and safety).
Which cleaning, sanitizing and schedule recommendations must be referenced?
Recommend scrubbing with hot soapy water and sanitizing with a dilute bleach solution (commonly 1 part household bleach:9 parts water ≈10% bleach) for ~10 minutes, then thorough rinsing and air drying; clean at least weekly and every 2–3 days in warm weather or when algae appears. Cite Cornell Lab/All About Birds and Cooperative Extension guidance (e.g., University Extension bulletins) for protocols and frequencies.
What mosquito‑control options and authoritative sources should be provided?
Describe EPA‑recommended larvicides (Bti) for small standing water containers, product examples (Mosquito Dunks/Bits containing Bti), label usage/intervals and safety notes (follow product label). Cite CDC larvicide guidance and a representative Mosquito Dunks product label and EPA regulatory materials on Bti safety.
Which sealants/adhesives can you recommend and what product documentation must be referenced?
List aquarium‑grade 100% silicone (sold as aquarium silicone) for waterproofing terracotta interiors once fully cured (cite manufacturer product page/SDS); list epoxy resins/tile epoxies or food‑contact‑tested epoxies only when a product explicitly documents food‑contact compliance (cite ArtResin or equivalent); include epoxy grout and modified thinset for mosaics with manufacturer PDS/SDS and cure‑time notes (cite Laticrete/Sika datasheets). Emphasize following cure times and SDS precautions (uncured materials hazardous).
What information about pottery glazes and toxicology must be included?
Warn that some decorative/unknown/antique glazes can leach lead or cadmium; recommend using plain ungrazed terracotta or commercially fired, labeled‑lead‑free glazes or sealing interior surfaces with approved, fully cured products. Cite FDA guidance on lead‑glazed traditional pottery and recommend testing/avoiding unknown glazed pots.