
You can build a solid, long-lasting brick bird bath in a single weekend using standard clay bricks, a preformed basin or mortar-set concrete bowl, and basic masonry tools. Stack the bricks into a pedestal roughly 24–30 inches tall, set a shallow basin (18–24 inches wide, no deeper than 2 inches at center) on top, seal everything with a bird-safe masonry sealer, and you have a water feature that will outlast almost any store-bought option.
How to Make a Brick Bird Bath: Step-by-Step Plans, Materials & Care

Marcus Henley
14 Jul 2026
What you're building: project overview
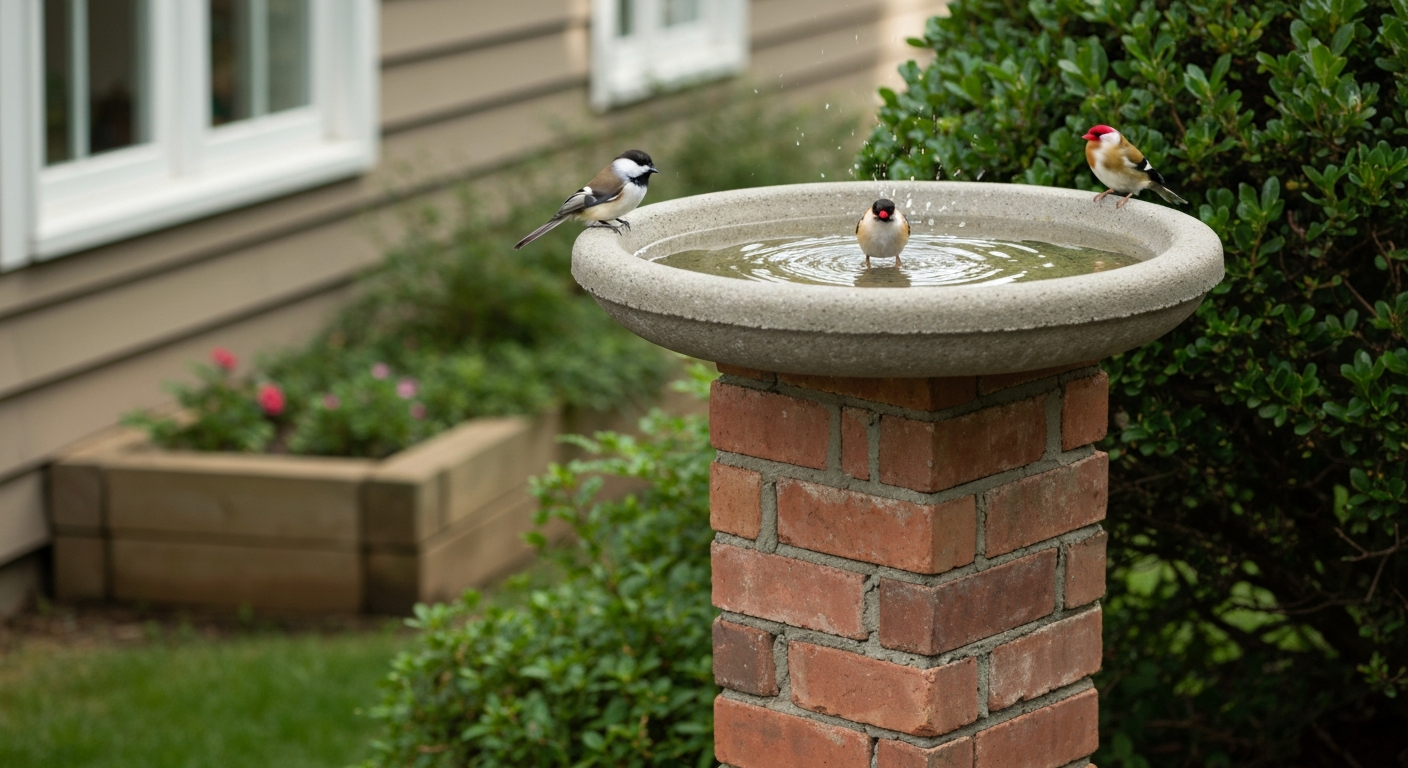
The classic brick bird bath is a hollow or solid brick pedestal topped with a shallow basin. The pedestal gives birds a clear sightline and keeps cats and other ground predators at a distance. The result looks formal but earthy, blends into most garden styles, and gains character as it weathers. Skill-wise, this is a beginner-to-intermediate masonry project. You don't need prior bricklaying experience, but you do need patience for leveling each course and letting mortar cure before adding weight.
- Compact design (12–14 in square pedestal, 18–24 in basin): fits a small patio corner or raised bed border
- Standard height (24–30 in pedestal): the most versatile option, puts the basin at a comfortable viewing and drinking height for most songbirds
- Tall statement version (36 in pedestal): suits formal gardens, requires a wider footing and more bricks
- Low ground-level ring (3–4 courses of brick as a surround): suits ground-feeding species like robins and doves, easiest build of all
For a first build, I'd aim for the standard 24–28 inch height with an 18-inch preformed basin. It's stable, bird-friendly in depth, and the whole pedestal takes about 40–50 standard bricks.
Everything you need: materials list
Bricks
Use standard modular clay bricks rated for exterior, freeze-thaw exposure. In the US, look for bricks meeting ASTM C62 Grade SW (Severe Weathering) if you live anywhere with freezing winters. ASTM classifies building brick and includes freeze–thaw/frost‑resistance criteria (see ASTM C62 for clay building brick and ASTM C67 test methods for sampling and freeze–thaw testing); bricks are graded by resistance to freezing when wet and by absorption characteristics ASTM C62 Standard Specification for Building Brick (Solid Masonry Units Made from Clay or Shale) — ASTM. Each standard brick weighs roughly 4–5 pounds. For a 24-inch hollow pedestal, budget 45–55 bricks. A solid pedestal uses more, around 70–80, but offers better stability for a heavy basin.
Basin options
- Preformed ceramic or resin bowl (18 in diameter, 1.5–2 in center depth): easiest option, drop it on top of the pedestal, done. Sunnydaze and similar brands sell ceramic bowls in this size range for $20–40.
- Concrete mixing tray (round, 18–20 in): inexpensive, rough-surfaced, birds love the texture. Seal it before use.
- Mortar-set concrete basin: mix your own using a mold (see the related guide on how to make a bird bath mold for details on casting your own shallow bowl), gives the most integrated look.
- Repurposed saucer or dish: large terracotta pot saucer (14–19 in) works well and costs under $10, especially useful for low ground-level ring builds.
Mortar, sealant, and finishing materials
- Type S or Type N mortar mix: Type S (approx. 1,800 psi compressive strength) is best for exterior, frost-exposed masonry. Type N (approx. 750 psi) works in mild climates and is more forgiving to work with for beginners.
- Bird-safe masonry sealer: look for a penetrating silane/siloxane sealer or a water-based acrylic pond sealer rated non-toxic when cured. Avoid oil-based products or anything containing lead compounds.
- Gravel (pea gravel or crushed stone): 2–4 inches for drainage bed under footing
- Concrete mix (optional): for a poured footing pad, one 60 lb bag covers roughly a 12 x 12 x 4 in pad
- Flat pea gravel or small stones: for placing inside the basin as footholds
- Sand: for leveling the base and mixing into mortar if using dry ingredients
Tools you'll need (and a few that just make life easier)
| Tool | What it's for | Essential or Optional |
|---|---|---|
| Brick trowel (pointing and laying) | Spreading and shaping mortar beds | Essential |
| 4-foot level | Keeping each course plumb and flat | Essential |
| Rubber mallet | Tapping bricks into position without cracking them | Essential |
| Tape measure | Checking course heights and basin alignment | Essential |
| Bucket and margin trowel | Mixing and transferring mortar | Essential |
| Safety glasses | Mortar and brick dust protection | Essential |
| Work gloves | Protecting hands from mortar alkalinity and abrasion | Essential |
| Wet tile/brick saw or angle grinder with masonry blade | Cutting half-bricks for bond pattern and top course | Optional but helpful |
| Drill with masonry bit | Drilling drainage hole in preformed basin or base | Optional |
| String line and line pins | Keeping courses level across longer runs | Optional |
| Jointing tool or bent nail | Finishing mortar joints for a clean look | Optional |
| Knee pads | Comfort during low-level work | Optional |
Time, cost, and planning checklist
A standard 24-inch pedestal with a preformed basin is realistically a two-day project: half a day for site prep and footing, a few hours on day one for laying brick, and then you must wait 24–48 hours for mortar to cure before adding the basin or applying sealer. Add another half day for sealing and setup.
| Phase | Estimated Time | Budget Range (USD) |
|---|---|---|
| Site prep and footing/base | 2–4 hours | $10–30 (gravel, concrete mix) |
| Brick laying (pedestal) | 3–5 hours | $30–60 (bricks, mortar) |
| Mortar cure | 24–48 hours (passive) | $0 |
| Sealing basin and brickwork | 1–2 hours | $15–25 (sealer) |
| Basin installation and finishing | 1 hour | $20–40 (preformed basin) |
| Total project | ~1.5–2 days active work | $75–155 for standard build |
If you cast your own concrete basin, add another half day and $10–15 in materials, but you'll get a more custom look and a better texture for birds. Going with a premium ceramic bowl or full poured-concrete base pushes costs toward $200 but gives you a more finished result.
Planning checklist
- Confirm your local frost depth (check your county building department or USDA zone map) and decide if you need a below-frost footing
- Check whether a small masonry garden structure needs a permit in your jurisdiction (most don't, but it's worth a quick call for anything over 30 in tall)
- Choose your basin before you lay bricks so you can size the top course to match
- Buy SW-grade (severe weathering) bricks if you get freezing winters
- Order 10% extra bricks to allow for cuts and breakage
- Have mortar mixed and all tools ready before you start laying — mortar has a working time of roughly 60–90 minutes
Picking the right spot
Placement makes or breaks how much use a bird bath gets. The ideal spot is in partial shade (2–4 hours of direct sun is fine, full all-day sun promotes algae and heats the water uncomfortably fast), within 10–15 feet of shrubs or trees so birds have a quick escape route from hawks or cats, but not directly under branches where debris drops into the water constantly. I've moved bird baths more than once after realizing the birds weren't using them, and shade-versus-sun exposure was the culprit both times.
- Visibility: place it where you can see it from a window — you'll be more motivated to keep it clean
- Predator safety: keep the base at least 5–6 feet from dense low shrubs where cats can hide; the elevated pedestal already helps
- Proximity to cover: shrubs or a small tree within 10–15 feet give birds a perch to dry off and escape to
- Avoid parking it under a sprinkler head — constant overspray dilutes any algae treatment and keeps bricks perpetually wet
- On sloped ground, always build a level pad first — a tilted pedestal puts uneven stress on the mortar joints
- In hot, dry climates (zone 8 and above): prioritize afternoon shade to reduce evaporation and algae
- In cold climates (zone 5 and below): choose a spot with some winter sun exposure to help if you add a de-icer
Getting sizing and dimensions right
The Cornell Lab of Ornithology is clear on depth: edges should be no deeper than 1 inch, sloping gradually to a maximum of about 2 inches at center. The RSPB recommends a basin at least 30 cm (12 in) across, but 18–24 inches is even better because it lets multiple birds bathe at different depths simultaneously. I'd call 18–20 inches the practical sweet spot for most backyards.
| Dimension | Recommended Range | Notes |
|---|---|---|
| Basin diameter | 18–24 in (45–60 cm) | Wider basins attract more species at once |
| Basin depth at rim | 0.5–1 in (12–25 mm) | Shallow entry lets small birds wade safely |
| Basin depth at center | 1.5–2 in (38–50 mm) | Maximum 2 in to keep all birds safe |
| Pedestal height | 24–30 in (60–75 cm) | Keeps water visible and deters ground predators |
| Pedestal footprint | 10–14 in square (25–36 cm) | Wider base = more stability; match to brick dimensions |
| Top course inner opening | 14–18 in (36–46 cm) | Sized to cradle your chosen basin snugly |
Place a few flat stones or a handful of pea gravel in the center of the basin to give very small birds like chickadees and wrens a secure foothold. Rough or unglazed surfaces are far better than smooth glazed ones because birds can grip them. If you're using a smooth ceramic bowl, spread a thin layer of coarse sand on the bottom before filling.
Foundation and base options
A 24-inch hollow brick pedestal with a full ceramic basin weighs roughly 60–90 pounds. That's not massive, but it's enough to sink into soft soil over a season, especially after rain. A proper base prevents settling and keeps your mortar joints from cracking. In frost-prone areas, the International Residential Code calls for footings to extend below the local frost line, which might be 12 inches in the mid-Atlantic but 48 inches or more in Minnesota. For a small garden ornament rather than a structural wall, most inspectors won't require a permitted footing, but getting below frost depth is still good practice to prevent heaving.
Option 1: Gravel drainage pad (simplest)
Dig out a 16 x 16 inch area about 6 inches deep. Fill with compacted pea gravel or crushed stone, level it off, and lay your first course of bricks directly on the gravel. The gravel drains freely, reducing frost heave risk by keeping water away from the base. This works well in zones 6 and warmer. It's the fastest option and fully reversible.
Option 2: Poured concrete pad (most durable)
For cold climates or a pedestal you plan to mortar fully, pour a concrete pad at least 6 inches thick over 2–3 inches of gravel. A 16 x 16 inch pad uses about one 60-pound bag of fast-setting concrete. In areas with a deep frost line, extend the pad depth below frost or pour a thicker footing (the HUD minimum guideline for small pedestals is 6 inches thick, but go deeper in frost-heavy zones). Let the pad cure for at least 24 hours before starting brickwork.
Option 3: Paver base
If you already have a patio, you can mortar the first brick course directly to existing pavers, as long as they're level and solid. Chip up any loose or uneven pavers first. This is convenient but ties your bird bath to the patio permanently, so think it through before mortaring.
Leveling matters more than you think
Check for level in both directions before laying your first brick. Even a 1/4-inch difference at the base amplifies to a noticeable lean by the time you reach the top course. Use a 4-foot level on the pad and shim with mortar as needed. Every 3–4 courses, set the level across the top surface again and correct before the mortar sets.
Step-by-step build instructions
Step 1: Lay out your pattern dry first
Before mixing any mortar, stack a few courses of brick dry (no mortar) to confirm your dimensions and the opening size at the top matches your basin. Use a running (stretcher) bond pattern, each brick overlaps the joint below by half a brick length. Wienerberger notes that running (stretcher) and English/Flemish bonds give good structural interlock, while stack bond (vertically aligned joints) provides less lateral strength and should be reinforced for load‑bearing walls A Guide to Brick Bonding Patterns — Wienerberger (manufacturer technical guide). This is the standard for structural integrity and avoids a stack bond (vertically aligned joints), which provides almost no lateral resistance. Adjust your layout now while it's easy.
Step 2: Mix mortar
For most climates and this application, Type S mortar is the right call. It handles frost exposure better than Type N and bonds well to clay brick. Mix to a peanut butter consistency, stiff enough to hold a thumbprint but not crumbly. A standard 60-pound bag yields enough mortar for about 25–30 bricks. Mix small batches; mortar starts to stiffen after 60–90 minutes.
Step 3: Lay the first course
Spread a 3/8-inch mortar bed on your pad or base. Set each brick firmly, tap level with the rubber mallet, and butter the vertical joint (head joint) of each subsequent brick before placing. Check level and plumb constantly. The first course is your reference for everything above it, don't rush it.
Step 4: Build up the pedestal courses
Continue laying courses in running bond, keeping mortar joints at a consistent 3/8 inch. A hollow rectangular or square ring is the standard approach: four bricks per course forming a frame, with the center open. This saves material, reduces weight, and still provides plenty of stability for a basin. Stagger the bond at corners so bricks from alternating courses interlock. Stop to check plumb every 3 courses. If a course gets off-level, add a slightly thicker mortar bed on the low side to correct it gradually.
Step 5: The top course
The top course cradles the basin, so its inner dimensions need to match your bowl's outer diameter. If you're using an 18-inch preformed bowl, the inner opening of the top course should be about 17–18 inches so the basin sits securely without wobbling. Lay the top course in mortar and let it cure fully (at least 24 hours) before setting the basin on top. You can optionally bed the basin in a thin ring of mortar for a permanent installation, or leave it dry-set so you can remove it for cleaning, I strongly recommend the removable option.
Step 6: Dry-stack alternative
You can build the pedestal without mortar (dry-stacked) for a fully reversible, no-mess project. Dry-stacking works reasonably well for a low, compact pedestal (under 20 inches tall) with a lightweight basin. The tradeoff is reduced lateral stability and susceptibility to frost heave pushing courses apart. If you go dry-stack, keep the pedestal short, use a rubber mat between the top course and basin to prevent rocking, and expect to re-level periodically. Dry-stacked brick is not suitable for pedestal heights over about 24 inches without some form of reinforcement or adhesive.
Step 7: Pointing and finishing joints
While mortar is still slightly soft (a few hours after laying, but before it fully hardens), run a jointing tool or the end of a bent nail along the joints to compress and shape them. This closes any hairline gaps that let water in, which matters a lot for freeze-thaw durability. Brush off any mortar smears with a stiff brush before they fully cure.
Step 8: Cure, then seal
Wait at least 48–72 hours after the final course before sealing. Apply a penetrating silane/siloxane water repellent to the exterior brickwork, this reduces water absorption dramatically and is the single best thing you can do for freeze-thaw longevity. For the basin, use a dedicated pond or water-feature sealant that is certified non-toxic when cured. Apply two coats, let it cure for the manufacturer's recommended time (usually 48–72 hours), then rinse the basin thoroughly before filling. Cornell Lab and Audubon both caution against any chemical additives that could leach into bird drinking water, so don't skip the curing period or use sealers with unknown chemical profiles.
Mortar vs. dry-stack: which is right for you?
| Factor | Mortared Build | Dry-Stack Build |
|---|---|---|
| Structural strength | High — resists wind and impact | Low to moderate — easily disturbed |
| Freeze-thaw durability | Excellent with SW-grade brick and sealed joints | Moderate — joints can shift with frost heave |
| Build difficulty | Moderate — mortar mixing and timing required | Easy — no mixing, fully reversible |
| Permanence | Permanent (hard to move) | Fully removable and reconfigurable |
| Recommended height | Up to 36 in or more | Keep under 20 in for safety |
| Best for | Long-term garden feature in any climate | Seasonal use, renters, low-risk sites |
My recommendation: if you want something that lasts 20 years without maintenance headaches, mortar it with Type S mortar and seal the joints. If you're experimenting with placement or building in a climate where you'll want to bring the bath indoors in winter, dry-stack is perfectly valid for a low pedestal.
Making it bird-friendly: perches, depth, and drippers
A bird bath is only as good as its usability. The Washington Department of Fish and Wildlife recommends rough, textured basin surfaces so birds don't slip, with shallow sloping entry at the rim (half an inch to 1 inch deep) and a rough or pebbled foothold. After filling your basin, drop in 4–6 flat pebbles or a handful of pea gravel near the center to give small birds like chickadees, wrens, and goldfinches something to stand on. For robins and larger birds, the unobstructed shallow rim is usually enough.
- Add a dripper or mister: moving water is far more attractive to birds than still water and dramatically increases traffic. A simple solar-powered fountain pump costs $15–25 and runs with no wiring.
- Place a flat branch or small dowel near the basin rim as a perch for birds waiting their turn.
- Keep the water level consistent — top it off daily in hot weather. Don't let it drop more than half an inch below the rim edge.
- Never add antifreeze, bleach above trace amounts, or any chemical additive to bird bath water. These are acutely toxic to birds.
- If attracting hummingbirds is a goal, a fine misting attachment near the bird bath is far more effective than a standard open basin — hummingbirds prefer misting to immersion bathing.
Cleaning schedule and maintenance
The biggest maintenance issue with any bird bath is algae, and algae is primarily a function of sun exposure, standing water, and infrequent cleaning. With a brick bird bath, you also need to keep an eye on mortar joint integrity and efflorescence (white mineral deposits on the brick face, which are harmless but worth brushing off periodically).
| Task | Frequency | Method |
|---|---|---|
| Empty and rinse basin | Every 2–3 days (summer) | Dump water, scrub with a stiff brush, refill |
| Deep clean with dilute bleach | Weekly in warm weather | 1 part bleach to 9 parts water, scrub, rinse thoroughly |
| Check and clean dripper/pump | Weekly | Clear debris from intake, check flow rate |
| Inspect mortar joints | Each spring | Look for cracks, spalling, or loose mortar; repoint as needed |
| Reapply brick sealer | Every 2–3 years | Clean brick surface, apply penetrating sealer |
| Clean basin sealer | Annually | Inspect for peeling or crazing; recoat if needed |
| Brush off efflorescence | As needed | Stiff dry brush, then dilute white vinegar if stubborn |
For algae control, the most effective approach is shade plus frequent water changes rather than chemical treatment. If algae is persistent, a small amount of barley straw extract (sold for garden ponds) is considered low-risk for birds and suppresses algae growth. I've used it in my own baths with good results, though I still change the water every 2–3 days in August regardless.
Mosquito prevention
Mosquitoes need standing water for at least 7 days to complete their larval cycle. Change the water every 2–3 days and you eliminate the problem entirely without chemicals. A dripper or fountain pump also disrupts the still surface mosquitoes require. If you miss a few days and see larvae, Bacillus thuringiensis israelensis (Bti) dunks are bird-safe and highly effective, drop a small piece of a dunk in and it kills larvae without harming birds, beneficial insects, or pets.
Fixing leaks and repointing joints
If your basin develops a hairline crack or the sealant fails, empty it, let it dry completely (at least 48 hours), and apply a hydraulic cement or epoxy-based water-feature patching compound to the crack before resealing. For mortar joint repairs, use a cold chisel and hammer to cut out deteriorated mortar to a depth of at least 3/4 inch, brush out dust, dampen the joint, and pack in fresh Type S mortar. Don't just smear new mortar over old, it won't bond and will pop off within a season.
Winterizing your brick bird bath
This is where a lot of brick bird baths fail prematurely. Water trapped in mortar joints or a porous basin expands when it freezes and literally breaks the structure apart. Here's how to handle it by climate.
Mild climates (zone 7 and warmer, rare hard freezes)
Keep the bath running year-round. Top up the water regularly and add a small submersible de-icer ($20–40) rated for bird baths if temperatures dip below freezing for a night or two. Remove the basin during any hard freeze warning, or at minimum empty it so it can't hold water while frozen.
Cold climates (zone 6 and colder, regular hard freezes)
You have two real options: winterize or keep it running with a heater. To winterize, remove the basin in October and store it somewhere above freezing, then cover the pedestal top with a piece of board or tarp weighted down to prevent water pooling in the hollow core. To keep it running, use a thermostatically controlled bird bath heater or a heated bird bath basin (typically 50–150 watts) that maintains water above freezing without overheating. Solar de-icers work in zones 7–8 but typically don't have enough output for sustained hard freezes in zones 5 and colder. Never pour boiling water into a frozen ceramic basin to thaw it, the thermal shock will crack it.
One critical note: never add antifreeze (ethylene glycol or propylene glycol) to the water. Both are toxic to birds. The only safe approach is a thermostatically controlled heater or regular water changes on warm days.
Safety, weight, and local code considerations
A fully mortared brick pedestal with a concrete basin can weigh 80–120 pounds. That's enough to sink into soft clay soil or tip on unstable pavers if not properly based. Always build on a level, compacted base. If you're placing the bath on a deck or raised platform, confirm the deck's load rating (typical residential decks are designed for 40–60 pounds per square foot, so the weight itself is usually fine, but check that decking boards and joists are sound). For tall pedestals (over 30 inches), consider drilling a central rebar pin through the pedestal core and into a concrete footing for added stability against accidental impact.
Most municipalities don't require permits for garden ornaments under 30 inches, but if you're pouring a concrete footing larger than 2 square feet, some jurisdictions want notification. It's a quick phone call to your local building department to confirm. Also use lead-free materials throughout, some old or imported decorative bricks contain lead pigments, and any chemical leaching into bird drinking water is a concern.
Sustainable materials and sourcing
Reclaimed bricks from demolition salvage yards are an excellent option, they're typically cheaper than new bricks, have a weathered look that fits naturally into a garden, and represent a genuine reduction in material waste. Just inspect them carefully: avoid bricks with heavy spalling, deep cracks, or powdery surfaces, which indicate they've already been damaged by freeze-thaw cycles. If you're in a cold climate, test an unknown reclaimed brick by soaking it in water for 24 hours and checking the absorption rate, low-absorption SW-grade equivalents will absorb less than 17% of their dry weight.
Other DIY bird bath styles worth considering
Brick is just one approach. If you like the hands-on project aspect but want something lighter or more decorative, a hypertufa bird bath uses a mix of Portland cement, perlite, and peat to create a lightweight, porous, ultra-naturalistic bowl that's much easier to cast and move around. Clay pot bird baths are another beginner-friendly option using stacked terracotta pots as a pedestal with a large saucer as the basin, quick, cheap, and easily seasonal. For step-by-step clay pot bird bath instructions, follow a dedicated how-to that walks through pot selection, stacking, and saucer installation. For step-by-step instructions, see how to make a bird bath out of clay pots (reference ID 7f506d83-7c16-4b61-9bc0-2137a01e7b38). For something more artistic, a mosaic bird bath lets you embed tile or glass into a cast concrete basin for a colorful, personalized finish. And if you want to cast your own concrete basin in any shape, a dedicated guide on how to make a bird bath mold walks through the casting process in detail. See the guide how to make a bird bath mold for step-by-step casting instructions. For step-by-step instructions on shaping, firing, and glazing a safe basin, see our guide on how to make a ceramic bird bath. Each approach has its own weight, durability, and aesthetic tradeoffs, so the right choice depends on your climate, how permanent you want the feature, and how much time you want to invest.
FAQ
Search‑oriented title and meta description
Title: How to Make a Brick Bird Bath — Planning, Building & Long‑Term Care Meta description: Durable, bird‑friendly brick bird bath: step‑by‑step build, basin options, placement, maintenance & winter tips (≤160 chars).
Complete materials list (quantities for a typical 20 in / 50 cm bowl, single pedestal)
Bricks: ~40–60 standard modular clay bricks (estimate depends on pedestal style and basin ledge). Concrete block (optional) or 2–3 60‑lb bags of concrete for footing/pedestal core. Mortar mix: 1–2 60‑lb bags (Type N for most above‑grade). Sand for mortar (if mixing). Preformed basin: 18–24 in (45–60 cm) bird‑bath bowl (ceramic/resin/concrete) or materials to form a basin (concrete or hypertufa). Gravel/pebbles: small bag for perches. Water‑seal (breathable, masonry exterior sealer) if sealing basin/ledge. Exterior‑grade adhesive (masonry) or silicone (bird‑safe). Steel reinforcement (rebar/mesh) if building heavy pedestal. Drainage gravel for footing. Optional: heated/solar de‑icer, dripper/mister kit, small pump for recirculating features.
Tools table (essential and optional)
Essential: trowel, brick hammer/chisel, level (4 ft), mason's line & stakes, tape measure, wheelbarrow/mixing tub, mortarboard or mixing bucket, jointer/pointing tool, rubber mallet, shovel, gloves, safety glasses. Optional: masonry saw or angle grinder with diamond blade, posthole shovel or auger (for deep footings), small concrete mixer, drill with paddle mixer, masonry brush for cleaning, caulking gun (for silicone), wheel dolly for moving basin.
Step‑by‑step build instructions — overview and planning
1) Choose site: level, near cover (shrubs/trees within 10–30 ft), visible from window, away from feeders (to reduce disease spread). 2) Select basin and size: aim 18–24 in (45–60 cm) diameter; rim depth ½–1 in (12–25 mm) sloping to 1–2 in (25–50 mm) center per Cornell/RSPB. 3) Decide pedestal type: solid mortared brick, concrete block core with brick veneer, or dry‑stack (anchored) for portability. 4) Calculate materials and check local frost depth and load restrictions.
Foundations and footing instructions
Dig/prepare a footing/pad sized at least 12 in (305 mm) wide by 6 in (152 mm) thick for small pedestals; for frost areas extend below local frost line per local code. Compact subgrade, add 2–3 in gravel bed, form and pour concrete pad or install a concrete pier. Use steel reinforcement or anchor bolts if planning a heavy basin or pump. Let concrete cure 48–72 hours before building above.
Laying brick (mortared) — patterns and tips
Use a running (stretcher) bond or English bond for strength; avoid stack bond for freestanding pedestal without reinforcement. Mix mortar to plastic consistency per manufacturer. Butter bricks with mortar, check level every course, use mason's line for straightness. Provide through‑ties or rebar dowels if tying veneer to concrete core. Tool joints for weather resistance and neat appearance. Keep joints ~3/8 in unless local style differs.