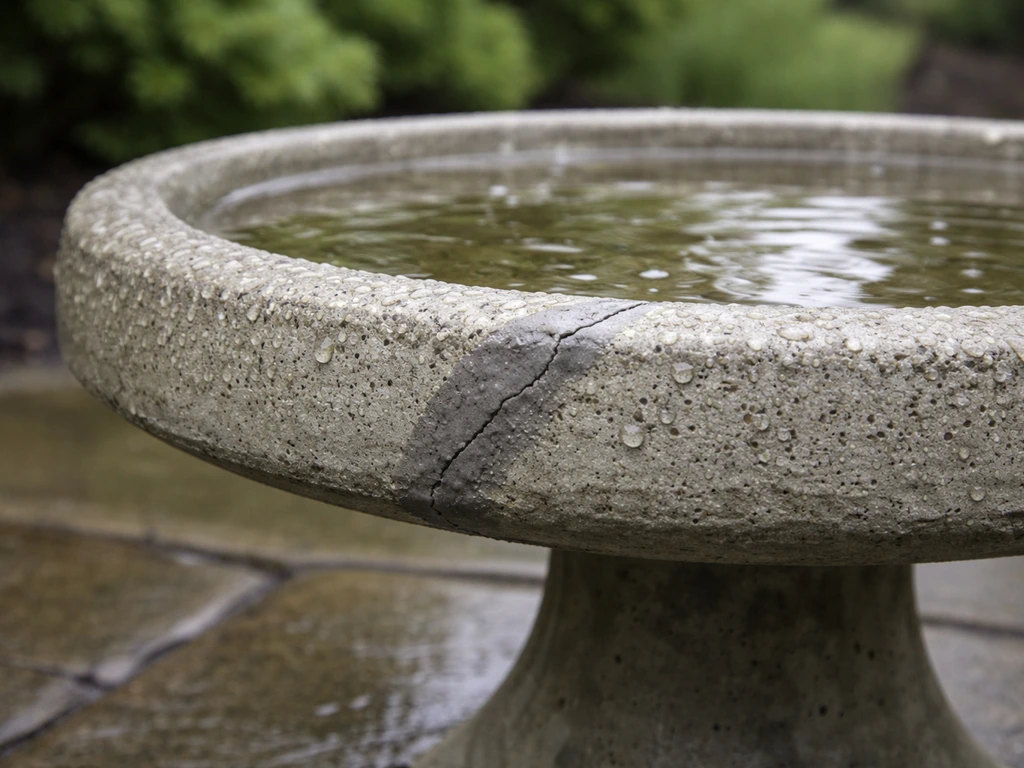
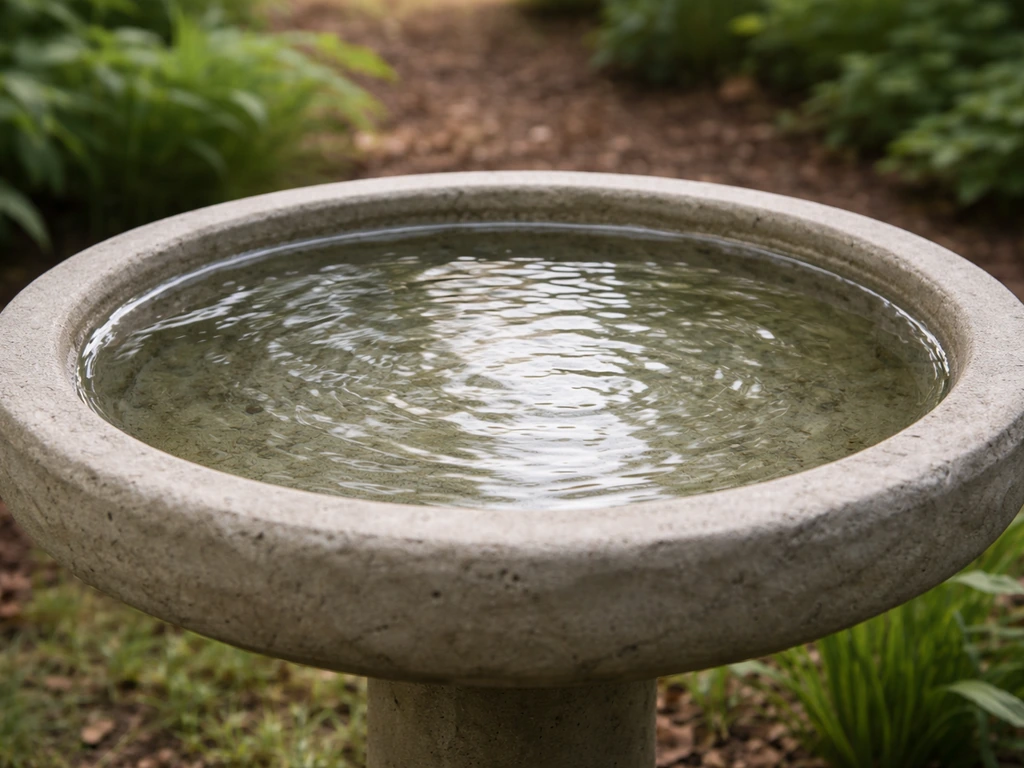
For a concrete bird bath, a two-part exterior epoxy is the best glue you can use, full stop. It bonds to concrete, handles constant wetting and drying, and survives freeze-thaw cycles that will destroy regular adhesives within a season. For ceramic bird baths, the same exterior epoxy works great, but you have a few more options depending on whether you're reattaching a broken piece or filling a crack. The key is not just picking the right product, it's prepping the surface correctly. Skip that step and even the best epoxy will pop loose in three months.
Best Glue for Concrete Bird Bath Repairs That Last

Marcus Henley
21 May 2026
Why regular glue fails on a bird bath
A bird bath is one of the harshest environments you can put an adhesive in. It's outdoors year-round, constantly wet, constantly drying out, baking in UV, and if you're in a cold climate, going through hard freeze-thaw cycles every winter. Standard white PVA glue, hot glue, and even most "waterproof" craft adhesives weren't designed for any of this. They absorb moisture, soften, and let go. Even construction-grade silicone can peel away from concrete over time because it never truly bonds to the substrate, it just sits on top.
Freeze-thaw stress is the real killer. Water that gets into a weak bond expands when it freezes, and that expansion pries the joint apart. ASTM C666 is the industry standard for testing how materials hold up through rapid freeze-thaw cycling, and it's a good mental benchmark: any adhesive you use needs to pass that kind of punishment repeatedly, season after season. That's why structural epoxies built for concrete repair outperform everything else in this application. They're rigid, dense, and don't let water infiltrate the bond line in the first place.
Choosing your glue based on bird bath material
Concrete and ceramic bird baths have different repair needs, so it's worth thinking through what you're actually bonding before you buy anything.
Concrete bird baths
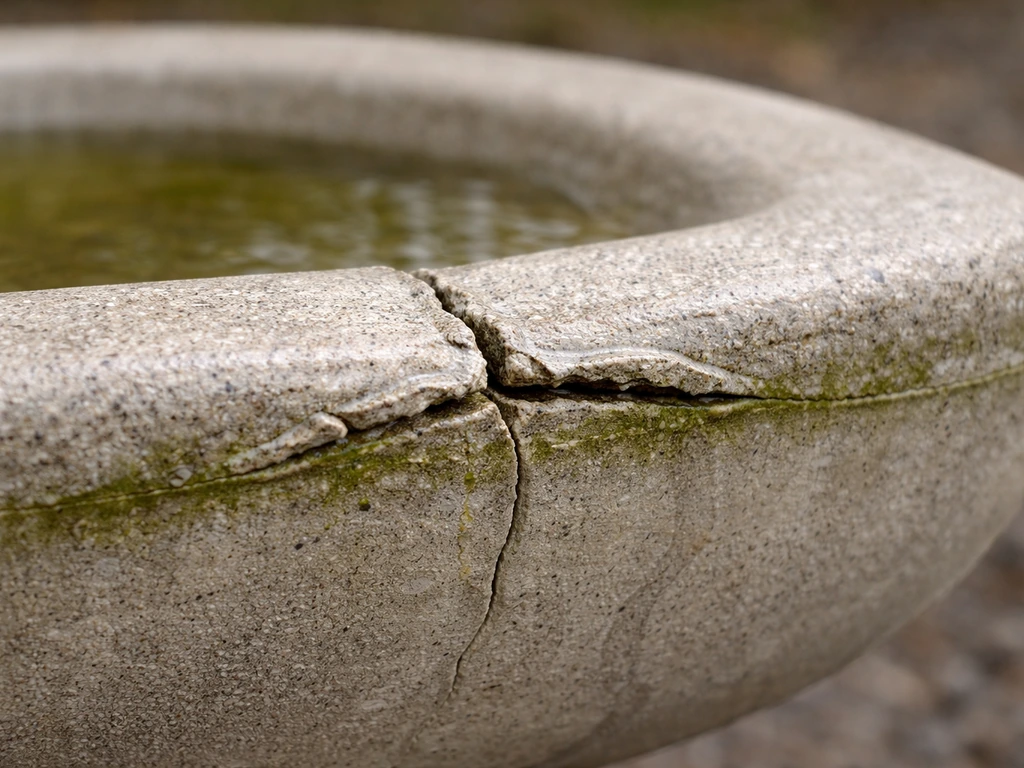
Concrete is porous and rough, which is actually a plus for bonding, epoxy penetrates into those pores and mechanically locks in. The challenge is that concrete is also heavy, so any bond holding a pedestal base together or reattaching a large broken chunk needs genuine structural strength, not just surface adhesion. For cracks, you want a low-viscosity epoxy that flows into the void. For broken pieces or missing sections, you want an epoxy putty or mortar-style product that you can shape and press into place.
Ceramic bird baths
Ceramic is non-porous and smooth, so the adhesive has less surface to grip. This means surface preparation matters even more. Epoxy still wins here, but you can also get good results with a high-quality exterior construction adhesive for reattaching large pieces where clamping is practical. What you're trying to avoid is any flexibility in the bond, ceramic doesn't flex, so a flexible adhesive creates a mismatch that tends to creep and eventually fail under thermal expansion and contraction.
| Bird Bath Material | Repair Type | Best Adhesive Choice | Key Requirement |
|---|---|---|---|
| Concrete | Crack filling | Low-viscosity 2-part epoxy (e.g., Sikadur Crack Fix) | Surface dry or damp, no standing water |
| Concrete | Broken piece/chunk | Epoxy putty or mortar (e.g., PC-Crete) | Mix thoroughly, press firmly, support while curing |
| Concrete | Base-to-bowl bond | Structural 2-part epoxy (e.g., Sikadur-32 Hi-Mod) | Both surfaces clean, dry, and roughened |
| Ceramic | Crack or chip | 2-part epoxy (clear or color-matched) | Roughen surface lightly, clamp if possible |
| Ceramic | Reattaching broken piece | Exterior epoxy or epoxy adhesive (e.g., LATAPOXY 300) | Dry fit first, clean with isopropyl alcohol |
The adhesive types that actually hold outdoors
Let's run through what works and what doesn't, so you're not standing in the hardware store guessing.
Two-part structural epoxy (the best option)
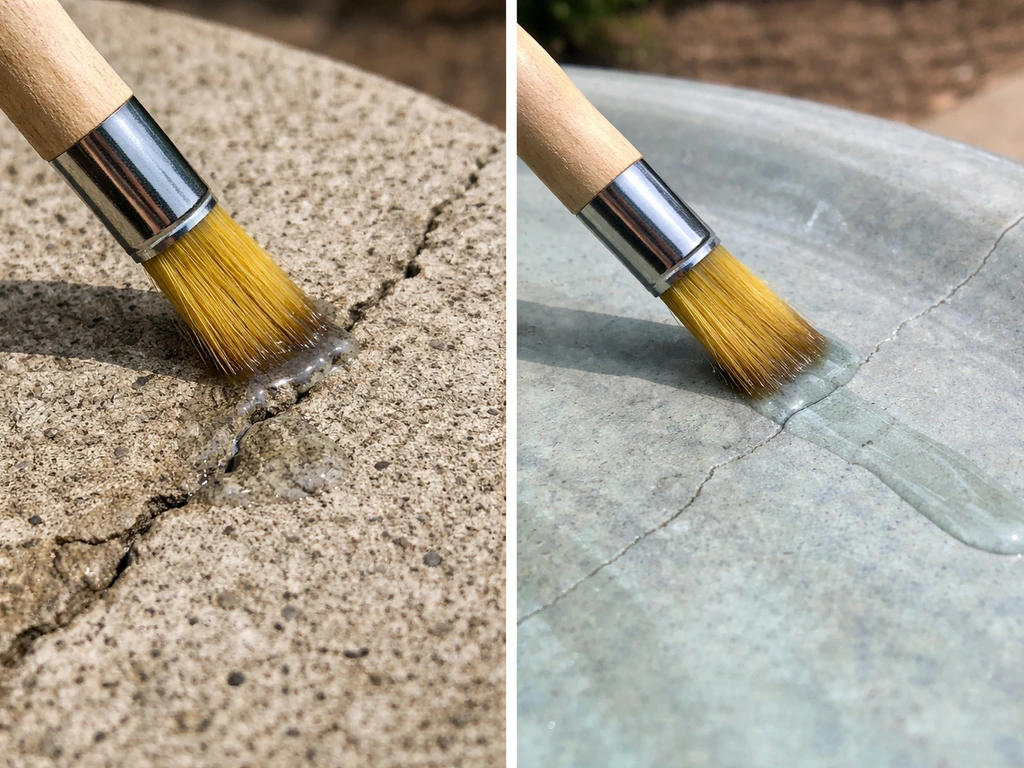
This is what professional concrete repair crews use, and it's the right choice for bird bath repair too. Products like Sikadur Crack Fix or the Sikadur Crack Repair Kit are two-component epoxy systems specifically built for concrete and masonry. You mix Part A and Part B together (typically a 2:1 ratio by weight), and the chemical reaction creates a bond that's moisture-resistant, rigid, and extremely durable outdoors.
Sikadur-32 Hi-Mod is worth knowing about too, it's a structural epoxy adhesive that's tolerant to moisture before, during, and after cure, which makes it forgiving in outdoor conditions where you can't guarantee a bone-dry surface. For crack injection or filling narrow cracks, low-viscosity versions like Sikadur-52 flow into the void rather than just sitting on top.
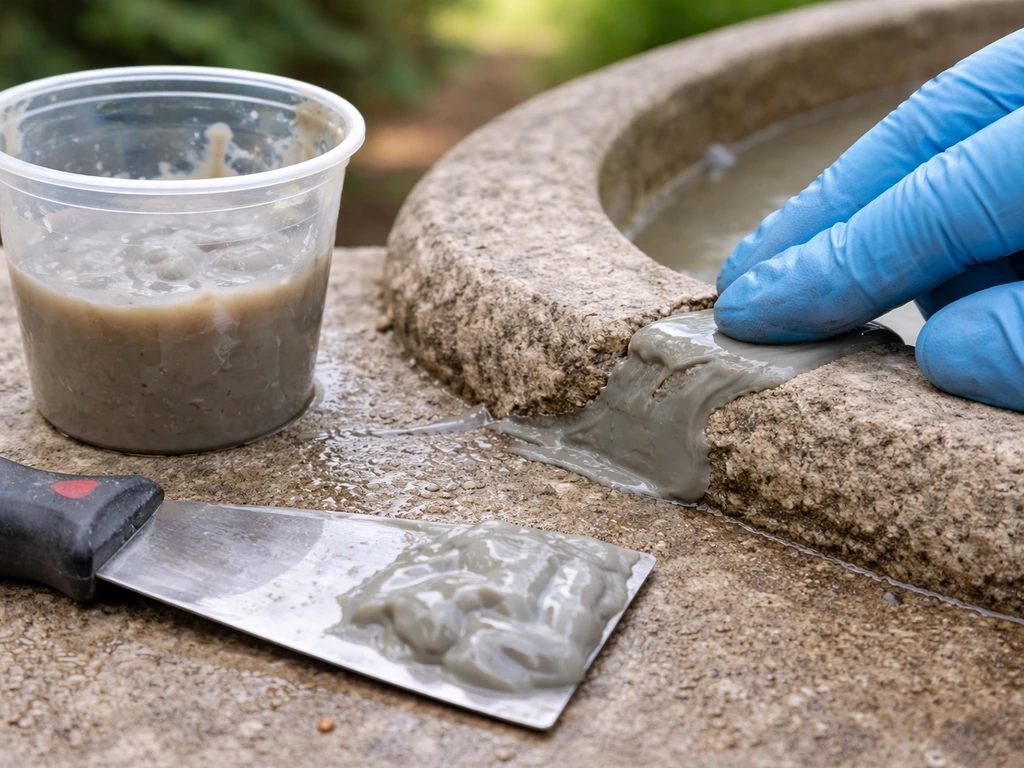
Epoxy putty (for missing pieces and gap fills)
When you've got a chunk missing or a big void to fill rather than a crack to seal, a hand-mixable epoxy putty is your friend. PC-Crete from PC-Products is a good example, it's a fast-setting epoxy putty designed specifically for concrete and masonry repair. You knead the two components together until the color is uniform, then press it into the damaged area and shape it. It sets firm and sands if needed.
One important note: PC-Crete specifically states it's not intended for aquarium or pond use, meaning it's not rated for continuous underwater submersion. For a bird bath that's constantly filled with water, make sure your repair is above the waterline or follow up with a bird-bath-safe sealant over the cured epoxy.
Epoxy adhesives for ceramic and tile (for ceramic bird baths)
Products like LATAPOXY 300 from LATICRETE are designed to bond ceramic, stone, and tile to clean, sound surfaces, which is exactly what you need when reattaching a ceramic bird bath base or fixing a large broken section. These are professional tile installation epoxies, but they're available at tile supply stores and online. For ceramic repairs, the bond quality depends heavily on clean surfaces, isopropyl alcohol wipe-down after any mechanical prep is essential.
What to skip
- Gorilla Glue (polyurethane) — expands as it cures, which can crack thin ceramic and leaves a foam-like residue that weakens the joint
- Silicone caulk — flexible and waterproof but doesn't truly bond to concrete or ceramic structurally; fine for temporary weatherproofing but not for holding pieces together
- Liquid Nails or generic construction adhesive — okay for indoor or sheltered use but most formulas don't survive repeated outdoor freeze-thaw stress
- Super glue (cyanoacrylate) — brittle when cured, not waterproof under sustained wet conditions, and fails quickly on porous concrete
Surface prep: the step most people skip
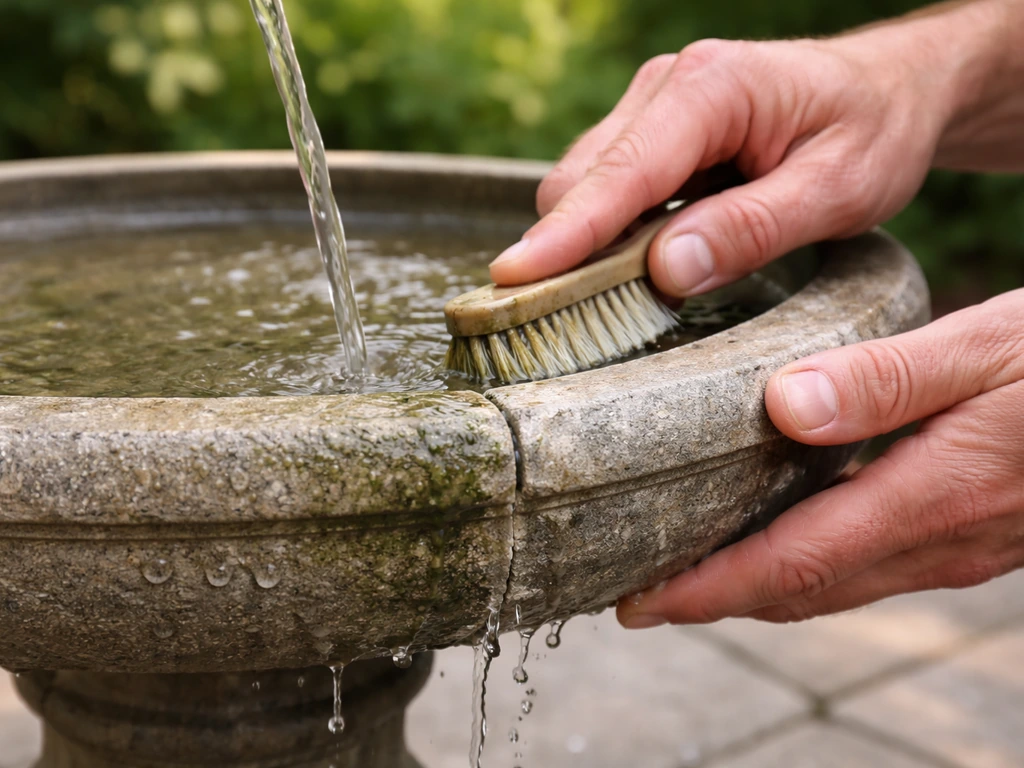
Here's the honest truth: 80% of failed bird bath glue jobs come down to bad surface prep, not bad adhesive choice. Concrete and ceramic both need serious cleaning before any adhesive will hold long-term. ACI 503R (the industry guidance on using epoxy with concrete) is clear that surfaces must be dry and completely free of laitance, dust, dirt, algae, and curing membranes. Any contamination creates a weak layer between the adhesive and the substrate, and the bond will fail at that layer no matter how good the epoxy is.
For a bird bath specifically, algae is the big problem. Bird baths develop algae film fast, and it's slippery and invisible in some spots. You need to scrub the repair area thoroughly with a stiff brush and rinse it clean. If there's heavy algae or mineral buildup, a diluted white vinegar solution works well without leaving a chemical residue that could harm birds later. After cleaning, give the area a good rinse and then let it dry. The Sikadur Crack Fix system, for example, specifies that cracks can be damp but must have no standing water, so damp is fine, wet is not.
For concrete, mechanical roughening helps a lot. Use a wire brush, coarse sandpaper, or a rotary tool to scuff the bonding area. This gives the epoxy mechanical tooth to grip into, on top of the chemical bond. Remove all the loose dust afterward using a dry brush or a blast of compressed air. For ceramic, lightly scuff the glaze with 80-grit sandpaper, just enough to dull the surface, then wipe with isopropyl alcohol and let it evaporate fully before applying the epoxy.
Step-by-step repair process
- Empty and dry the bird bath. Remove any standing water from the repair area. Damp surfaces are usually fine for most exterior epoxies, but no puddles.
- Clean the repair area. Scrub off algae, dirt, and mineral deposits. Rinse well. For stubborn buildup, use diluted white vinegar, then rinse again.
- Let it dry. Concrete needs at least 30 to 60 minutes of air drying after rinsing. More is better. On a sunny day, 1 to 2 hours in direct sun is ideal.
- Roughen the surface. Use a wire brush or coarse sandpaper on concrete. For ceramic, lightly scuff the glaze only where the epoxy will contact it.
- Brush away all dust. Use a dry brush or compressed air. For ceramic, wipe with isopropyl alcohol and let it evaporate completely.
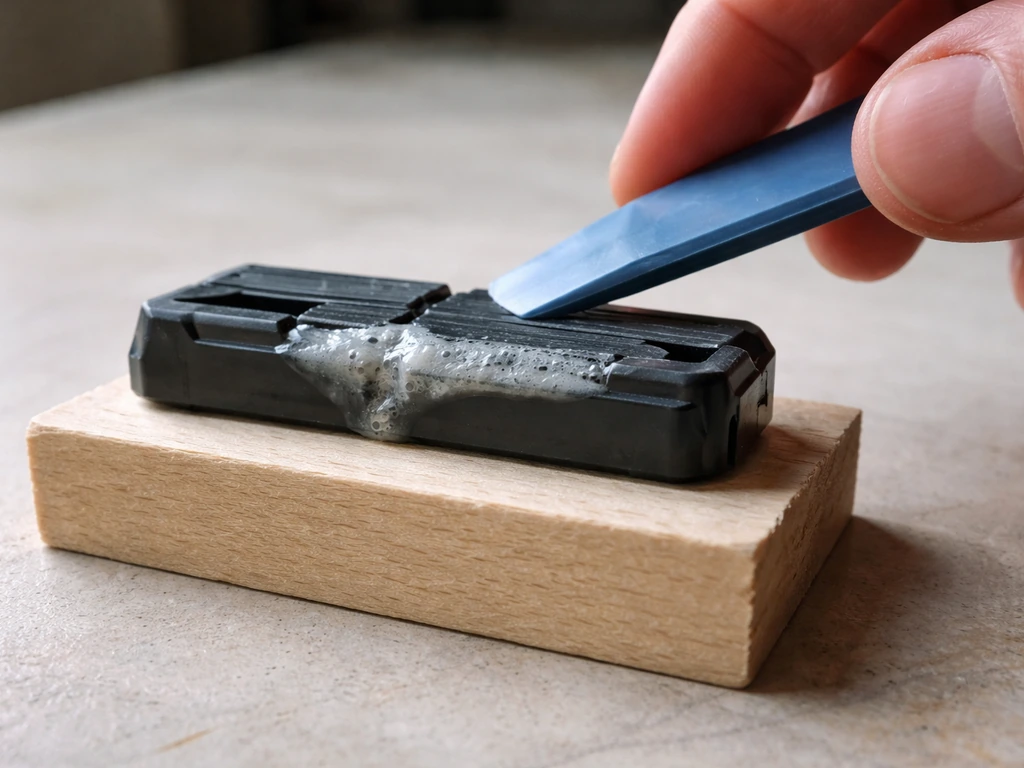
- Mix your epoxy. Follow the product's exact A: B ratio — don't eyeball it. For two-part liquid epoxies, mix on a disposable surface for the full recommended time (usually 3 minutes). For putty, knead until the color is completely uniform with no streaks.
- Apply the epoxy. For cracks, work it in with a putty knife or squeeze it in from a mixing nozzle. For broken pieces, apply to both mating surfaces if possible. For gap fills, press the putty firmly into the void.
- Support the repair while it cures. Use painter's tape, clamps, rubber bands, or prop pieces against something stable. Epoxy needs the joint to stay still while it sets.
- Allow full cure before refilling. Most exterior epoxies are tack-free in 4 to 8 hours but need 24 hours minimum for handling strength. Wait a full 48 to 72 hours before refilling the bird bath with water, especially if the repair is at or below the waterline.
- Inspect before the birds come back. Check that the bond looks solid and there's no seepage or soft spots. If the repair is in the bowl area, consider applying a bird-bath-safe sealant over the cured epoxy before use.
How to tell if your bond is going to fail (and what to do)
A few warning signs will show up early if the repair isn't going to hold. The most common one is the epoxy looking milky, foamy, or bubbly after it cures, that usually means moisture contaminated the mix or the surface was too wet. A good epoxy cure should look clear to amber (for liquid types) or a consistent solid color (for putties). If it looks off, chip it out while it's still curable, re-prep the surface, and start over.
Another sign of trouble is if you can flex or rock a reattached piece at all after the cure window. Epoxy bonds on concrete or ceramic should feel completely rigid. If there's any movement, the surface wasn't clean enough or the cure time was cut short. You'll also see this failure mode after the first hard freeze, the piece will lift or crack along the bond line. At that point, chisel it off cleanly, prep again more aggressively, and re-bond.
Leaks in a repaired crack are usually a sign of incomplete penetration, the epoxy sat on top of the crack rather than flowing in. Low-viscosity injection-style epoxies (like the Sikadur-52 system) are the fix here. For Sikadur®-52 Injection Normal, Sika specifies slow-speed mixing using a Sikadur mixing spindle at a maximum of 250 rpm for at least 3 minutes, to help prepare the system for proper performance Sikadur-52 system. They're designed to flow into narrow cracks under their own weight or light pressure, rather than requiring you to force them in.
| Problem | Likely Cause | Fix |
|---|---|---|
| Milky or foamy cure | Surface too wet or mix contaminated | Remove cured epoxy, re-prep drier surface, re-apply |
| Bond feels flexible | Insufficient cure time or dirty surface | Extend cure time; if still soft, remove and start over |
| Piece detaches after first freeze | Moisture infiltrated bond line | Use lower-viscosity epoxy, ensure no standing water during application |
| Crack still leaks after repair | Epoxy didn't penetrate the crack fully | Switch to low-viscosity injection epoxy; fill from inside |
| Epoxy won't stick to ceramic | Glaze not roughened or surface not clean | Sand glaze lightly, wipe with isopropyl alcohol, re-apply |
Keeping the repair solid long-term
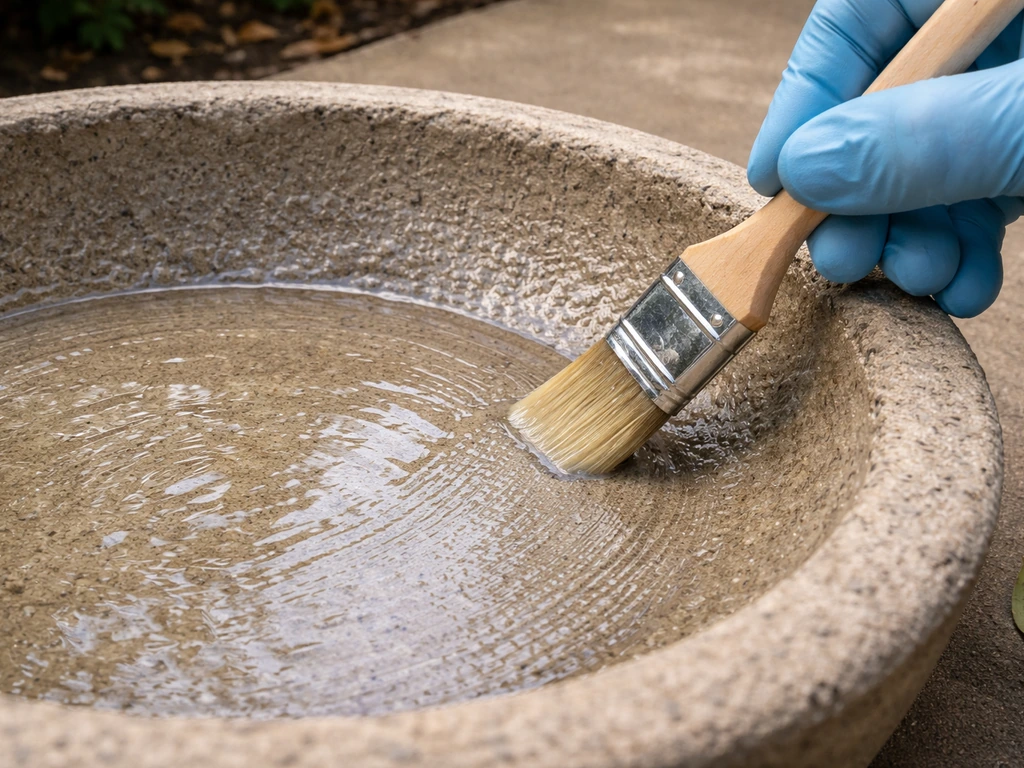
Once the epoxy has cured, the repair itself is pretty durable, but a few maintenance habits will keep it solid for years and protect the birds using the bath. The biggest one is sealing. If you want your epoxy repair to last, focus on how to seal a concrete bird bath right after the cure so water can’t seep into the edges sealing.
Bare concrete is porous, and even a good epoxy repair creates a slight texture change that can trap moisture at the edges. Applying a bird-bath-safe concrete sealant over the entire bowl (not just the repair) after the epoxy has fully cured creates a barrier that slows water infiltration and extends both the repair and the bath itself.
For a long-lasting repair on concrete, the best paint for a concrete bird bath helps seal the surface and protect it from constant wetting and drying best paint for concrete bird bath. This pairs naturally with the kind of sealing work covered separately for concrete bird baths in general.
This pairs naturally with the kind of sealing work covered separately for concrete bird baths in general, and if you're also rebuilding the basin, the best concrete mix for bird bath basics help you get a repair that lasts.
For cleaning, avoid pressure-washing directly at the repair, especially in the first few weeks. A stiff brush and warm water is all you need for routine cleaning, and it won't stress the bond. Keep an eye on algae buildup around the repair area, algae can work its way under the edges of a repair over time if the surface wasn't perfectly sealed. If you notice your concrete bird bath turning red, that can be a sign of moisture-related staining or mineral deposits rather than an adhesive failure. A quick weekly brush-out prevents that from becoming a problem.
Before winter hits, give every glued joint a visual inspection. Look for any hairline cracks developing at the repair edges or any lifting. If you spot early signs of failure, addressing it in the fall, before freeze-thaw stress hits, is far easier than trying to re-glue frozen concrete in January. In very cold climates, emptying the bird bath during hard freezes will take pressure off every joint and seam, repaired or not.
One more thing: if your bird bath has significant structural damage, large missing sections, a cracked pedestal base, or a bowl that's broken into multiple pieces, there's a point where gluing stops being practical and replacement makes more sense. A well-executed epoxy repair on a clean break can last many years. But a bath that's crumbling in multiple spots will keep failing no matter how good your adhesive is, and at that point the better call for the birds is a fresh start.
FAQ
Can I use construction-grade silicone instead of epoxy for a concrete bird bath crack?
Usually no. Silicone is flexible and tends to peel from concrete over time because it does not create a true chemical bond to the substrate, especially after wet-dry cycling. If you insist on silicone for a temporary weather seal, treat it as short-term and still plan to switch to an exterior epoxy once you can properly prep and cure.
How long should the bird bath be left dry before I epoxy it?
Dry to the point of no standing water and no visible damp sheen at the surface. Many two-part epoxies tolerate some dampness, but not wet surfaces, and moisture trapped under the bond can cause bubbling or a cloudy cure. A practical check is to press a clean dry paper towel on the area after rinsing, if it comes away damp, wait and re-clean.
What’s the best way to clean algae so the epoxy actually bonds?
Scrub thoroughly with a stiff brush, then rinse well and let the area fully dry. A diluted white vinegar solution can help with heavy algae or mineral film, but make sure you rinse after vinegar so residue does not interfere with adhesion or leave bird-unsafe chemistry.
Is there a difference between fixing a hairline crack and filling a larger missing chunk?
Yes. Hairline cracks typically need a low-viscosity injection or flowable epoxy so it penetrates into the crack width. For missing sections or large voids, use an epoxy putty or shapeable repair mortar so you can build and support the broken geometry rather than relying on a surface patch.
Can I epoxy a repaired area and then fill the bird bath right away?
Don’t. Let the adhesive cure fully, then seal, then run a water test before returning birds. Even if the epoxy is hard to the touch, early water contact can weaken the bond line and encourage seepage at the edges.
Should I clamp or weight ceramic pieces when reattaching them with epoxy?
If the ceramic joint can shift, yes. Use clamps or a gentle support so the pieces stay aligned while the epoxy cures, otherwise you can end up with a thin, uneven bond line that creeps later. Also remove any squeeze-out, since dried epoxy blobs can create stress points.
What temperature range is safest for epoxy repairs on bird baths?
Follow the product label, but as a general rule avoid very cold conditions where cure slows and moisture condenses on surfaces. If you repair in cool weather, give extra cure time, and ensure the surface is not just dry-looking but also not chilled and damp.
How can I tell if the epoxy mix failed because of moisture in the mix or on the surface?
Look for milky, foamy, or bubbling appearance after cure, and check whether the repair feels sandy or weak rather than rigid. If anything looks off, remove the affected material while it is still workable, re-prep aggressively, and remix fresh epoxy rather than trying to patch over the compromised layer.
Do I need to seal over the epoxy on a concrete bird bath every time?
For long-term performance, seal the entire bowl after the epoxy has fully cured, not only the repair spot. The sealing step reduces edge seepage and slows moisture migration into micro-gaps, which is a common reason repairs fail after the first winter.
What’s the best maintenance to prevent the repair from getting bypassed by algae again?
Brush the bath area weekly, especially around repaired edges, and avoid pressure-washing right after repair. If algae returns, it can work under tiny gaps, so prompt cleaning plus a solid seal over time is more effective than repeated re-gluing.
When should I stop repairing and replace the bird bath instead?
If the pedestal base is cracked through, the bowl is broken into multiple interlocking pieces, or there are widespread crumbling sections, replacement is usually the more reliable option. Epoxy can reattach a clean break, but it cannot rebuild structural integrity when multiple zones keep failing under freeze-thaw and impact.
Next Articles
Best Sealant for Concrete Bird Bath: Bird-Safe Guide
Choose the best bird-safe, non-toxic sealant for concrete bird baths, with prep, coats, curing, and maintenance steps.
Best Paint for Concrete Bird Bath: Inside and Outside Options
Find the best paint for concrete or metal bird baths, including inside safety, waterproofing, and spray options.
How to Seal a Concrete Bird Bath: Stop Leaks and Cracks
DIY steps to seal and waterproof a concrete bird bath, stop cracks and leaks, prep properly, choose the right sealer, wi