The easiest bird shower you can build today is a shallow terra cotta saucer or concrete basin set on a stable pedestal, kept to 1–2 inches of water depth, with an optional drip tube or small submersible pump to add movement. Moving water is the single biggest upgrade you can make because birds find it by sound, not just sight. Whether you go with a simple drip bottle, a recirculating fountain basin, or a full misting setup depends on your budget, your yard, and which birds you want to attract. This guide walks you through all three options from cheapest to most involved, so you can pick your level and start building today. A common question is whether a hoe bath or a bird bath works better, but the main factor is still water depth, cleanliness, and whether you add movement hoe bath vs bird bath.
How to Make a Bird Shower: DIY Plans, Materials, and Setup

Choosing the right bird shower type
There are three practical setups worth building: a standard bird bath with a drip attachment, a recirculating fountain, and a misting or fine-spray system. Each has a different sweet spot in terms of cost, species appeal, and maintenance demand.
| Type | Best for | Approx. cost (DIY) | Maintenance level |
|---|---|---|---|
| Drip / gravity-fed bath | Most songbirds, robins, thrushes, sparrows | $5–$30 | Low |
| Recirculating fountain | Wide range of species, all-season use | $40–$120 | Medium |
| Misting / fine spray | Warblers, hummingbirds, smaller migrants | $15–$60 | Low-medium |
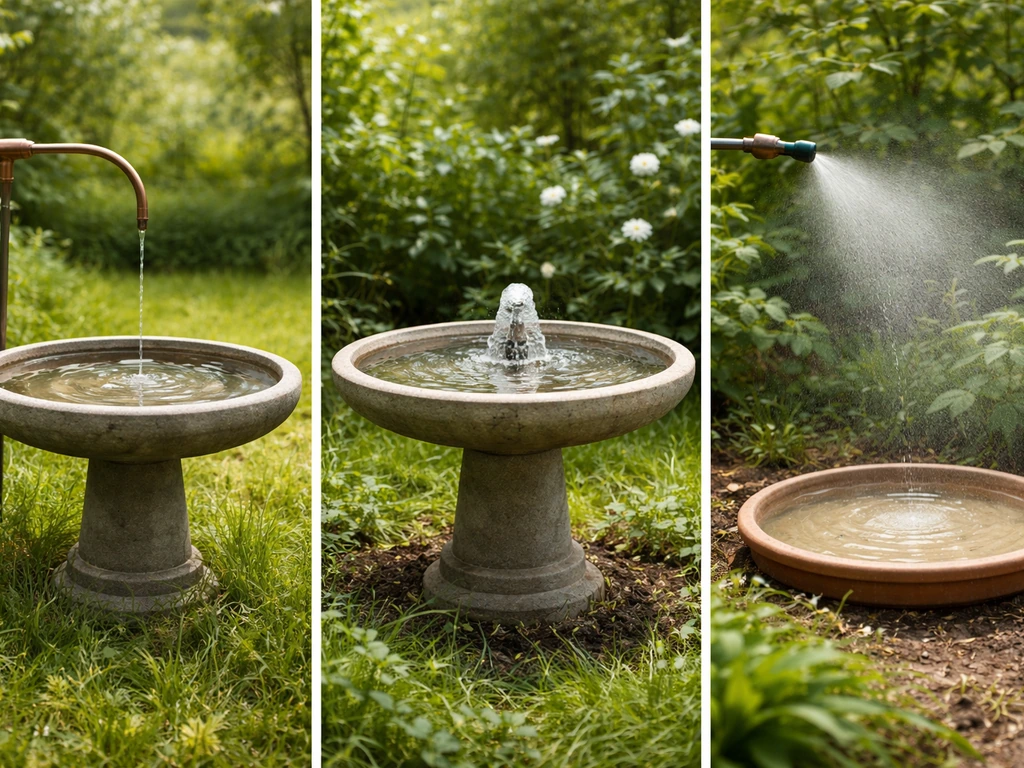
A drip setup is just a gravity-fed container with a small hole that lets water drip steadily into a basin below. It costs almost nothing, makes audible dripping sounds that attract birds from a distance, and works without electricity. A recirculating fountain uses a small submersible pump to push water up through a nozzle or spillway and back into the basin continuously. It's the most versatile option and keeps water moving even in warm weather when algae would otherwise take over a still bath. A misting system attaches to your garden hose and produces a fine spray that certain species, especially hummingbirds and warblers, will fly directly through. If you're trying to attract hummingbirds specifically, misting is worth prioritizing over a deep basin. Larger birds like crows prefer a deeper, still bath, so the approach really does depend on who you're trying to host.
Materials and tools you'll need
The material you choose for the basin affects durability, bird safety, and how much cleaning it demands. Here's a practical rundown of the main options.
| Material | Pros | Cons | Best use case |
|---|---|---|---|
| Terra cotta / ceramic | Cheap, natural texture for grip, easy to find | Cracks in hard freezes, glaze can be slippery | Mild climates, simple drip baths |
| Concrete / hypertufa | Durable, rough texture birds love, holds heat slowly | Heavy, takes effort to make or move | Permanent installations, fountain bases |
| Plastic / resin | Lightweight, won't crack, cheap | Heats up fast, algae-prone, less textural grip | Temporary or winter-storage setups |
| Stainless or galvanized metal | Very durable, easy to clean | Can heat water quickly in sun, more expensive | Modern yards, heated bath conversions |
For most DIY builds, a wide terra cotta saucer (14–18 inches across) or a pre-cast concrete basin is the fastest starting point. If you want to go the recirculating fountain route, you'll also need a small submersible pump rated for 50–100 GPH (gallons per hour), which is plenty for a standard backyard basin. For misting, you need a misting nozzle kit designed for garden hose connection, available at most hardware stores for under $20.
Shopping list by build type
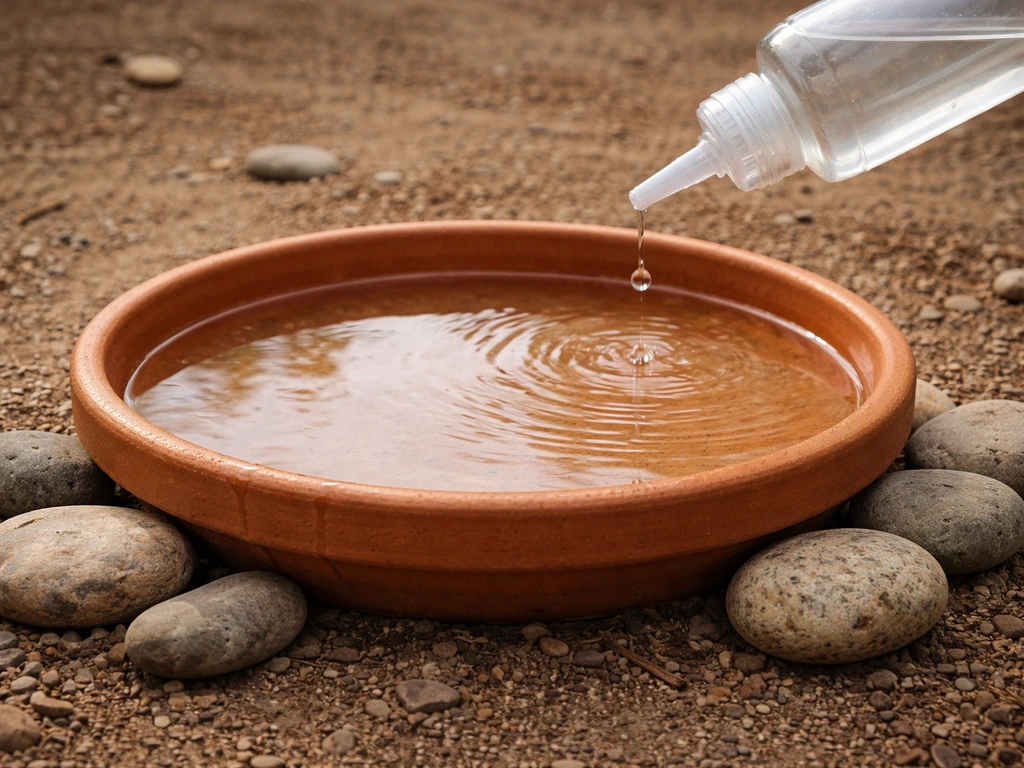
- Drip bath: 14–18 inch terra cotta or concrete saucer, plastic bottle or small bucket with a pin-hole, wire or cord to hang it above the basin, rough stones or gravel for texture inside the basin
- Recirculating fountain: shallow basin (concrete or resin, 16–24 inches), submersible pump (50–100 GPH), flexible tubing (1/2 inch inner diameter), a riser pipe or decorative spillway, outdoor-rated extension cord if needed
- Misting setup: garden hose Y-splitter, misting nozzle kit (1–3 nozzles), small stake or clamp to position nozzle near a shrub or perch, optional timer to run it during peak bird activity hours
- All builds: stiff scrub brush, white vinegar or diluted bleach (9:1 water to bleach) for cleaning, non-toxic waterproof sealant if using unglazed concrete, rough pea gravel or flat stones for the basin floor
Step-by-step build instructions
Option 1: Simple drip bath (budget, beginner-friendly)
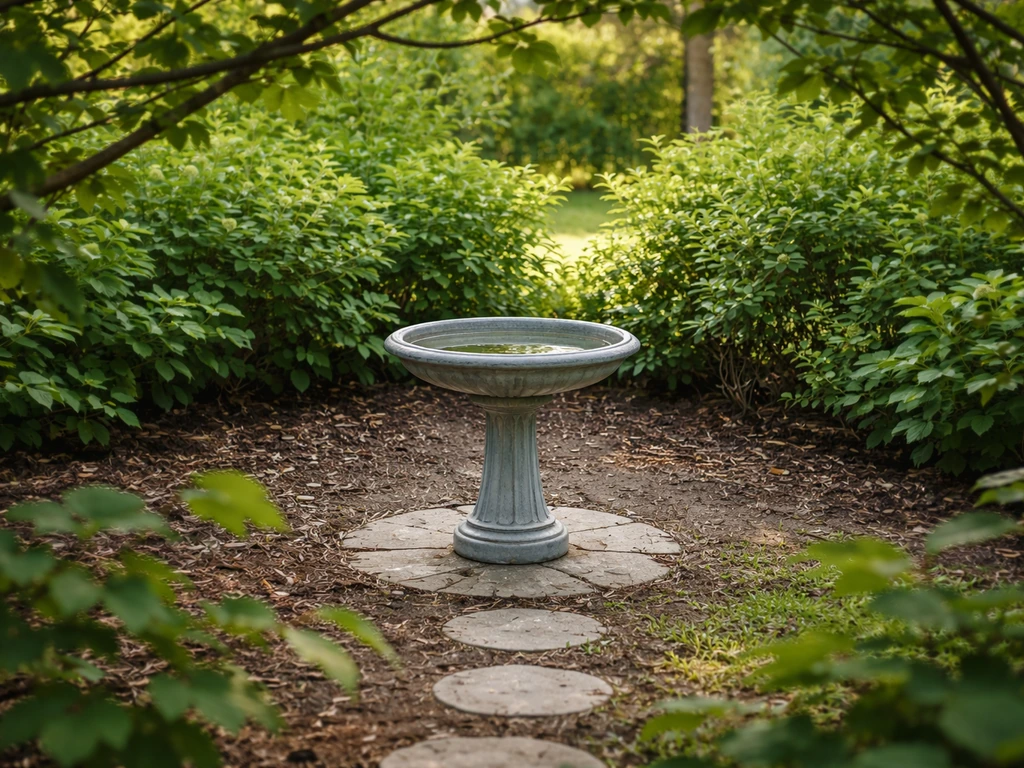
- Find or buy a shallow terra cotta saucer or concrete bowl, at least 14 inches across. Avoid anything with a smooth glazed interior, as birds need grip to stand safely.
- Place a few flat stones or a layer of pea gravel inside the basin to create shallow areas and texture. Water depth should be 1–1.5 inches maximum in the deepest spot, with shallower areas near the edges.
- Take a plastic bottle or bucket and make a pinhole in the bottom. Fill it with water and hang it 12–18 inches above the basin using wire, twine, or a simple hook mounted to a nearby post.
- Adjust the hole size with a needle or small nail until you get a steady drip every 1–2 seconds. This is enough to create ripples and sound without splashing water out of the basin.
- Set the basin on a stable surface at least 18–24 inches off the ground (a stump, overturned pot, or purpose-built pedestal all work), and you're done.
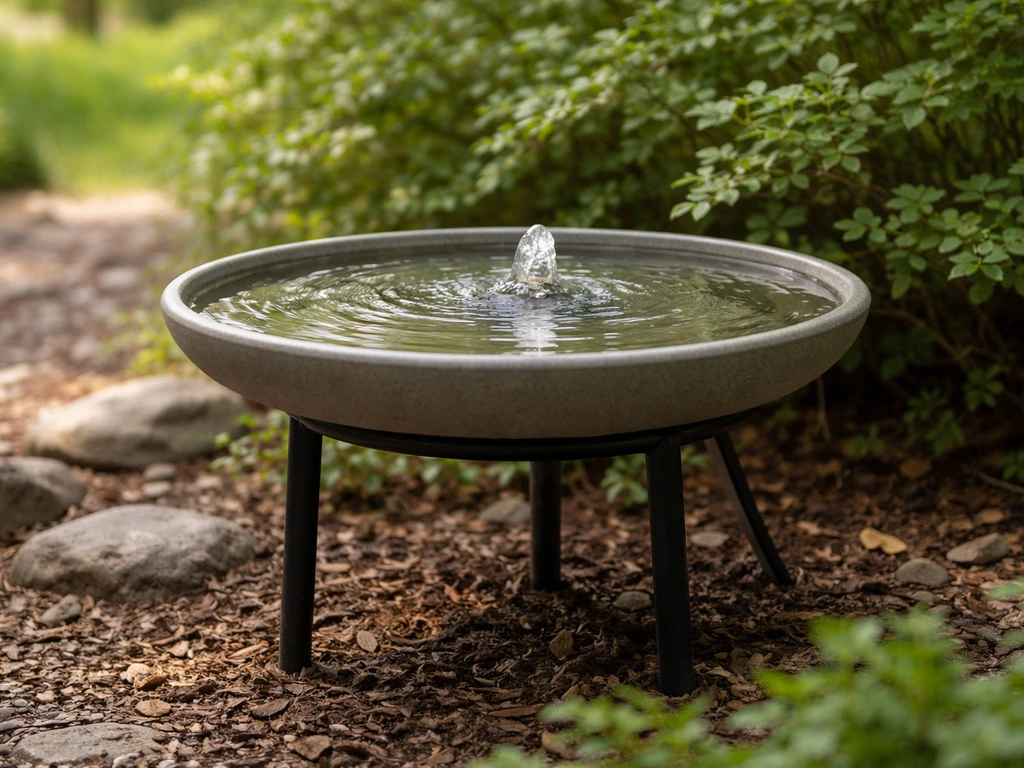
Option 2: Recirculating fountain bath (intermediate)
- Choose a basin at least 16 inches wide and no more than 3–4 inches deep. If using concrete, seal the interior with a non-toxic waterproof masonry sealer and let it cure for 48 hours before use.
- Place a small submersible pump (50–100 GPH) in the deepest part of the basin. Run the pump cord over the edge of the basin and to your outdoor outlet. Keep the cord tucked flat so birds don't tangle in it.
- Attach flexible 1/2-inch tubing to the pump outlet. Run the tube up through a vertical riser pipe, a decorative rock with a drilled hole, or a simple stake positioned in the center of the basin.
- Test the flow height before finalizing placement. Aim for a gentle bubbling or 2–4 inch arch of water, not a tall jet. High jets splash too much water out and can startle smaller birds.
- Add flat stones around the pump to hide it and create perching spots at different water depths. Refill the basin whenever the water level drops below the pump intake to avoid burning out the motor.
- If you're in a climate with cold winters, consider a pump that pairs with an inline thermostat or heated base, or plan to bring the pump indoors when temps regularly drop below freezing.
Option 3: Garden hose misting setup (for hummingbirds and warblers)
- Attach a Y-splitter to your outdoor hose bib so you can run the mister on a separate line without interrupting garden watering.
- Thread a misting nozzle kit onto the secondary hose line. Position 1–3 nozzles near a dense shrub or tree branch that birds already use as a perch, aiming the mist horizontally so it creates a fine spray zone birds can fly through.
- For hummingbirds, place a nozzle so it creates a gentle mist about 3–5 feet off the ground near a feeder or flowering plant they visit regularly. They prefer to fly through a mist rather than bathe in standing water.
- Add a simple hose timer set to run the mister for 20–30 minutes in the morning and again in late afternoon, which matches peak bird activity in most regions.
- If you also want to serve ground-feeding birds, place a shallow saucer under the mist zone to catch dripping water. Keep it filled to only 1 inch deep.
Where to put your bird shower
Placement makes or breaks bird visitation. The ideal spot balances three things: visibility to birds flying overhead, safety from predators, and close proximity to cover where birds can retreat quickly after bathing. A wet bird is a vulnerable bird, and they know it. In a prison setting, a bird bath is essentially a controlled water source used to attract and support local birds within the facility’s managed grounds bird bath in prison.
- Place the bath within 10 feet of a shrub or tree that provides quick escape cover, but not so close that cats can use the shrubs as a hunting blind. About 5–8 feet from dense cover is a good balance.
- Keep it away from your main window collision zone. Bird feeders and baths placed between roughly 3 and 30 feet from a large window put birds in the highest-risk zone for glass strikes. Either push the bath within 3 feet of the window so any collision is too slow to injure, or move it 30+ feet away.
- Choose an open, partly shaded spot. Direct afternoon sun heats water quickly and speeds up algae growth. Morning sun is fine and helps keep water from becoming too cold in spring and fall.
- For ground-level baths serving sparrows, towhees, or doves, a slight incline or a spot visible from above works well. For mounted or pedestal baths serving robins, thrushes, and finches, 24–36 inches off the ground is the sweet spot.
- Keep misting setups near existing activity, not in isolated corners of the yard. Birds need to discover the feature, and they do that fastest when it's near plants or feeders they already visit.
Water depth, flow settings, and keeping it safe
The single most common DIY mistake is too much water depth. Audubon recommends about 1 to 1.5 inches of water, with the basin itself no more than about 2 inches deep. The RSPB puts the maximum at around 10 cm (roughly 4 inches) for the deepest point, but that's the absolute ceiling. For the best results, keep the main bathing area at 1–2 inches and use stones to create a gradient so smaller birds can stand in the shallower edges while larger birds like crows and jays use the center. Gently sloping sides are just as important as depth because they let birds wade in gradually rather than drop in over their heads.
For fountain flow, aim for a bubbling or gentle arching stream rather than a strong jet. Strong jets push smaller birds off the basin edge and scatter too much water. If you're running a pump, dial it back to its lowest useful setting and watch how birds respond in the first few days. They'll tell you what they prefer.
Cleaning and maintenance routine
A neglected bird bath doesn't just look bad; it can actively harm the birds that use it. Stagnant water grows bacteria and algae, and Audubon is direct that letting a birdbath go dirty puts birds at real health risk. The good news is that a consistent weekly routine keeps everything under control without much effort. North Carolina State Extension also advises cleaning the birdbath weekly and keeping it full of fresh, cool water a consistent weekly routine.
Weekly cleaning steps
- Empty the basin completely. Don't just top it off with fresh water; dump it and start clean.
- Scrub all surfaces with a stiff brush. For light buildup, plain water and physical scrubbing is enough. For algae or mineral deposits, use undiluted white vinegar and let it sit for 5–10 minutes before scrubbing.
- For any serious bacterial concern (slimy coating, cloudy water that came back fast), use a diluted bleach solution of 1 part bleach to 9 parts water. Scrub, rinse thoroughly multiple times, and let the basin air dry for 15 minutes before refilling.
- Rinse the pump impeller and tubing with fresh water weekly. Every month, soak pump parts in white vinegar for 30 minutes to dissolve mineral scale.
- Refill with fresh, cool water to your target 1–2 inch depth. NC State Extension recommends weekly cleaning and keeping water fresh and full, which is the simplest summary of a good routine.
Between-cleaning tips
- Top off water daily in hot weather since evaporation is fast and birds drink more
- Remove leaves and debris every day or two so they don't speed up algae growth
- Consider adding a few drops of enzyme-based pond treatment (bird-safe formulas exist) if you have persistent algae problems in a fountain setup
- Never use soap or dish detergent in a bird bath; residue is harmful to birds' feathers and can disrupt the natural oils that keep them waterproof
Troubleshooting common problems
Algae buildup

Algae grows fastest in warm, still, sunlit water. The fastest fix is to move your bath to a shadier spot and add water movement with a drip or pump. If you can't move it, increase cleaning frequency to every 3–4 days in summer. A darker-colored basin (charcoal or slate) also absorbs heat faster, which can make the problem worse, so lighter colors work better in very sunny spots.
Freezing in winter
If you're in a climate with real winters, a heated bird bath or an add-on basin heater is the most practical solution. These are thermostatically controlled and only kick on when the water approaches freezing, so they use minimal electricity. Alternatively, pour warm (not boiling) water over a frozen basin in the morning to melt it temporarily. Never add salt or antifreeze, as both are dangerous to birds. For fountain setups, pull the pump indoors once temps drop consistently below 32°F to protect the motor.
Mosquitoes and standing water
Mosquitoes need about 7–10 days of still water to complete their larval cycle. If you're changing the water weekly and have any kind of water movement (drip, pump, or mister), mosquitoes are almost never a practical problem. For still setups, weekly dumps are your best defense. You can also add Bacillus thuringiensis israelensis (Bti) dunks, which are toxic to mosquito larvae but completely safe for birds, fish, and other wildlife.
Low bird visitation
If birds aren't showing up, go through this checklist: Is the water making any sound or movement? Sound is often the first thing that draws birds in. Is the basin too deep or too slippery? Add stones. Is it placed too close to heavy foot traffic or a predator hangout? Move it. Is it brand new? Some birds take 1–2 weeks to discover a new feature, especially if it's in a spot they don't currently visit. Patience plus water movement solves most low-visitation problems. You can also speed discovery by temporarily placing the bath near an existing feeder. To reduce window collisions, Washington Department of Fish & Wildlife recommends that bird feeders placed between about 3 and 30 feet from windows are at greatest risk, while placing feeders directly on the window can help reduce collisions window-collision risk window feeders.
Leaks or pump failures
If a concrete or ceramic basin is leaking, reseal it with a non-toxic waterproof masonry sealer designed for water features. If a pump stops circulating well, check for clogged impeller blades first (hair, debris, and mineral buildup are the usual culprits) before assuming the pump is dead. Most pump problems are just a clogged intake screen or impeller that clears up in a 30-minute vinegar soak.
Seasonal tips and species-specific optimization
Spring and fall migration
Migration periods are when a water feature earns its keep. Traveling warblers, vireos, and thrushes are exhausted and dehydrated, and moving water brings them in fast. During spring and fall migration (roughly March–May and August–October depending on your region), add water movement if you don't have it year-round and keep the basin freshly cleaned every few days. You'll see species you never get at feeders.
Summer heat
In summer, focus on keeping water cool and fresh. Top off or fully change the water every day during heat waves. Partial shade is critical. If you have a misting setup, run it during the hottest part of the afternoon; birds will use it even when they'd normally be inactive.
Winter
Liquid water in winter is genuinely rare and valuable to birds. A heated basin can attract species that are hard to see at any other time of year, including overwintering sparrows, juncos, and cedar waxwings. Keep the basin shallower in winter (1 inch is plenty) since birds aren't bathing as actively; they're mainly drinking.
Matching your setup to specific birds
| Bird type | Preferred setup | Water depth | Key tip |
|---|---|---|---|
| Hummingbirds | Misting nozzle | N/A (fly-through mist) | Position near a feeder or flowering plant they already visit |
| Warblers, smaller migrants | Misting or shallow drip bath | 0.5–1 inch | Cover nearby is essential; they need quick escape routes |
| Robins, thrushes | Basin fountain or drip bath | 1–2 inches | Love to splash; use a wide, 18-inch+ basin |
| Sparrows, finches | Ground-level or low pedestal bath | 1 inch | Rough texture inside basin is important for footing |
| Crows, jays | Deep, stable basin | 2–3 inches | They dunk food; a larger, heavier basin resists tipping |
| Doves | Ground-level shallow basin | 1–1.5 inches | Open sightlines; they're skittish about cover overhead |
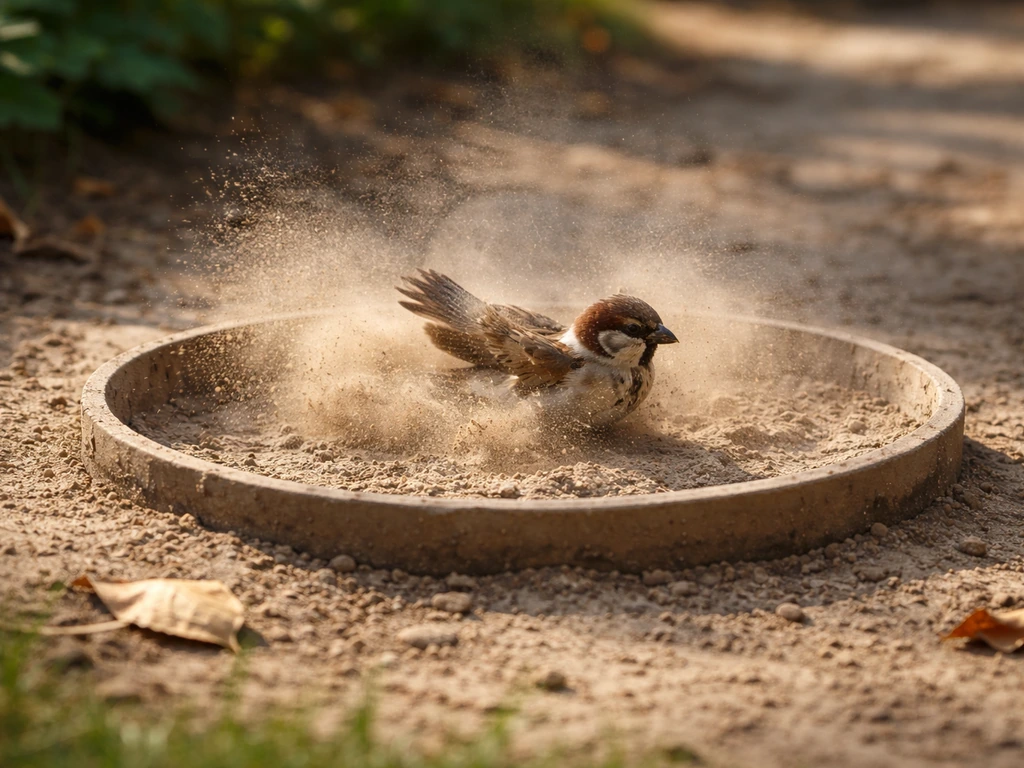
If hummingbirds are your main target, a misting setup is worth building separately from your main bird bath since their preferences are so different from most other backyard birds. For attracting a broad mix, a recirculating fountain with a shallow basin and some flat stones is the single most versatile thing you can build. It's also worth knowing that a bird shower differs from a bird dust bath, which is a completely dry, loose-soil feature some species prefer for a different kind of grooming entirely. What does it mean to take a bird bath? It means you’re providing shallow, safe water where birds can wet their feathers for cleaning, cooling, and grooming a bird shower.
Your next steps: a quick build and maintenance checklist
Here's everything summarized into a practical action list you can start on today. If you also want birds to dust-bathe, see how to make a bird dust bath for an easy companion setup to your water bathing station.
- Decide on your build type: drip bath (cheapest, easiest), recirculating fountain (most versatile), or misting setup (best for hummingbirds and warblers)
- Grab a shallow basin (14–18 inches wide, 1.5–2 inches deep) in terra cotta, concrete, or resin
- Add rough pea gravel or flat stones inside the basin to create grip and a depth gradient
- Install your water movement feature: hang a drip bottle, drop in a 50–100 GPH submersible pump, or connect a misting nozzle kit to your hose
- Place the bath 5–8 feet from escape cover, out of the main window-collision zone, and in partial shade
- Fill to 1–1.5 inches depth and run the water movement feature to confirm flow looks gentle and inviting
- Commit to a weekly clean: dump, scrub with vinegar or diluted bleach (9:1 water to bleach), rinse well, refill
- Top off water daily in hot weather and check for debris every 2–3 days
- Add a heated basin insert before winter if your climate gets below freezing regularly
- Observe for 1–2 weeks and adjust placement or depth based on what you see birds actually doing
FAQ
What water depth should I aim for if I want small birds but also avoid drowning larger ones?
Keep the main bathing area around 1 to 2 inches deep, and build a gradual slope with flat stones so smaller birds can use the edges while larger birds stand lower and wade into the center without needing to drop in over their heads.
Can I use river stones, or do I need smooth, rounded rocks only?
Use stones that birds can grip safely, avoid sharp or easily tip stones, and check them for slick surfaces after rain. Flat, partially embedded stones work best because they create stable “steps” and a natural depth gradient.
How do I stop my bird shower from becoming a mosquito breeding spot if I forget a few days?
If you can, keep weekly full dumps, and any kind of water movement (drip, pump, or misting) reduces mosquito risk. If you have still water and missed a week, use Bti dunks as a backup until you’re back to regular changing.
Is it safe to add anything to the water, like apple cider vinegar or bleach, to prevent algae?
Avoid adding household chemicals. Instead, rely on water movement, shade, and cleaning intervals. If algae is persistent, shorten the interval between scrubs and consider switching from still to drip or recirculating.
My fountain pump runs, but the water looks stagnant. What should I check first?
Look for a clogged intake or impeller buildup, hair or leaf debris, and mineral scaling that reduces flow. Also confirm the flow pattern is a gentle bubbling or short arch, strong jets can make the basin feel “active” without actually circulating well.
How often should I clean a DIY bird shower if I want the lowest maintenance but safest water?
In warm weather, clean and refill at least weekly, and every 3 to 4 days if the basin is sunny and still. During cool seasons, weekly refreshes are usually sufficient as long as the water stays clear and doesn’t smell or turn green.
What’s the best way to prevent birds from slipping on the bottom?
Avoid bare smooth bottoms. Add stones to create traction and a depth gradient, and periodically remove any fine slime buildup during cleaning so the surface stays grippy rather than glassy.
How long should I wait for birds to notice a brand-new bird shower?
Plan on 1 to 2 weeks. During that period, keep sound and movement consistent (drip or gentle flow) and consider temporarily placing it near an existing feeder so scouting birds discover it faster.
Can I run a heated bird bath in winter all day?
Use thermostatic heaters so they only activate when temperatures approach freezing, that’s the lowest-effort and lowest electricity option. Keep the basin shallow in winter, about 1 inch, since birds are usually drinking more than bathing.
What do I do if the basin cracks or starts leaking after a season?
If a concrete or ceramic basin leaks, reseal it with a non-toxic masonry sealer meant for water features. Let it cure fully before refilling, and periodically check for small seep points at seams and edges.
Is a bird shower different from a bird bath, and should I build differently?
In practice, most backyard “bird baths” are bird showers, the key variable is still shallow water plus safety and cleanliness. If you want a true upgrade, prioritize water movement (drip, recirculation, or mist) rather than adding water depth.
Will hummingbirds use the same setup as other backyard birds?
They often prefer a fine spray and direct misting over a deeper basin, so a misting setup dedicated to hummingbirds usually performs better. For other species, a shallow recirculating fountain with flat stones is typically the most versatile approach.
How to Make a Bird Dust Bath: Step-by-Step DIY Guide
Step-by-step DIY guide to build a bird dust bath, choose substrate, place it safely, maintain and troubleshoot muddy or